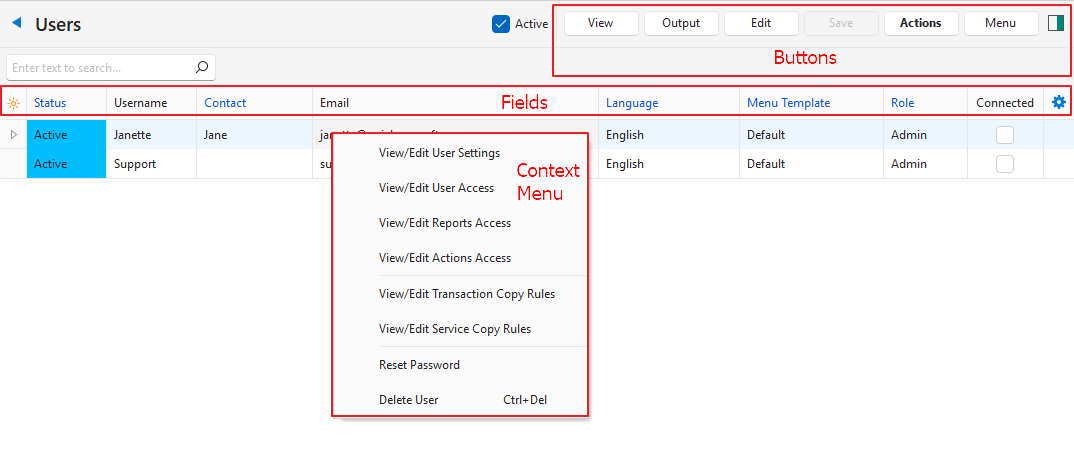
The Users interface lists the users set up for the database. This page describes its buttons, filter and fields, including the user access options under Actions (button) and Menu (button). Only Admin users can open the Users module (see Understanding User Access and Settings for the roles).
Update Users, Check Connected Users, Reset Password and View Login History connect to QuickEasy’s Master Server. If the connection fails, the message “Connection to the Master Server Failed.” appears and nothing is changed. Check your internet connection and try again.
Export: Exports the list in .xlsx, .htm or .csv format.
Edit
Edits the entry.
Save
Saves any changes.
Actions
Lets you change multiple records that you can select using Ctrl + left-click or by clicking the checkboxes next to each record. The options are:
Update Users: Updates the list from the users that QuickEasy set up for this database, if you confirm the message “Inactive Users will be deleted and active Users will be added/updated. Continue?” The changes are:
A new user is added as Active, with the language English, no Menu Template and the role User.
A user who is still set up for the database is set to Active, including a user you set to Inactive.
A user who is no longer set up for the database is permanently deleted (not sent to the Recycle Bin). If the user last updated a transaction or a Service Manager job, the user is set to Inactive instead.
The QuickEasy support user is given the role Admin. The support user and you are never deleted.
Check Connected Users: Determines which users are connected and checks the applicable checkboxes.
Sign Out Selected Users: Signs out the selected users. Each user’s BOS checks its login every five minutes, so a user is only signed out at the next check. The user then sees the message “You have been logged out. Please log in again to continue?” and clicks Restart to log in again or Exit to close BOS.
Email QuickEasy to Remove the Selected Users: Creates an email requesting the removal with the names of the selected users. The email is not automatically sent; you must still click Send (button). Warning: If no users are selected, the user at the top of the list is added. Emails are sent to helpdesk@quickeasysoftware.com.
Email QuickEasy to Add New Users: Creates and opens an email for the new user details to be filled in. The email is not automatically sent; you must still click Send (button). Emails are sent to helpdesk@quickeasysoftware.com.
View/Edit User Access by User: Provides an interface to view or edit a user’s access.
View/Edit User Access by Module: Provides an interface to view or edit access to a specific module.
Menu
View Login History: Displays a record of users and login information. The Login History screen lists every login to this database, newest first, with these columns:
The contact linked to the user. Select a contact from the dropdown list.
Email
The user’s email address, as set up for the database.
Language
The user’s language. Select a language from the dropdown list.
Menu Template
The user’s Menu Template. Select a Menu Template from the dropdown list.
Role
The role selected for the user:
User: Can access all the features allocated to them.
PoS User: A user who must clock in to the PoS system (e.g. a cashier).
Admin: Can access this interface and grant themselves access to all the modules.
Connected
Checked if the user is connected, after you click Actions (button) > Check Connected Users.
Updated
The date on which the record was last updated.
This column was added in V1.0.73, so it may show the date on which that version was installed.
Updated By
The user who last updated the record.
A submenu with the following options:
View/Edit User Settings: Opens a settings interface to set email and timekeeping defaults.
Note: The user setting Hide Cost/Profit was removed in Ver 2.5.0. To hide costs from a user, check Hide Costs in the user’s access to each Transaction Type instead.
View/Edit User Access: Opens an interface where user access for all the modules can be managed.
View/Edit Reports Access: Opens an interface where user access to all the custom reports can be managed.
View/Edit Actions Access: Opens an interface to set user access to all the custom actions.
View/Edit Transaction Copy Rules: Opens an interface where user access to all Transaction Type Copy Rules can be managed.
View/Edit Service Copy Rules: Opens an interface where user access to all the Service Type Copy Rules can be managed.
Reset Password: If you confirm the message “The Password will be reset and emailed to the User. Continue?”, the password of every selected user is reset.
Each user gets a new password by email, sent from your email address to the user’s own address, with the subject BOS Password Reset.
The user must change the password at the next login.
Users without an email address and the QuickEasy support user are skipped.
The message “Password successfully reset.” appears when it is done.
Delete User: Moves the user’s record to the Recycle Bin.