
Timekeeping Statuses Tutorials
💡These tutorials explain how to create default and unique timekeeping statuses, and edit, delete and reorder them.
How to Create Default Statuses
Note
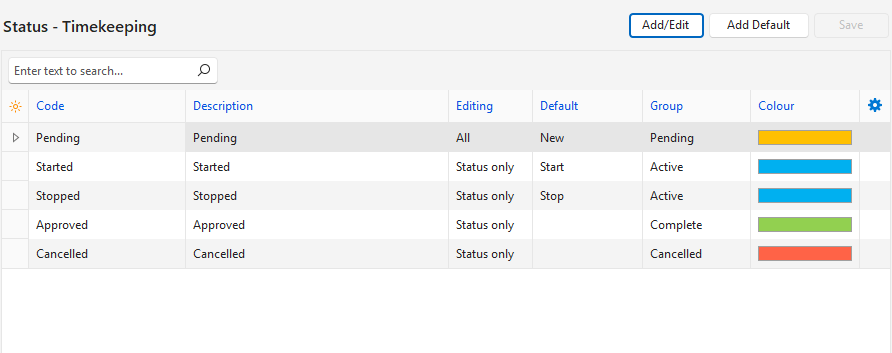
- This feature is available only if there are no statuses yet. It adds these statuses:
- Pending
- Started
- Stopped
- Approved
- Cancelled
- Navigate to Timekeeping.
- Click Menu (button) > Edit Statuses.
- Click Add Default (button).
- Edit the statuses as necessary.
- Click Save (button) if it is not greyed out.
How to Create Unique Statuses
Info
You can create statuses from scratch or edit the default statuses to suit your requirements.
- Navigate to Timekeeping.
- Click Menu (button) > Edit Statuses.
- Click Add/Edit (button).
- Click the top row and fill in the details as follows:
- Code = Enter a short description for the code (e.g. Pending).
- Description = Enter an explanation of when the status is used.
- Editing = Select one of these options:
- None: No editing.
- All: Editing is allowed.
- Status only: Only the status can be changed.
- Default = Select one of these options from the dropdown list:
- New: The status applies to newly created entries. One status must have the default New.
- Start: The timekeeping record changes to this status when it is started. Works only if the Mobile App is used.
- Stop: The timekeeping record changes to this status when it is stopped. Works only if the Mobile App is used.
- Group = Select a group from the lookup list of groups. The options are:
- Pending: The entry can be edited.
- Active: The entry is active.
- Complete: The entry is complete.
- Cancelled: The entry is cancelled.
- Colour = Click inside the colour block and select a different colour from the available colours.
- Click Save (button) if it is not greyed out.
How to Edit Statuses
- Navigate to Timekeeping.
- Click Menu (button) > Edit Statuses.
- Click Add/Edit (button).
- Edit any of the fields.
- Click Save (button) if it is not greyed out.
How to Delete a Status
Note
Once a status is used, it cannot be deleted.
- Navigate to Timekeeping.
- Click Menu (button) > Edit Statuses.
- Click Add/Edit (button).
- Right-click the status to remove and select Delete.
- Confirm the deletion on the popup.
How to Change the Order of Statuses
Note
- The order of the statuses should match the order in which they are used (e.g. Started > Stopped > Approved).
- This order helps to automatically set the next status in the hierarchy when certain processes are completed.
- Navigate to Timekeeping.
- Click Menu (button) > Edit Statuses.
- Click Add/Edit (button).
- Right-click the status to move and select Move Up or Move Down.
- Click Save (button) if it is not greyed out.