
Menu Groups
Menu Groups are the groups of modules and Transaction Types that make up the menus. They are included in Menu Templates, which are assigned to users (see Menus Explained). This page lists the Menu Groups and explains how to create, edit and delete them.
- You can create as many Menu Groups as you need. For example, one group named Workflow for all the transactions, or four groups named Customer Transactions, Supplier Transactions, Inventory Transactions and Accounting Transactions.
- An item can be in more than one Menu Group. For example, Contacts, Customers and Suppliers are in Setup (a pre-created Menu Group), and you can also add them to your own Menu Groups.
When Modules or Transaction Types are added to QuickEasy BOS, they must also be added to a Menu Group before users can access them. The exception is accounting transactions, which you can open from the ledger interface.
If a Custom Menu Group is added to a Menu Template, any changes to the Custom Menu Group are automatically applied. However, they only become visible if the menu is previewed or QuickEasy BOS is restarted.
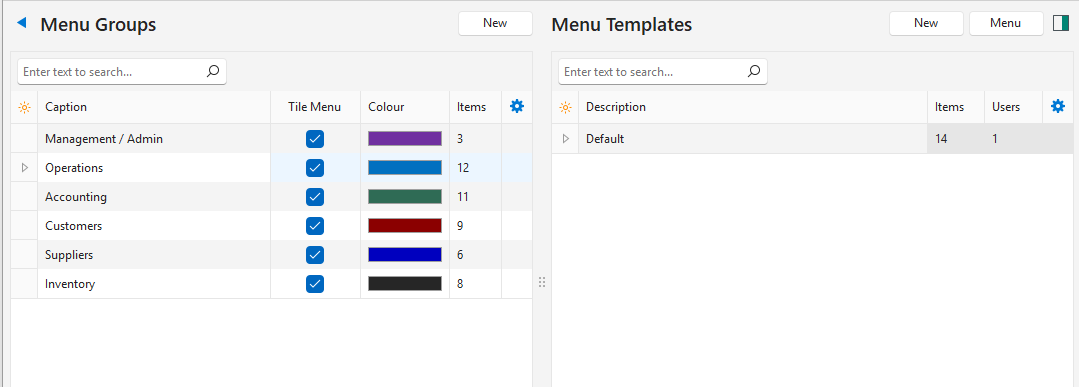
Menu Groups List
The left panel of the Menus screen lists the Menu Groups. The number of Menu Groups appears below the Caption column.
| Column | Description |
|---|---|
| Field Chooser (*) | Add or remove columns. |
| Caption | The name of the Menu Group. |
| Tile Menu | If checked, at least one item in the Menu Group appears on the Tile Menu. |
| Colour | The colour of the Menu Group. |
| Items | The number of items in the Menu Group. |
| Menu (…) | Right-click a Menu Group, or click its three dots (…), for these options:
|
How to Create a Menu Group
- Click New (button) next to the Menu Groups caption (left panel).
- Caption = Enter a name for the Menu Group.
- Click the coloured block and select a colour on the colour chooser.
- Select a module from the dropdown list next to Add Module.
- Click Add (button).
- Edit the following information:
- Caption = Edit the default caption (optional).
- Tile Menu = Check the box if you want the entry to appear on the Tile Menu. The entry is automatically added to the Main Menu (top row).
- Begin Group = Check the box to add a separator (line) before the selected menu item.
- Style = Select Default (not bold) or Bold from the dropdown list.
- Add any other modules to the Menu Group.
- Note: A module can be in more than one Menu Group.
- To change the order of the menu items, right-click a row and select Move Up Ctrl + U or Move Down Ctrl + D.
- To delete an entry, right-click its row and select Delete Ctrl + Delete.
- Click Save (button). If it is greyed out, close the popup (the changes are already saved).
How to Edit a Menu Group
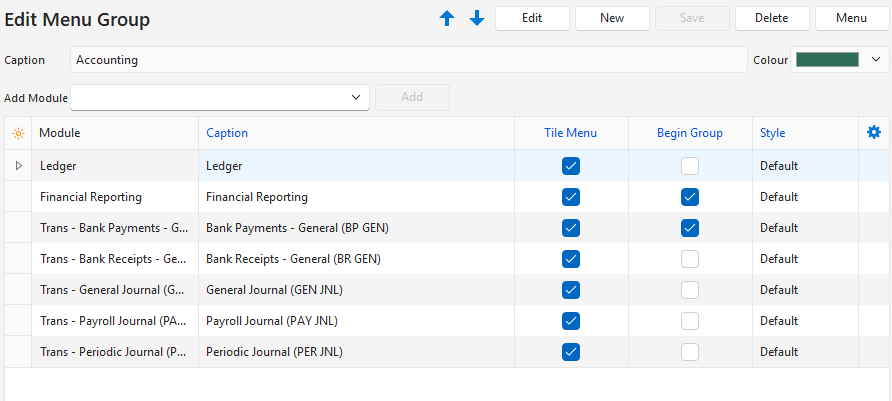
- Double-click the Menu Group, or right-click it and select Edit.
- Click Edit (button).
- Make any changes.
- Click Save (button).
- Note: The navigational arrows next to Edit (button) let you scroll through the other Menu Groups.
How to Delete a Menu Group
You must remove the Menu Group from all Menu Templates before you can delete it.
- Double-click the Menu Group, or right-click it and select Edit.
- Click Edit (button).
- Right-click every menu entry and select Delete.
- When there are no entries left, click Delete (button) on the top row of the popup.
- Confirm the deletion on the popup.