
Inventory Replenishment Interface
The Inventory Replenishment report can be added as a standalone module to any Menu Group. It can also be accessed from any Transaction Type with the applicable setting activated.
Use this report to view the stock that must be ordered, edit the stock prices and change the minimum quantity of stock that should be on hand.
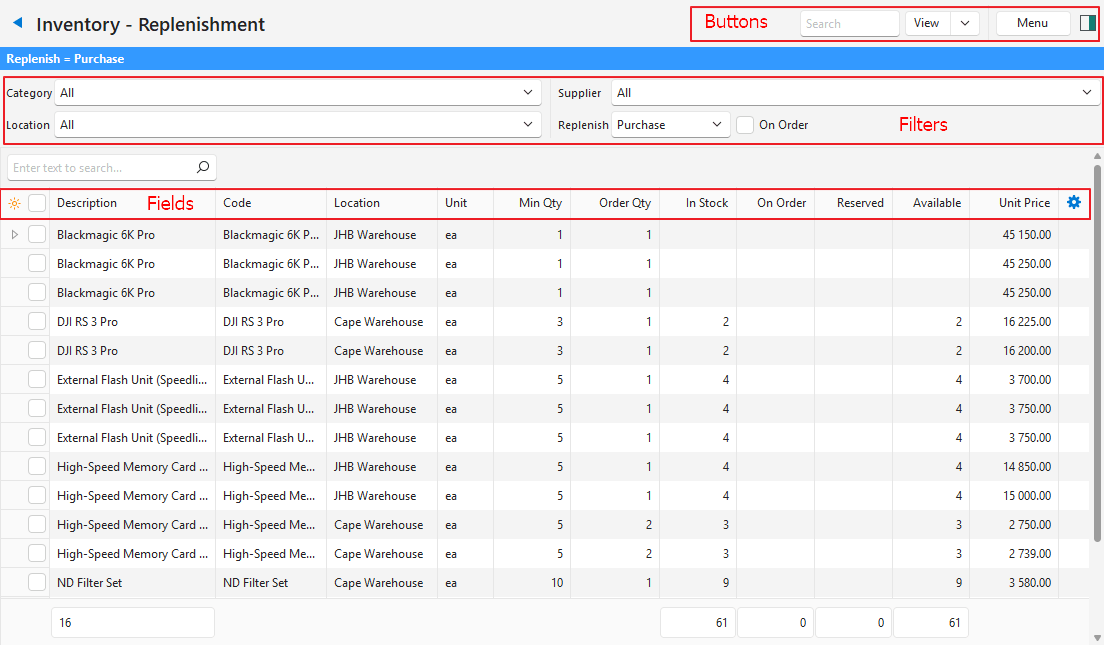
Buttons Explained
| Button | Description |
|---|---|
| View | Lists the items that match the selected filters. A Replenish option must be selected first. Otherwise, the message “Please select a Replenish filter.” appears. |
| Arrow on View | Reset Data Filter: Clears the filters. |
| Menu | Layout |
Filters Explained
| Filter | Description |
|---|---|
| Category | Select a category to show only its items, or all the categories.
|
| Location | Select a location, or all the locations. |
| Supplier | Select a supplier to show only its items, or all the suppliers. Available only when Replenish is set to Purchase. For Produce and Transfer, the filter is locked to All. |
| Replenish | Shows only the inventory items that must be replenished. Select one of these options:
A Replenish option is required to generate the list. |
| On Order | Checkbox. If checked, shows only ordered items (that is, a Purchase Order was created but the inventory is not yet received). |
| All Units | Checkbox. If checked, every unit linked to the item appears, not only the units linked to a price. Note: All units appear, regardless of whether they need to be replenished. The unit cell is highlighted in green where the unit is linked to a price (that is, you can add it to a transaction). Entries without a price cannot be selected. |
| Search | Enter text to find items by the item’s description, code or category, or the location’s description or code. Entering text in the search block resets the other filters. |
Fields Explained
| Field | Description |
|---|---|
| Field Chooser (*) | Add or remove columns. |
| ID | The system-generated number allocated to the entry. |
| Item ID | The system-generated number allocated to the item. |
| Location ID | The system-generated number allocated to the location. |
| Status (Item) | The item’s status. |
| Description | The item’s description. |
| Code | The item’s code. |
| Categories | The item’s categories. |
| Status (Location) | The location’s status. |
| Location | The location’s name. |
| Supplier | The supplier. |
| Base Unit | The item’s Base Unit. |
| Unit | The entry’s unit. If All Units is checked, the cell is green where the unit is linked to a price. |
| Min Qty | The minimum quantity that should be on hand. |
| Order Qty | The quantity that should be ordered. |
| In stock | The quantity in stock. |
| On Order | The quantity ordered but not yet received. |
| Reserved | The quantity that is reserved for orders. |
| Available | The quantity that is available. |
| Unit Price | The item’s unit price for the displayed unit.
Priced rows only appear when Inventory Replenishment is opened from a transaction, and the price then comes from the transaction (e.g. the Supplier Price or Sell Price). If you open it on its own with Transfer selected, no priced rows appear. When the report is opened from a transaction, supplier prices appear in the transaction’s currency. |
| Created | The date on which the item was created. |
| Updated | The date on which the item was updated. |
| Updated By | The user who last updated the item. |
| Last Order | The code and number of the last order placed for the item at the same location and in the same unit. Only filled in when the item is on order. The last order is the latest order that is not cancelled, even when its status does not update stock. |
| Last Order Date | The date of the last order. |
 | A menu that also opens when you right-click the entry. The options are:
|