Form Designer – Reportbuilder Tutorials
💡These tutorials explain how to create, copy and relink Reportbuilder templates, build their header, detail and footer sections and change the print setup.
Info
QuickEasy BOS includes Reportbuilder, a form designer that lets you customise all your templates (e.g. statements, invoices, emails).
You have access to the data pipelines, fields and editing tools to help you design forms.
Reportbuilder templates can be designed from scratch, copied from an existing template and edited, or created using the form wizard from Reportbuilder > File > New > Report Wizard.
How to Create a Template
Info
- A Quotation template is created as an example. The same procedure can be used for all Transaction Types.
- You can create multiple templates for the same Transaction Type.
- When you place an entry, it has two fields: one that contains the label and one that contains the data. You can delete the label field by clicking it and pressing Delete. You can still see a description of the data field by clicking the field and looking at the row directly below the icons. The name of the table and the field appear.
- Create a template in QuickEasy BOS, so that the name of the form exists, either through the Transaction Type or Output Templates module.
- Open a list of Quotations.
- Note: You cannot create a form if there is no data because the data fields are not available to add to the form or to preview. The data fields available on Form Designer are created from the view that is open on the screen in BOS.
- Navigate to the Reportbuilder (Main Menu > Setup > Form Designer > Reportbuilder).
- Click File > New Report.
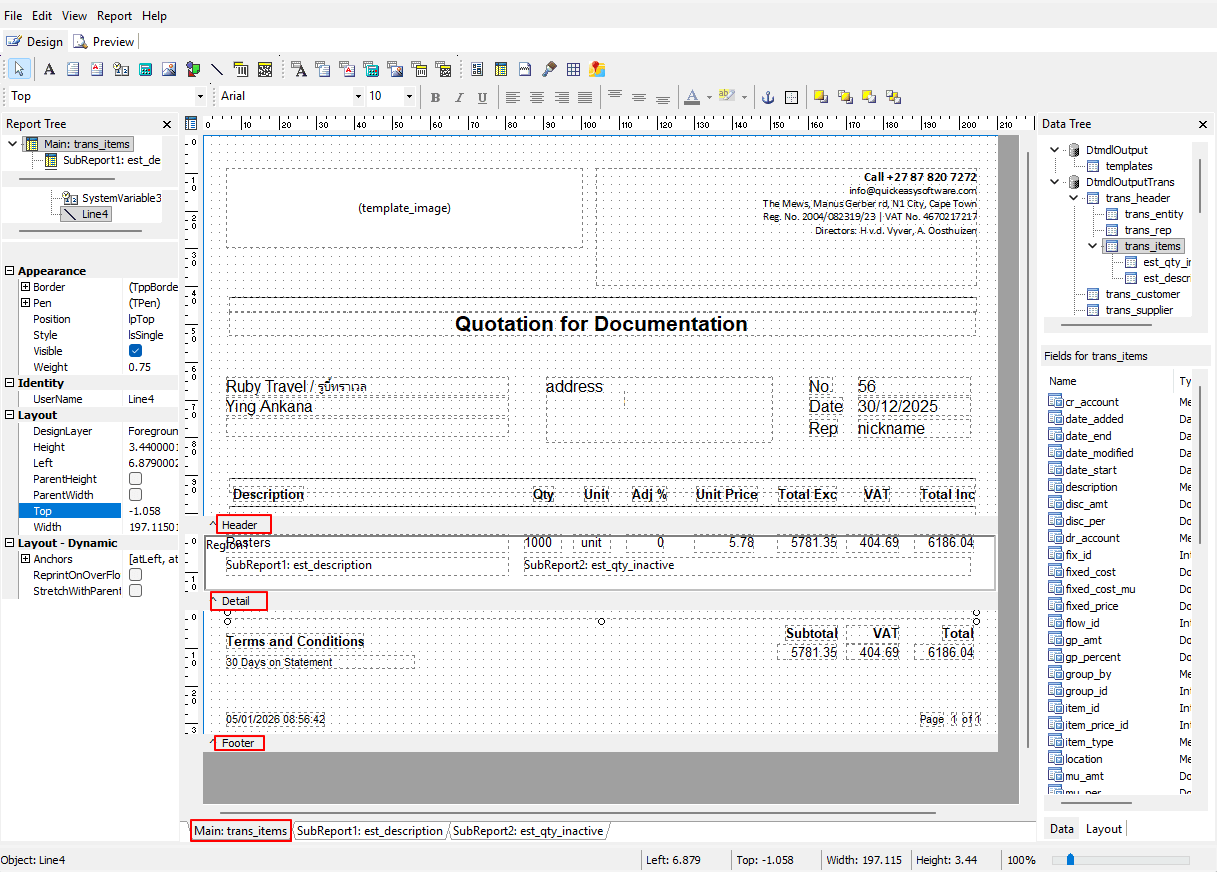
- Drag the sections (Header, Detail, Footer) down using the dividing grey bars to expand them.
- Check if the Data Tree panel is open on your right. If not, add it from Main Menu > View > Toolbars > Data Tree.
- A list of the available tables from BOS appears on the right. When you click an entry on the Data Tree, a list opens below it that shows all the available fields. (Drag the bar that separates the two panels up or down to resize the panels.)
How to Create the Header for Transactions
- Entity Information:
- Click the entry with information about your entity, named trans_entity under the Data Tree.
- On the top row of icons, click DB Image (the icon with the picture) and click inside the header section to place it.
- On the left in the Data section, enter template_image next to DataField.
- Check that the DataPipeline shows trans_entity (directly below DataField). If it does not, replace the entry with trans_entity.
- Use the dots to drag and resize the entry until it is placed where you need it.
- On the left under Layout – Dynamic, check the box next to Stretch to adjust the logo to fit inside the block.
- On the top row of icons, click DBRich Text (icon) (the icon with the red A) and click inside the header section to place it.
- On the left in the Data section, enter template_masthead_rtf next to DataField.
- Check that the DataPipeline shows trans_entity. If it does not, replace the entry.
- If the Header section is too small, drag the bar with the Header label down to increase the Header’s size.
- Click the line icon and click the header section just below the placed fields.
- Drag the line using the dots until it spans the entire header section.
- Press Ctrl + S to save your work.
- Customer Information:
- Click Label (icon) and click the form to place the label.
- Double-click inside the label and enter Quotation. Use the text functions above the form to centre the label, make it bold and increase the font size.
- Click trans_header under Data Tree to access information on the transaction’s header.
- Click and drag the following fields into the Header Section:
- company_name (inserts the customer’s name).
- contact_name (inserts the name of the customer’s contact person).
- Click trans_customer under Data Tree.
- Click and drag email into the header section.
- For each of the added fields:
- Delete the labels (first part that shows the name of the field).
- Click the field and enter these values in the Layout section:
- Height = 5
- Left = 6
- Width = 75
- Drag the fields to space them vertically, which sets the top margin.
- Click trans_header under Data Tree.
- Click and drag address into the header, next to the company name.
- Document Information:
- Next to the address, create labels for:
- Number (QT No.)
- Date
- Rep
- Click trans_header under the Data Tree.
- Drag trans_no from the Fields section next to the text Number.
- Drag date_trans from the Fields section next to the text Date.
- Click trans_rep and drag nickname from the Fields section next to the text Rep.
- For each of the added fields, adjust the layout as described in Step 2g.
- Next to the address, create labels for:
- Labels:
- Insert a horizontal line below the previous entries (click the line icon and drag the line to span the page).
- Insert labels just below the line and above the section break for the following fields:
- Description
- Qty
- Unit
- Adj% (include this field only if the adjustment is a discount that you want the customer to see)
- Unit Price
- Total (Exc)
- VAT
- Total (Inc)
- Change the labels’ appearance and size (e.g. bold, 10 pts).
- Insert another line below the labels.
- Press Ctrl + S to save your work.
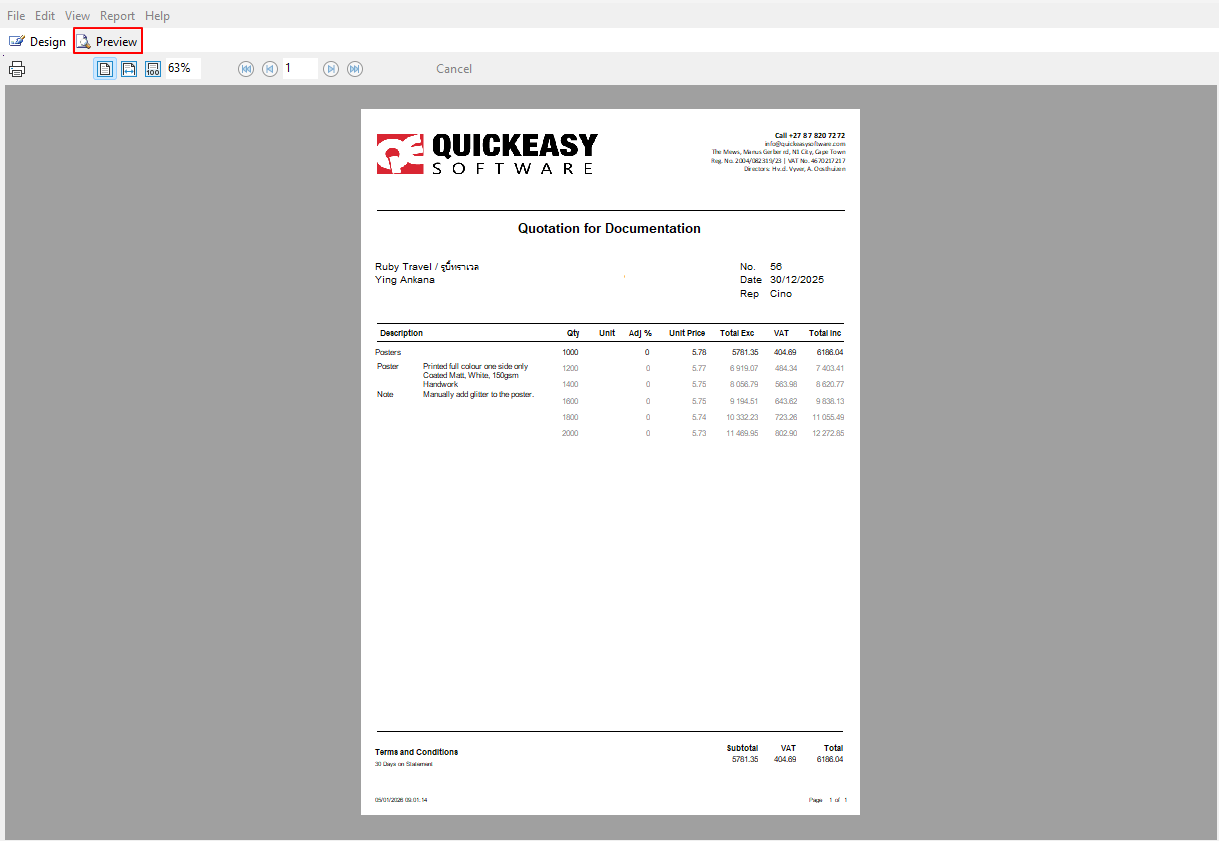
- Click Preview (tab) to see what the layout looks like. Adjust as needed.
How to Create the Detail Section
- Click the icon next to Report Tree to switch the left-side panel to Report View.
- In the block on the left that shows Data, select trans_items from the dropdown list next to DataPipeline.
- Click Region (icon) (the sixth icon from the right) and click the detail section.
- Under Appearance, click the plus sign next to Pen.
- Change the Style to psClear.
- Under Layout, check the boxes next to ParentWidth and ParentHeight.
- Under Layout – Dynamic, check KeepTogether.
- Note: The region block helps to keep the data together and inserts a page if there are too many transactions.
- Click trans_items on the Data Tree and drag the following fields into the region block below where the headings were created:
- description
- qty
- unit
- disc_per (adjustment percentage: Adj%)
- total_unit_cur (This field is the total unit price in the transaction’s currency.)
- total_cur (This field is the total due, excluding VAT, in the transaction’s currency.)
- vat_cur (This field is the VAT amount.)
- total_vat_cur (This field is the total due, including VAT, in the transaction’s currency.)
- Align the added fields using the icons on the font section. The totals should be aligned right.
- Change the font size and colour (e.g. black 10 pts) using the options on the font section.
- Press Ctrl + S to save your work.
- Add a subreport (inside the region) to show the full Estimate Description as follows:
- Click Subreport (icon) (the yellow icon, fifth from the right).
- Next to DataPipeline, select est_description.
- Uncheck the box next to ParentWidth.
- Enter the width to match the width of the description (e.g. 75).
- Align the subreport with the description.
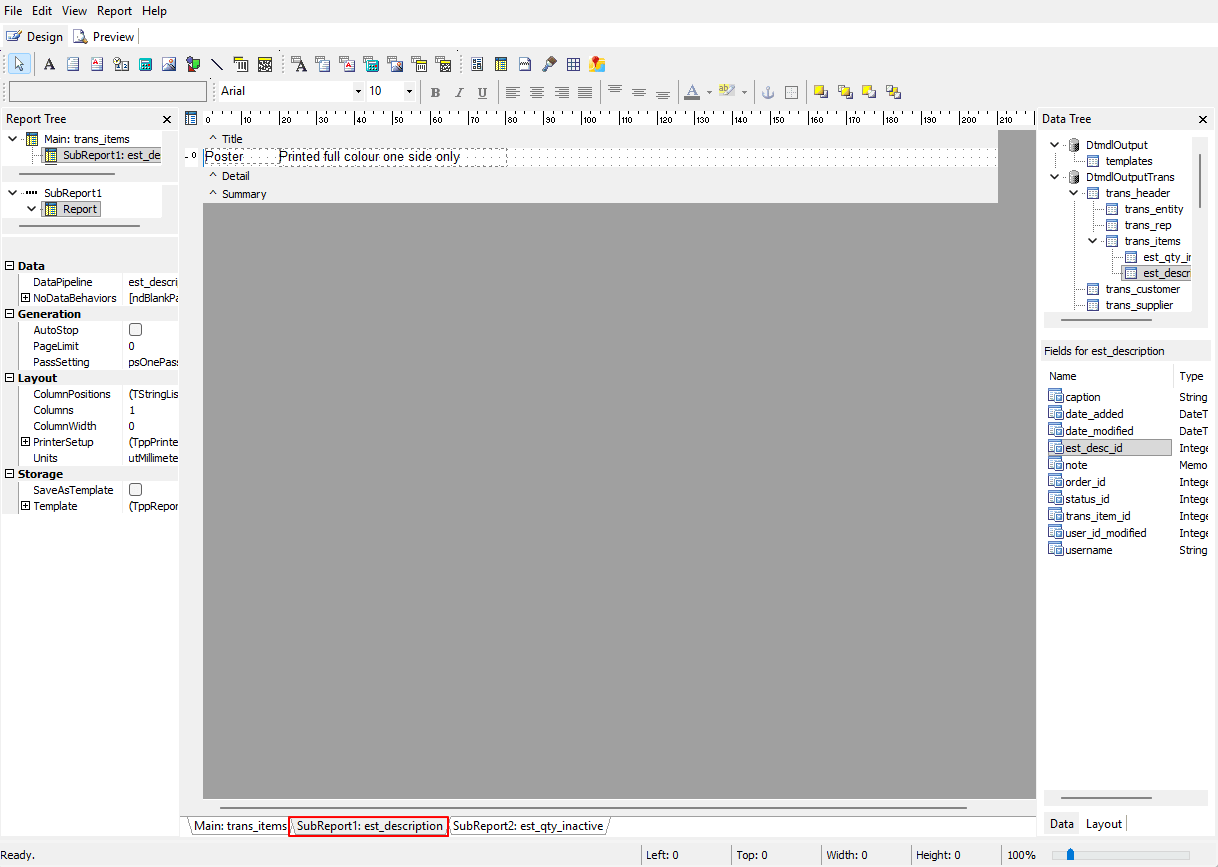
- Click the tab at the bottom that shows SubReport1: est_description.
- Drag these fields into the Detail section:
- caption
- note
- Align the fields next to each other. Look at the margin bar and check that the fields end where the description ends on the main report (Main: trans_items).
- Adjust the font and alignment as needed.
- For the Note field below Layout – Dynamic, check the box next to Stretch. This step expands the block to fit the full description.
- Press Ctrl + S to save your work.
- Drag these fields into the Detail section:
- Click the tab Main: trans_items to return to the main report.
- Add a subreport to show inactive quantities as follows:
- Click Subreport (icon) (fifth from the right) and click the region block to add it.
- Select est_qty_inactive as the DataPipeline.
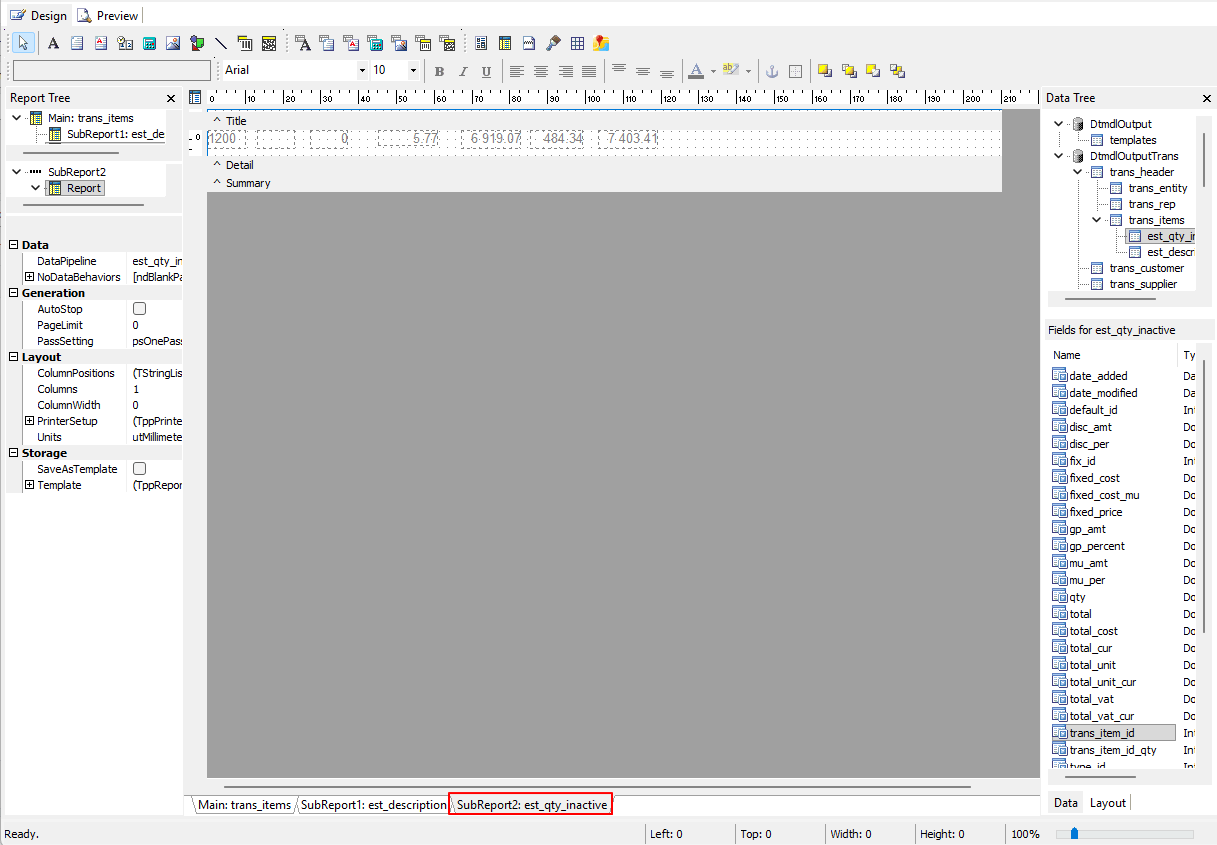
- Click the tab at the bottom that shows SubReport2: est_qty_inactive.
- Drag the same fields as in Step 7b-h from est_qty_inactive and align each with the field of the same name:
- Write down the left margin and width of each field to help you align them.
- Place them on the right until they are all placed.
- Hold down Shift and click all the fields to select them.
- Move them to the left so they start where SubReport2 starts. (SubReport2 starts under the Qty column on the main design – see the screenshot.)
- Change the font, text colour (grey) and alignment of the fields.
- For each of the number fields, click the three dots (…) next to DisplayFormat under Text. Select the second option from the dropdown list.
- Drag the same fields as in Step 7b-h from est_qty_inactive and align each with the field of the same name:
- Click the tab Main: trans_items to return to the main report.
- Press Ctrl + S to save your work.
- Click Preview (tab) to check that the report is generated correctly.
How to Create the Footer
- Insert a horizontal line on the first line of the footer (click the line icon, click the footer and drag the line to span the page).
- Click the label icon (the large black A).
- Click inside the footer section to place the label and drag it to the left.
- Double-click the placed label and change the text to Terms & Conditions.
- Click trans_header on the Data Tree and drag credit_term from the fields below the label you created in Step 4. Resize the field to allow for a block of text if you have complicated terms.
- Delete the label name (optional).
- Create labels for the following fields and align them on the right below the respective fields in the detail section:
- Subtotal
- VAT
- Total
- Click trans_header on the Data Tree:
- Drag the field total_cur below the text Subtotal.
- Drag the field vat_cur below the text VAT.
- Drag the field total_vat_cur below the text Total.
- For each of these fields, in the Text section on the left, click the three dots (…) next to DisplayFormat and select the second option (which uses two decimal places).
- Press Ctrl + S to save your work.
- Click the icon SystemVariable (the fifth icon from the left).
- Click the form to place it.
- Select one of the options (e.g. date, time, page number) on the dropdown list, which is just below the row of icons and shows Date at first.
- Add more system variables if needed. For example, place the date and time below the terms and conditions so you have a record of when the quotation was generated. Place the page number and page count on the right. Insert labels if needed (e.g. Page (label), page number (variable), of (label), page count (variable)).
- In the Layout block on the left, align all the fields and, where applicable, give them the same width and height.
- Note: If the layout block is not there, you are still in Report View. Click any field on the table to switch back to Layout View.
- Press Ctrl + S to save.
Tips and Troubleshooting
- If the preview does not show anything, go to a transaction and output the report. Close the output and return to Reportbuilder. This step tends to trigger the preview.
- Drag fields anywhere onto the relevant section and use the layout block on the left to enter the actual coordinates, instead of trying to visually position and align the fields. This method also helps you coordinate the heights and widths of fields.
- After dragging a field onto a section, click anywhere else in that section. This breaks the label and field into two parts, which makes it easier to delete the label part.
- Instead of double-clicking labels, you can also enter the caption in the Text section on the left.
- To start over, create a new form and save it over the existing form.
- If attributes are used in a rich-text block, the Attributes query does not open. Workaround: Add an invisible DBText component linked to the Attributes data pipeline.
How to Copy a Template
Info
- Copying a template is easier than creating a new template from scratch because most of the fields are already there; you only need to edit them.
- Copying forms also ensures consistency because all the layouts follow the same pattern (e.g. logo on the left, address on the right).
- Create a template in BOS, so that the name of the form exists, either through the Transaction Type or Output Templates module.
- Open a transaction list (e.g. Main Menu > Workflow > Quotations).
- Note: You cannot create a form before entering data, because the fields are created only when data is entered. The data fields available on Form Designer are created from the view that is open on screen.
- Click Main Menu > File > Open and select a template from the list. (Or Main Menu > File > Load From File to open a report created elsewhere.)
- Click Open (button).
- If you receive the message “Error Reading Template”, click Ignore All (button) and relink the template once it is loaded.
- Before you change the template, save it: click Main Menu > File > Save As, select the name you created in step 1 from the list and click Save (button).
- Make any changes as needed:
- Add fields as required.
- Click a field and press Delete to remove it.
- Click a field and drag it to reposition it.
- Click a field and use the dots to resize it.
- Double-click a text field to change the text.
- Save your work often (press Ctrl + S), because there is no auto-save feature.
How to Relink a Template
Info
- The message “Error Reading Template” often means that the template is looking for data fields that are not in your current version of QuickEasy BOS. This mostly happens when you import a template from another database.
- In that case, relink the fields to your current data fields.
- Click the field you want to change.
- Open the list of fields at the top (below the icon row).
- From the dropdown list in the first block, select the Data Table.
- From the dropdown list in the second block, select the Field.
- Repeat steps 1 and 2 until all the fields are relinked.
- Save the form (Main Menu > File > Save or Ctrl + S).
How to Change the Print Setup
- Click the icon next to Report Tree to switch the left-side panel to Report View.
- In the Layout tab on the left, click the + next to PrinterSetup to expand the view.
- Select the printer next to PrinterName from the dropdown list of all your installed printers.
- Change any of the other settings as necessary.
- Click Main Menu > File > Save.
About Data Pipelines
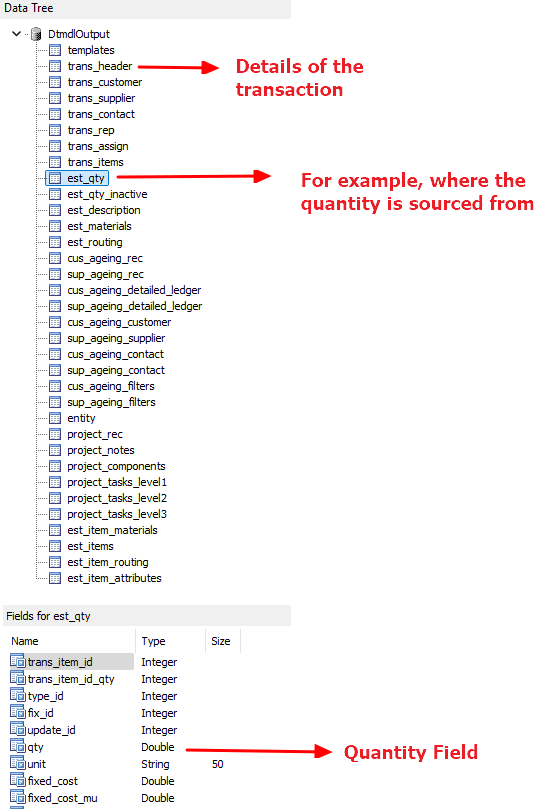
- All the data is in DtmdlOutput.
- Each field under DtmdlOutput consists of multiple sub-fields.
- If you click a field, the sub-fields appear in an expanded tree view or in the block below (depending on your settings).
- Each sub-field is linked to its parent field.
- You cannot use a sub-field without including the parent field because the form must know where to fetch the data from (it needs the link).
- This rule also applies to sub-fields of sub-fields.
- For example, if you want to display quantities, you need to include the header (trans_header) to indicate where the quantities come from (e.g. Quotation) and the sub-field that contains the quantity (e.g. est_qty) before you can display the quantity (qty).
- The information must be inserted into the form using DBText or DBMemo fields. (Do not use rich-text fields to access these pipelines because rich-text fields do not create the necessary links.)