
Timekeeping User Access Tutorials
User access to timekeeping can also be set under Users (Main Menu > Setup > Users).
💡These tutorials explain how to add or remove Timekeeping users, edit and batch update their access, and restrict access by user or resource.
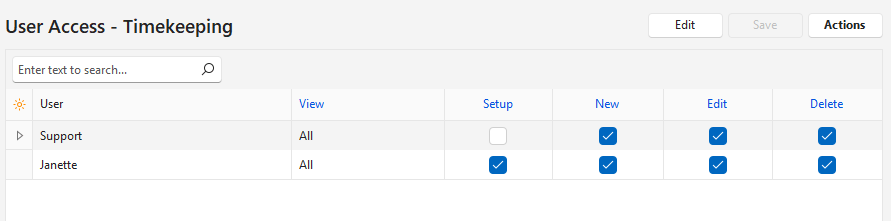
How to Add or Remove a User
- Navigate to Timekeeping.
- Click Menu (button) > Edit User Access.
- Click Actions (button) > Add/Remove Users.
- Select the user you want to add and use the arrows to move them from the Available section to the Selected section.
- Note: You can remove a user by moving them from the Selected to the Available section.
- Click Save (button).
- Edit the fields to give the user the access rights they need.
- Click Save (button) if it is not greyed out.
How to Change Multiple Records (Batch Update)
- Navigate to Timekeeping.
- Click Menu (button) > Edit User Access.
- Select all the records you want to change (use Ctrl + left-click to select more than one).
- Click Actions (button) > Batch Update.
- Select one of these options and check the box to give access, or leave it unchecked to remove access:
- View: Change the access to All or None, which sets whether users can view timekeeping records. If you select None, New, Edit and Delete access is removed automatically.
- Setup: Grants access to Timekeeping Settings.
- New: Allows users to create timekeeping records.
- Edit: Allows users to edit timekeeping records.
- Delete: Allows users to delete timekeeping records.
- Click Update (button).
- Confirm the update on the popup.
How to Edit User Access
- Navigate to Timekeeping.
- Click Menu (button) > Edit User Access.
- Click Edit (button).
- Note: Only users added to Timekeeping are listed. To add a user, see How to Add or Remove a User.
- Edit any of the records.
- Click Save (button).
How to Restrict User Access to Timekeeping Records – Users
- Navigate to Timekeeping.
- Click Menu (button) > Edit User Access.
- Click Edit (button).
- Note: Only users added to Timekeeping are listed. To add a user, see How to Add or Remove a User.
- For each user’s access you want to change, select Own (User) from the dropdown list in the View column.
- Click Save (button).
How to Restrict User Access to Timekeeping Records – Resource
Info
On service tickets, projects and tasks, users can be selected as resources. You can restrict those users to viewing only the records where they are the selected resource.
- Navigate to Timekeeping.
- Click Menu (button) > Edit User Access.
- Click Edit (button).
- Note: Only users added to Timekeeping are listed. To add a user, see How to Add or Remove a User.
- For each user’s access you want to change, select Own (Resource) from the dropdown list in the View column.
- Click Save (button).