
Custom Attributes Tutorials
Attributes, and the records that custom attributes can be added to, are explained on Custom Attributes. Custom attributes and their lookup lists are created from the attributes interface, for example, Main Menu > Setup > Attributes or Menu button > Edit Attributes.
💡These tutorials explain how to create, edit and delete custom attribute sets and add them to contacts, service tickets and transactions.
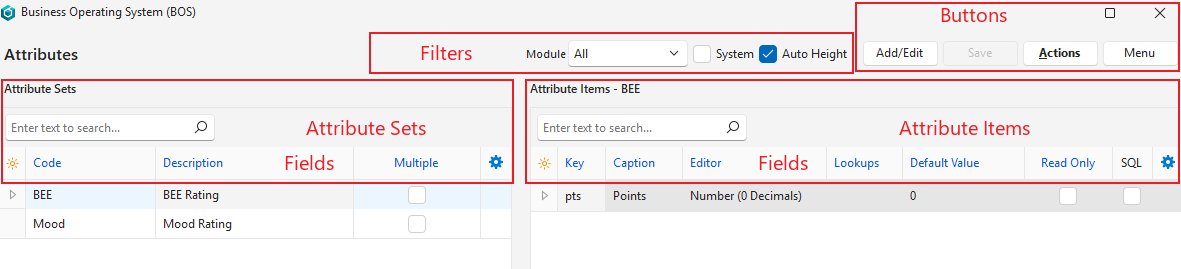
How to Create Custom Attribute Sets
- Navigate to Edit Attributes (e.g. Main Menu > Setup > Attributes).
- Click Add/Edit (button).
- Module = Select one of these options from the dropdown list:
- All
- Contacts
- Customers
- Suppliers
- Items
- Assets
- Transactions
- Services
- Create an Attribute Set (top row left) as follows:
- Code = Enter an abbreviation of the description.
- Description = Enter a description for the set.
- Multiple = Check the box if the attribute set can be added more than once to the same record.
- Add Attribute Items to the set. Click the set on the left and complete the fields in the attribute items section on the right as follows:
- Key = Enter a descriptive key (lowercase, no spaces). This key makes finding the attribute easier when creating custom actions or reports.
- Caption = Enter a descriptive heading for the attribute (e.g. BEE Rating).
- Editor = Select what type of answer the user must provide from these options:
- Text: Any text can be entered.
- Number (0 Decimals): Only integers can be entered.
- Number (2 Decimals): A number with two decimals can be entered.
- Number (4 Decimals): A number with four decimals can be entered.
- Combobox (Fixed): An answer must be selected from a lookup list.
- Combobox (Edit): An answer may be selected from a lookup list or entered directly.
- Checkbox (Y/N): A checkbox. Checked for yes.
- Lookup SQL: A fixed lookup list is created using an SQL query (which must be added afterwards).
- Date: Opens a calendar to select a date.
- Lookups = If Combobox (Fixed) or Combobox (Edit) is selected, enter the expected answers in the field provided, one entry per line.
- Note: Check or uncheck the Auto Height box to display or hide the full lookup list. In certain circumstances, the system lets you create lookup lists without first selecting Combobox, but the lookup lists do not work until you select Combobox in the Editor column.
- Default Value = Enter a default value for the attribute (optional).
- Read Only = Check the box if the attribute must not be edited on the records it is added to (optional).
- Note: The default value is still filled in.
- Repeat Step 5 to add more attribute items to the set (optional).
- Click Save (button).
How to Edit a Custom Attribute Set
- Navigate to Edit Attributes (e.g. Main Menu > Setup > Contacts > Menu (button) > Edit Attributes).
- Click Add/Edit (button).
- Edit the fields as needed.
- Note: Check or uncheck the Auto Height box to display or hide the full lookup list.
- Click Save (button).
How to Delete a Custom Attribute Item
- Navigate to Edit Attributes (e.g. Main Menu > Setup > Contacts > Menu (button) > Edit Attributes).
- Right-click an attribute item on the right and select Delete.
- Confirm the deletion on the popup.
How to Delete a Custom Attribute Set
Note
- All the attribute items on the right must be removed from the set before it can be deleted (see How to Delete a Custom Attribute Item).
- Sets must be removed from the records to which they were added (e.g. contacts, transactions) before they can be deleted.
- Navigate to Edit Attributes (e.g. Main Menu > Setup > Contacts > Menu (button) > Edit Attributes).
- On the left in the Sets section, right-click a set and select Delete.
- Confirm the deletion on the popup.
How to Add Attribute Sets to a Contact
Info
Fixed attribute sets appear under System. Custom attributes appear under Custom.
- Navigate to Contacts (Main Menu > Setup > Contacts).
- Right-click the contact you want to edit and select Edit Contact.
- Click Edit (button) on the top row if it is not blue.
- Click Attributes (tab).
- On the right side, click Attributes (button) next to Add/Remove.
- Move your mouse over Add and click the Attribute Group you want to add.
- Enter the information in the Value column.
- Repeat Steps 5-7 to add more attribute groups.
- Click Save (button) on the top row.
How to Remove Attribute Sets From a Contact
Note
System attributes cannot currently be removed.
- Navigate to Contacts (Main Menu > Setup > Contacts).
- Right-click the contact you want to edit and select Edit Contact.
- Click Edit (button) on the top row if it is not blue.
- Click Attributes (tab).
- On the right side, click Attributes (button) next to Add/Remove.
- Move your mouse over Remove and click the Attribute Group you want to remove.
- Confirm the deletion on the popup.
- Repeat Steps 5-7 to remove more custom attribute groups.
- Click Save (button) on the top row.
How to Update Modules When Attribute Items Are Edited
- Navigate to Edit Attributes (e.g. Main Menu > Setup > Contacts > Menu (button) > Edit Attributes).
- Click Actions (button) > Update Attributes on Modules.
- Note: The attributes are updated and a confirmation message appears.
How to Add or Edit Attribute Sets on a Service Ticket
- When editing a ticket, click Menu (button) > View/Edit Attributes.
- On the popup:
- Click Add (button) and select one of the available attributes.
- Enter the required information in the Value column.
- Click Save (button).
How to Add an Attribute Set to a Transaction
Info
If an attribute set is selected in the Transaction Type setting General > Default – Attribute Sets, it appears on the transaction automatically.
- When editing a transaction, click Menu (button) > View/Edit Attributes.
- On the popup:
- Click Add (button) and select one of the available attributes.
- Enter the required information in the Value column.
- Click Save (button).
How to Edit an Attribute Item on a Transaction
Note
Attributes can be edited if the transaction can be edited.
- When editing a transaction, click Menu (button) > View/Edit Attributes.
- On the popup:
- Enter the required information in the Value column.
- Click Save (button).