
Point of Sale Setup Interface
This page describes the Point of Sale (PoS) setup screen: its top row buttons and warning bar, the Settings and Users tabs, the PoS settings and the PoS session statuses. For the setup steps in order, see Point of Sale Setup Tutorials.
Top Row Buttons Explained
| Button | Description |
|---|---|
| Add/Edit | Lets you edit the fields or add settings. |
| Save | Saves any changes. |
| Menu | Settings
|
Warning Bar Explained
The warning bar does not catch every gap in the setup. A required setting that was never added to the Settings tab is not reported, and in some cases a blank required setting is not reported either. Check the four required settings yourself (see Set Up the PoS Environment: Settings).
A warning bar near the top of the screen lists problems in the PoS setup, separated by semicolons. The warnings are:
- Required Settings are blank: Followed by the required settings that are on the Settings tab without a value. The required settings are:
- Denominations
- Sales Accounts
- Cash Accounts
- Default - Customer
- Contacts are linked to multiple Users: A contact is linked to more than one user. Each PoS user needs their own contact on the Users tab.
- Duplicate PIN No.: Two or more users have the same PIN No. on the Users tab.
- The PoS Status list is empty: No PoS session statuses exist. Click Add Default Statuses (button) on the Statuses (PoS Sessions) tab.
Settings (tab)
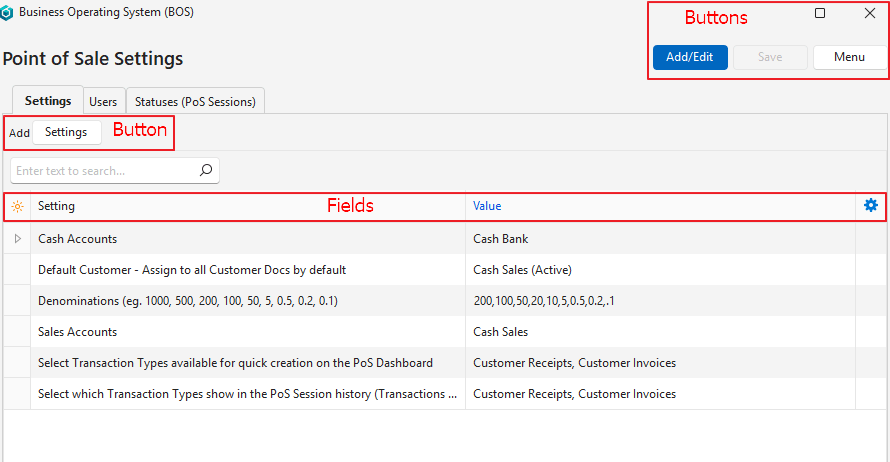
Fields Explained
Fields marked in blue (✎) can be edited.
| Buttons / Fields | Description |
|---|---|
| Settings (button) | Opens a list of settings that can be added. |
| Field Chooser (*) | Add or remove columns (fields). |
| Editor | The system-generated number of the type of editor (input control) used for the setting’s value. |
| ID | The system-generated number allocated to the setting. |
| Module ID | The system-generated number allocated to the module. |
| Group | The setting’s group name. |
| Setting | The name of the setting. The settings are blank by default. |
| Value | The setting’s value. This field is editable. |
| Created | The date on which the setting was added. |
| Updated | The date on which the setting was last updated. |
| Updated By | The user who last updated the setting. |
 | A submenu with this option:
|
PoS Settings Explained
| PoS Setting | Explanation |
|---|---|
| Cash Accounts |
|
| Default Customer – Assign to all Customer Docs by default | Provides a dropdown list of customer accounts to select the default customer (e.g. Cash Sales). |
| Denominations (e.g. 1000, 500, 200, 100, 50, 5, 0.5, 0.2, 0.1) |
|
| Sales Account |
|
| Select Transaction Types for quick creation on the PoS Dashboard: |
|
| Select which Transaction Types show in the PoS Session history (Transactions Tab) |
|
Users (tab)
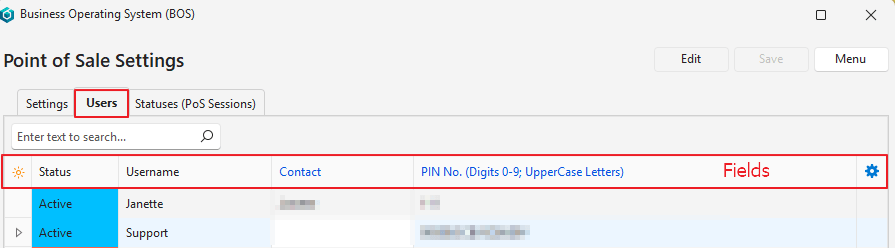
Fields Explained
Fields marked in blue (✎) can be edited.
| Fields | Description |
|---|---|
| Field Chooser (*) | Add or remove columns (fields). |
| ID (User ID) | The system-generated number allocated to the user. |
| Status | The user’s status. |
| Username | The user’s name. |
| Contact | The name of the contact linked to the user. This field is editable and provides a dropdown list of contacts for selection. PoS users must have a linked contact. |
| The user’s email address. | |
| PIN No. (Digits 0-9, Uppercase Letters) | The PIN to access the PoS interface. The PIN can be generated (12-digit alphanumeric) or entered (any length, numbers and capital letters only). |
| Updated | The date on which the entry was last updated. |
| Updated By | The user who last updated the entry. |
| A submenu with this option:
|
Statuses (PoS Sessions) Explained
Fields marked in blue (✎) can be edited.
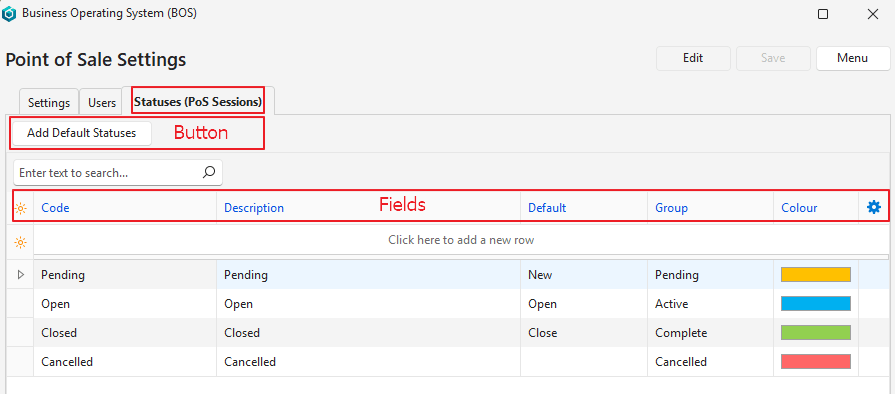
| Button / Fields | Description |
|---|---|
| Add Default Statuses (button) | Creates default statuses. Can be used only if no statuses exist yet. You can edit the default statuses freely. |
| Field Chooser (*) | Add or remove columns (fields). |
| ID | The system-generated number allocated to the entry. |
| Order ID | The system-generated number allocated to the order of the statuses. |
| Code | The brief description of the status. |
| Description | The full description of the status. |
| Default | The defaults assigned to the status. The defaults are:
|
| Group | The Status Group that the entry belongs to. The groups are:
|
| Colour | The colour of the status. To change the colour, click the field, click the arrow that appears and select a different colour. |
| A submenu with the following functions:
|