Transaction Allocations
Debit and credit transactions can be offset against each other to determine the outstanding amounts. This feature is mostly used in customer and supplier transactions to identify which invoices are paid and which are still outstanding.
If an allocation is complete and the outstanding amount is zero, the transaction is set to the status for which the default Complete was selected. This change only happens if the transaction is in a lower status than the default Complete status and no information is missing on the transaction.
In QuickEasy BOS, the allocations can be managed from any linked transaction (e.g. from the invoice or from the customer receipt).
Settings
The allocation features are disabled by default. A general setting enables them.
Accounting > Enable Customer and Supplier Allocations: Checkbox. If checked, allocations are enabled.
Transaction Allocations
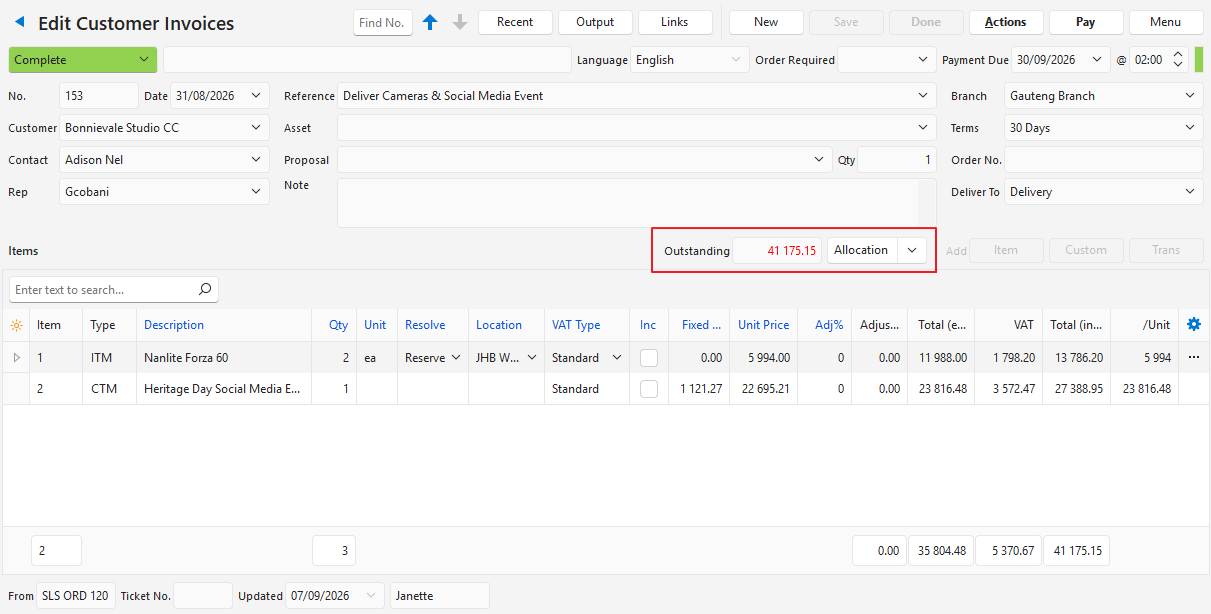
Relevant Fields:
- Outstanding: Shows the amount that is not allocated.
- Allocation (button): Opens an interface to allocate the transaction.
- Allocation arrow on button: Includes the same commands as the Actions button on the Allocation interface.
- Update Transaction to the Allocated Amount: Changes the amount on the transaction to the total of all the allocated entries.
- Update Withholding Tax (WHT): Calculates and splits the transaction into withholding tax and payment amounts. Only appears if WHT applies to the transaction.
- Done (button): Asks “Allocate the outstanding amount to” followed by the source transaction when all of these apply:
- The transaction was copied from a transaction of another Transaction Type that posts to the ledger (for example, a Customer Receipt copied from a Customer Invoice).
- Its amount is not zero.
- Nothing is allocated yet.
Click Yes (button) to allocate the transaction to the source transaction, or No (button) to complete it without allocating.
Allocations Interface
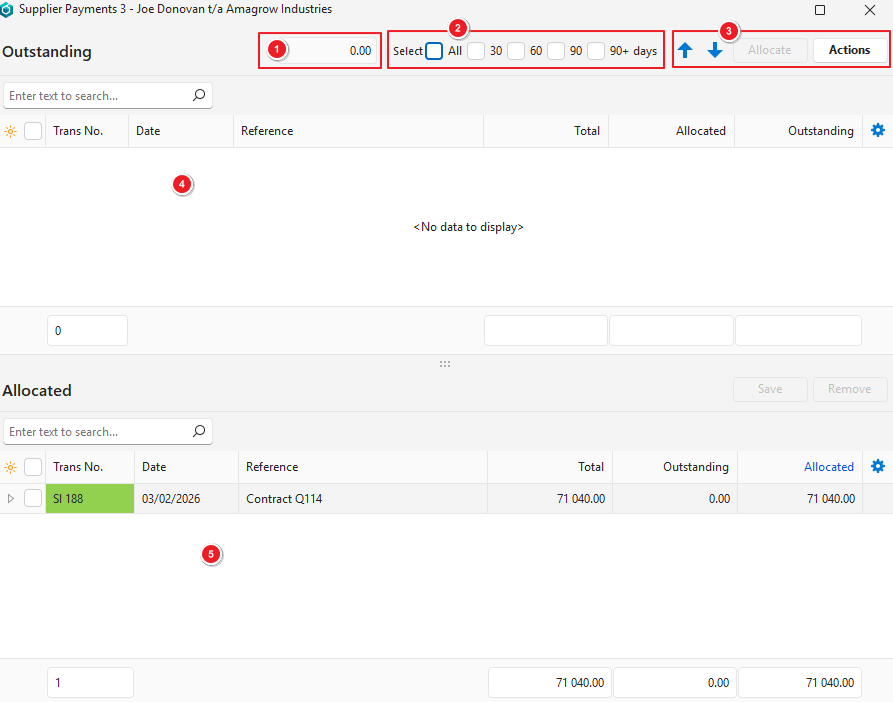
Buttons Explained
| Button | Description |
|---|---|
| Top Row | |
| Arrows | Navigates between transactions and shows the allocations for the transaction it scrolled to. ⚠️ Warning: When you close the allocation popup, the transaction you scrolled to stays open. |
| Allocate | Allocates the selected entries. Each entry is allocated the smaller outstanding amount of the two transactions. For example, allocating a receipt of 500 to an invoice of 1 000 allocates 500.
|
| Actions |
|
| Allocation Section | |
| Save | Saves the allocations. Needed only if you changed the allocation amounts. |
| Remove | Removes the selected allocations. |
Filters Explained
| Filter | Description |
|---|---|
| All | If checked, selects all the filters and displays all the transactions. All the transactions also appear if all the filters are unchecked. |
| 30 | Displays transactions dated in the previous month. |
| 60 | Displays transactions dated two months ago. |
| 90 | Displays transactions dated three months ago. |
| 90+ days | Displays transactions dated four or more months ago. The 30, 60, 90 and 90+ days filters can be combined. |
| Currency / Local (radio buttons) | Appear only if the transaction is in a foreign currency. The first shows the transaction’s currency code (e.g. USD).
|
Outstanding Fields Explained
| Field | Description |
|---|---|
| Field Chooser (*) | Lets you add or remove fields. |
| Selection Checkbox | Lets you select entries by checking the box, or deselect them by unchecking it. |
| ID | The system-generated number for the entry. |
| Trans No. | The transaction code and number, colour-coded to match the transaction’s status. |
| Date | The transaction date. |
| Reference | The transaction’s reference. |
| Total | The transaction’s total amount. |
| Allocated | The amount already allocated. |
| Outstanding | The total amount on the transaction that is not yet allocated. |
Allocated Fields Explained
Fields marked in blue (✎) can be edited.
| Field | Description |
|---|---|
| Field Chooser (*) | Lets you add or remove fields. |
| Selection Checkbox | Lets you select entries by checking the box, or deselect them by unchecking it. |
| ID | The system-generated number for the entry. |
| Trans ID | The transaction’s ID number. |
| Trans No. | The transaction code and number, colour-coded to match the transaction’s status. |
| Date | The transaction date. |
| Reference | The transaction’s reference. |
| Total | The transaction’s total amount. |
| Outstanding | The total amount on the transaction that is not yet allocated. |
| Allocated | The amount already allocated. On a foreign currency transaction, editing the amount in one currency converts the other at the allocation’s exchange rate (the currency amount to the local amount, and the other way round). |
 | A submenu, also opened by right-clicking an entry, with this option:
|
Tutorials
These tutorials explain how to allocate transactions.
How to Allocate a Payment
In this example, a payment is allocated to invoices. Credit notes are allocated to invoices the same way. If you open the allocations from an invoice, the list of outstanding entries shows unallocated credit notes or customer receipts.
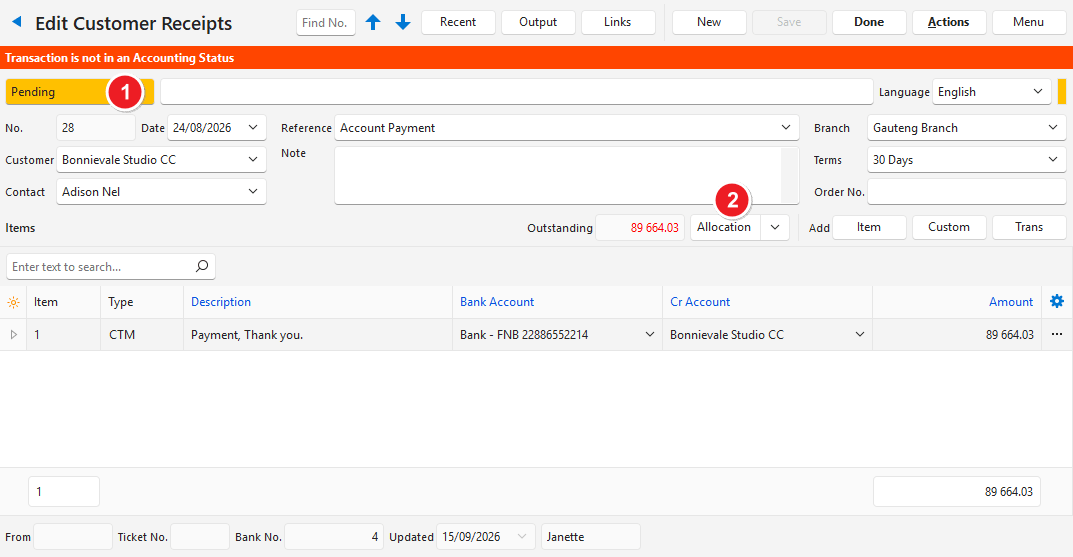
- Ensure the transaction can be edited (the transaction’s Status must allow editing). Change the status if necessary.
- Click Allocation (button) to open the allocations interface.
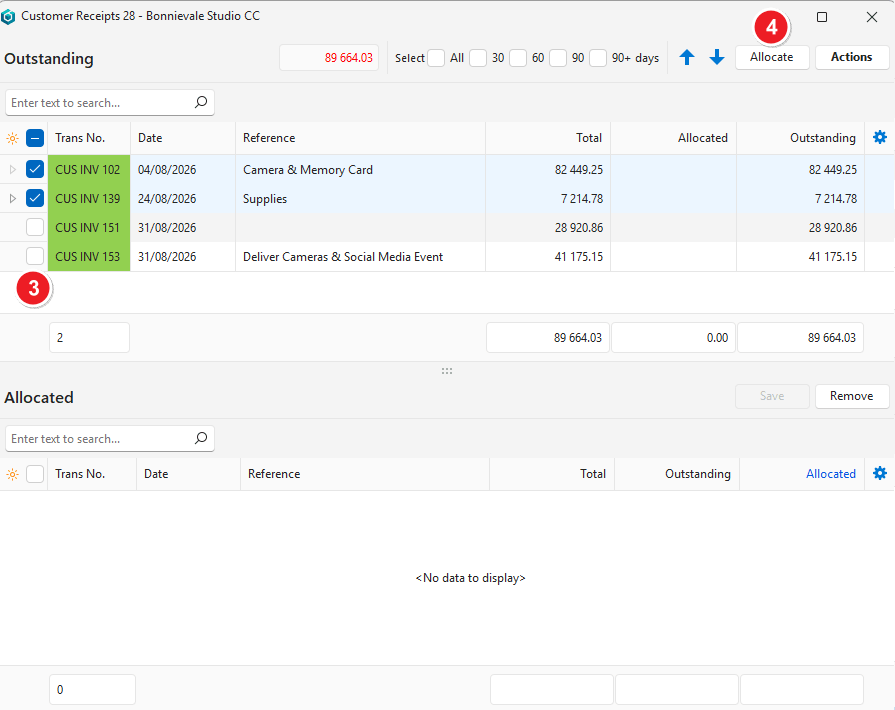
- Check the boxes on the left to select unallocated entries.
- Note: To deselect an entry, uncheck its box.
- Click Allocate (button).
- Note: Each invoice is allocated the smaller outstanding amount of the invoice and the payment, until the payment is fully allocated.
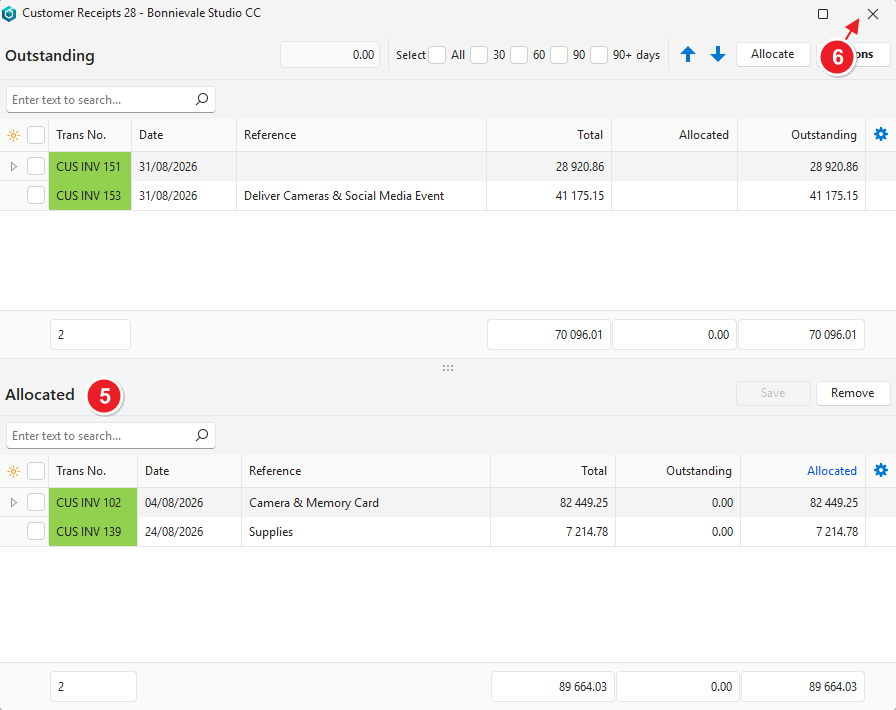
- The invoices that were paid are moved to the Allocated section.
- Close the popup.
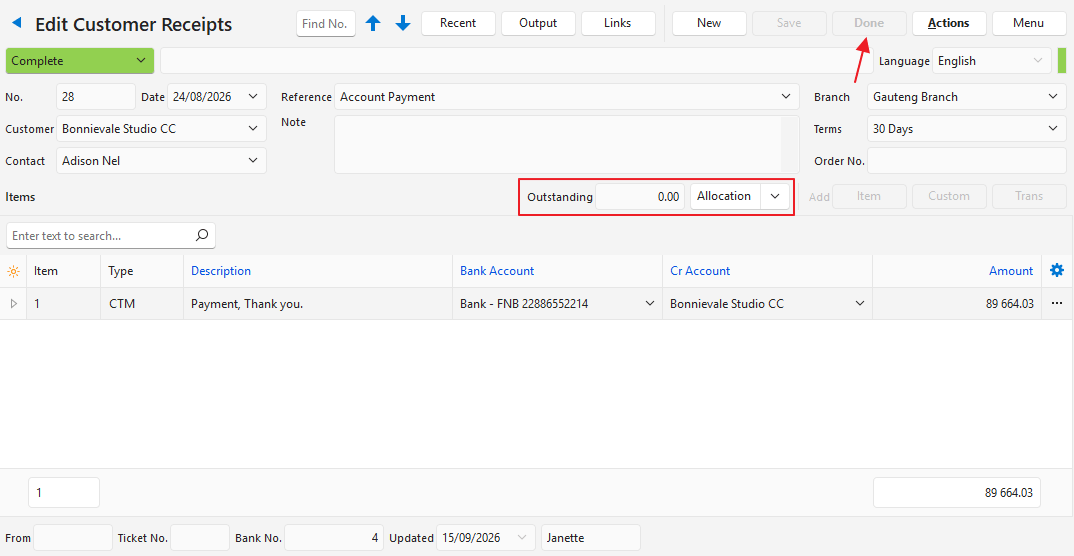
- Complete the transaction as needed (e.g. change the status to complete).
How to Remove an Allocation
If you delete an item from a transaction that was previously allocated, you must also delete the allocation manually.
- From editing a transaction, click Allocation (button).
- In the Allocation section of the popup (at the bottom), check the box next to each entry to remove.
- Click Remove (button).
- Confirm that you want to remove the allocation.
- Close the Allocation popup.
How to Change the Transaction Amount
- This process changes the transaction total to match the allocations.
- The command to update the transaction is also available from the arrow on the Allocation button.
- Ensure the transaction can be edited (the transaction’s Status must allow editing). Change the status if necessary and if you have the required permissions.
- Click Allocation (button) to open the allocations interface.
- Check the boxes on the left to select unallocated entries.
- Note: To deselect an entry, uncheck its box.
- Click Allocate (button).
- Click Actions (button) > Update Transaction to the Allocated Amount.
- Close the popup.
- Complete the transaction as needed.
How to Change the Allocation Amounts
The unallocated portions move back to the Outstanding section, but double-clicking and Allocate (button) do not work on those amounts. Either edit the amount in the Allocation section, or remove all the allocations and allocate the entries again.
- Ensure the transaction can be edited (the transaction’s Status must allow editing). Change the status if necessary and if you have the required permissions.
- Click Allocation (button) to open the allocations interface.
- Check the boxes on the left to select unallocated entries.
- Note: To deselect an entry, uncheck its box.
- Click Allocate (button).
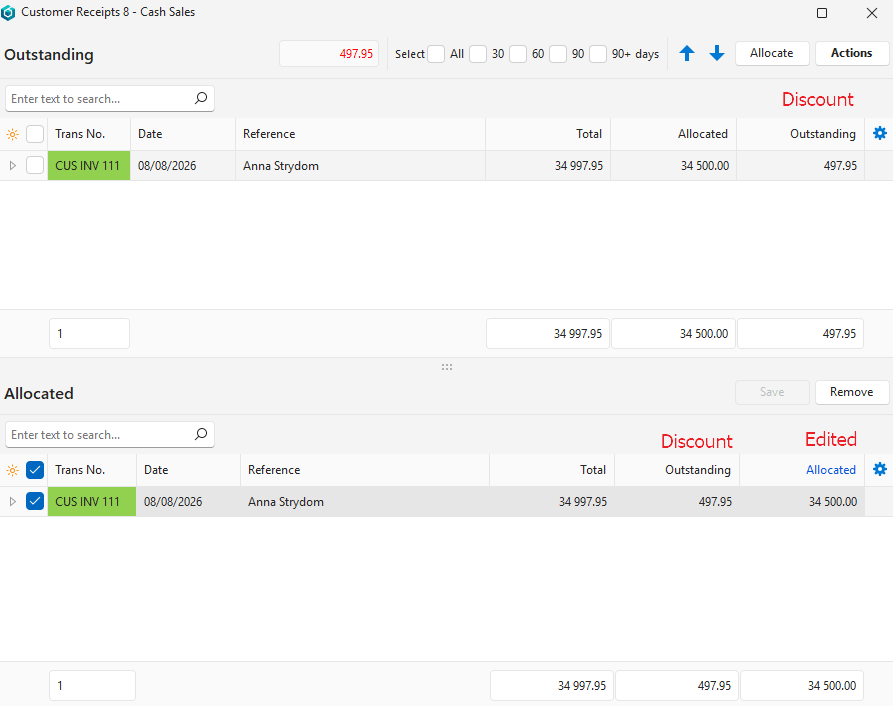
- Enter the new amounts in the Allocated column. For example, if a customer receives a settlement discount, reduce each payment by the discount amount.
- Click Save (button).
- Close the popup.
- Complete the transaction as needed.
- Create an additional transaction for the discount (that is, the amount outstanding).
Foreign Currency Allocations Explained
- Foreign currency allocations are done the same way as local currency allocations.
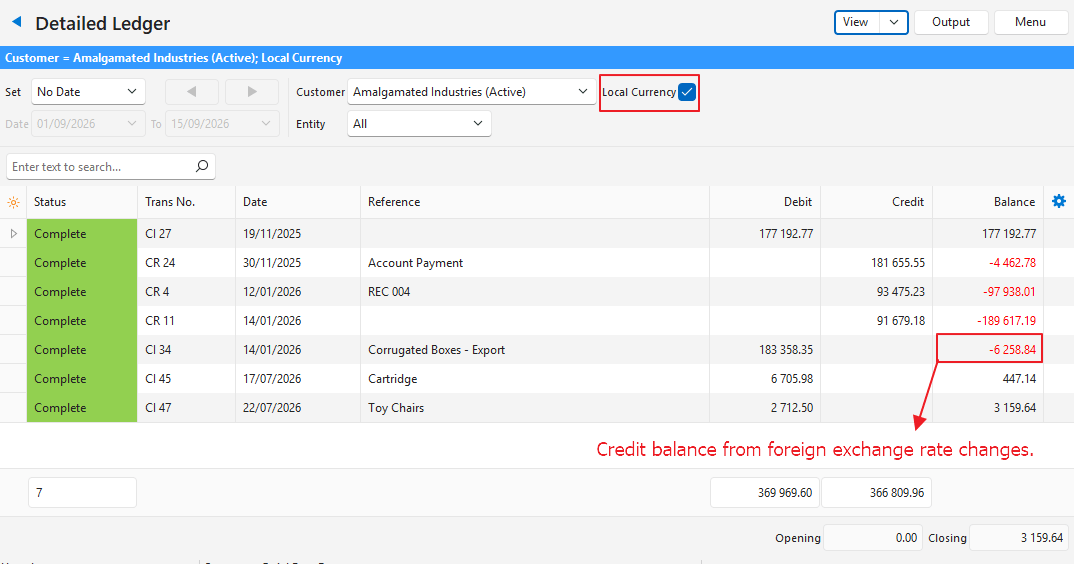
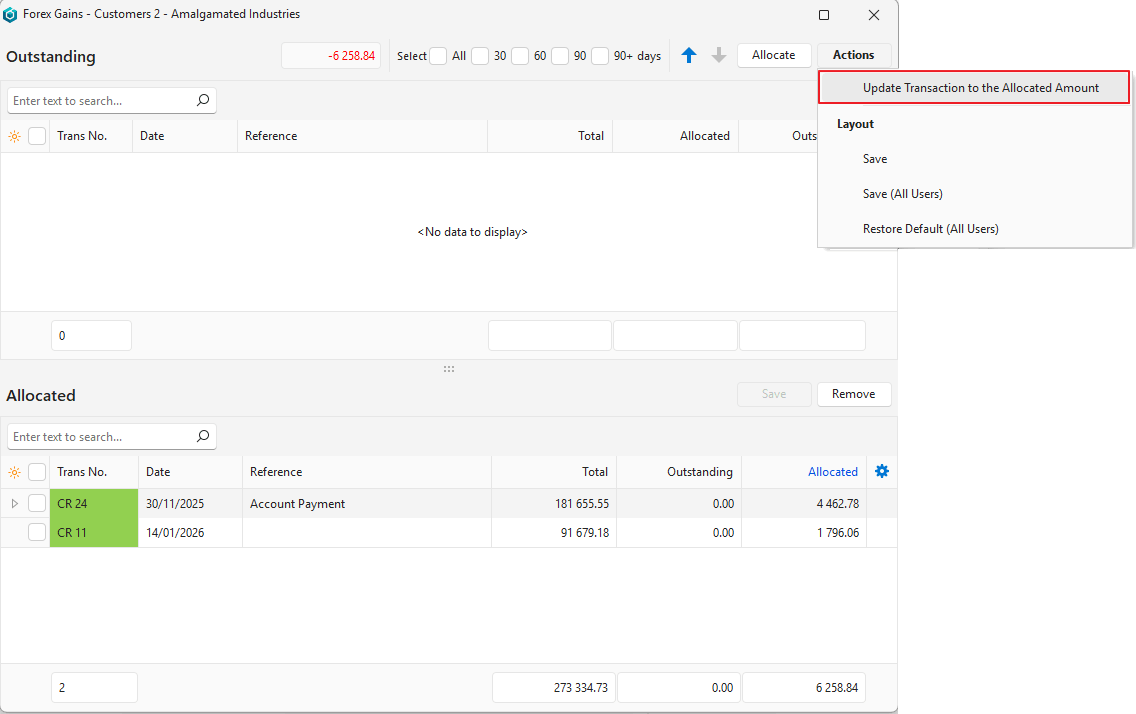
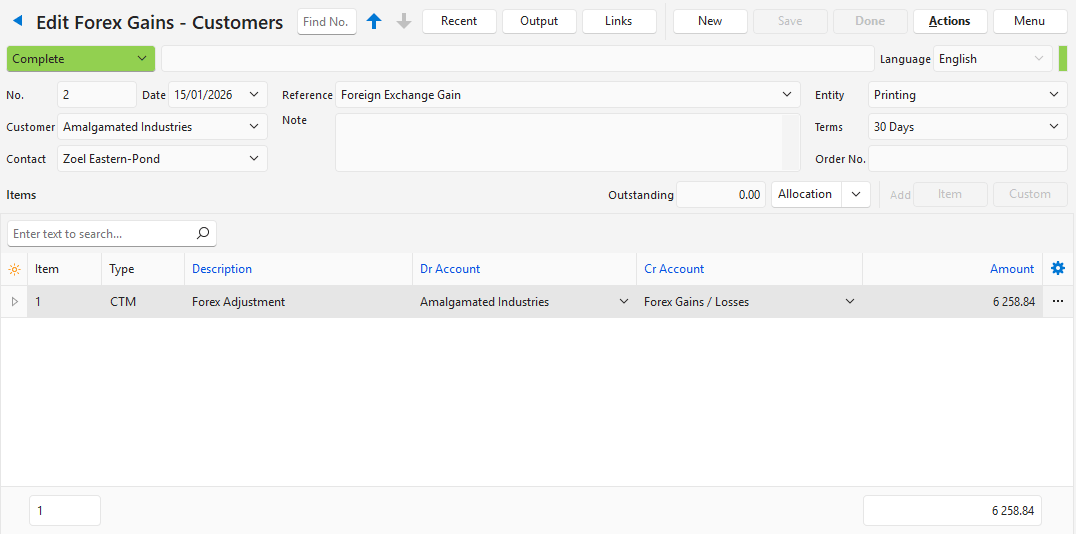
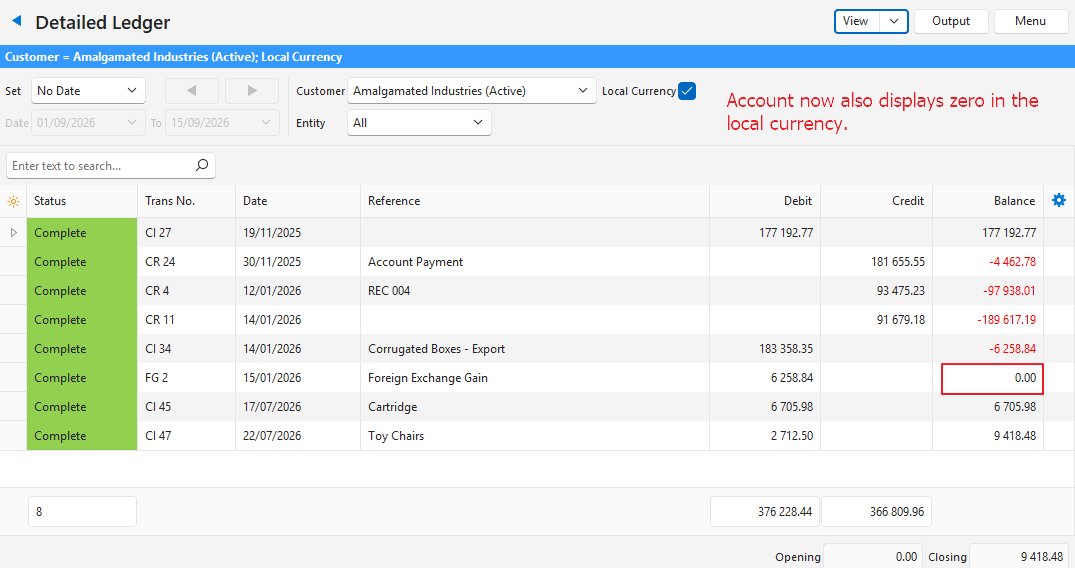
- When both transactions are in the same foreign currency, Allocate allocates the smaller currency amount, with the smaller of the two local amounts. The exchange rate difference stays outstanding in the local currency only (with a currency amount of 0), so you can allocate it with a foreign exchange gain or loss transaction in the local currency.
- For example, with ZAR as the local currency, an invoice of 1 150 USD at a rate of 0.05 is 23 000 ZAR, and a receipt of 1 150 USD at a rate of 0.06 is 19 166.67 ZAR.
- Allocating the receipt to the invoice allocates 1 150 USD and 19 166.67 ZAR.
- The invoice keeps 3 833.33 ZAR outstanding, which you allocate with a foreign exchange loss transaction.
- A foreign exchange gain or loss transaction in the local currency leaves the outstanding list once it is fully allocated.
- Allocations made before Ver 2.5.0 keep their amounts. To allocate them by these rules, remove them and allocate again.
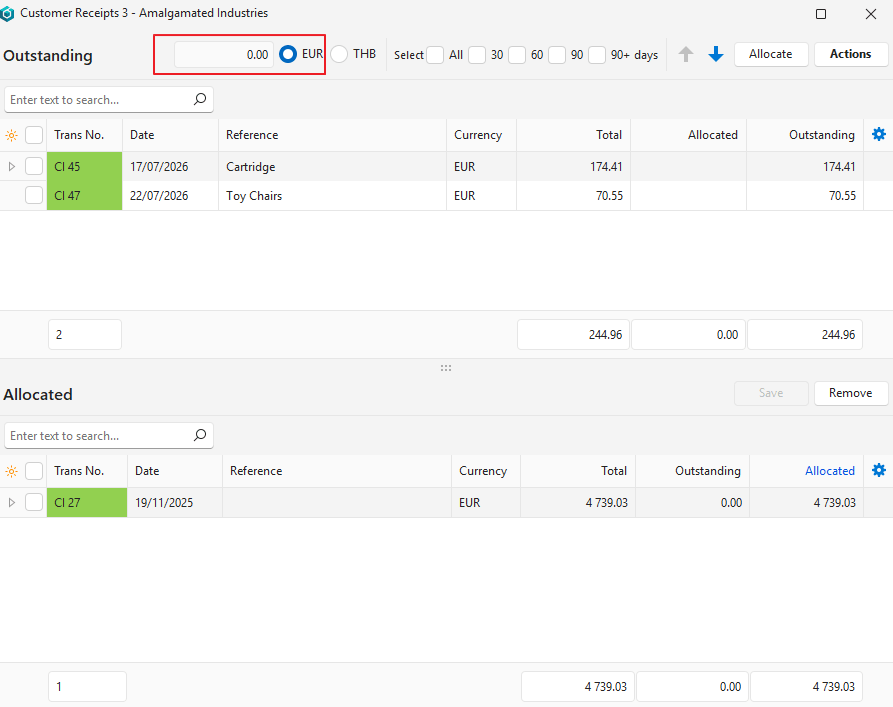
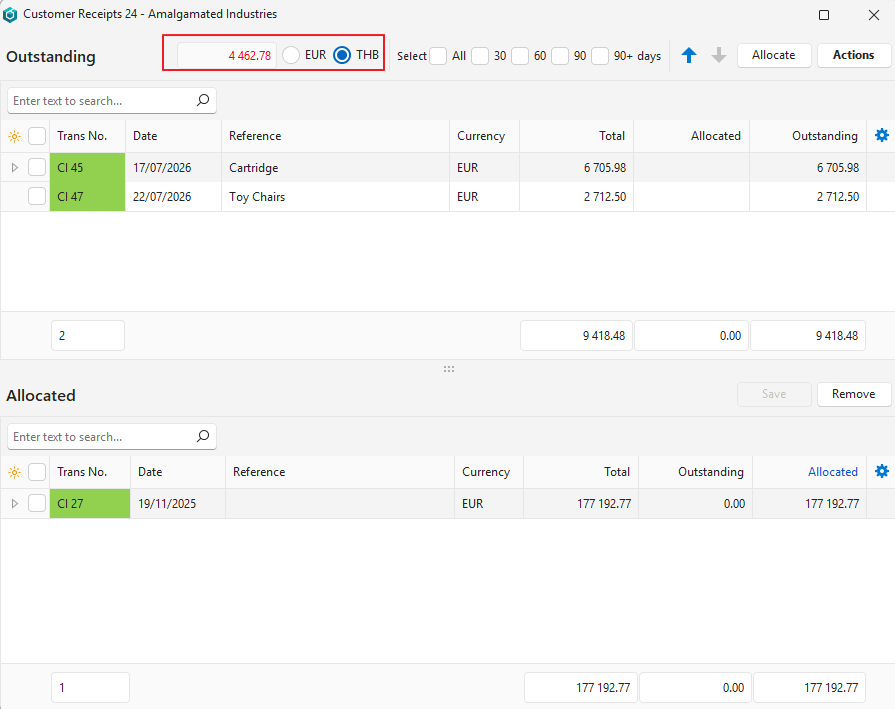
- The interface lets you switch between the local and foreign currency using the radio buttons on the top row.
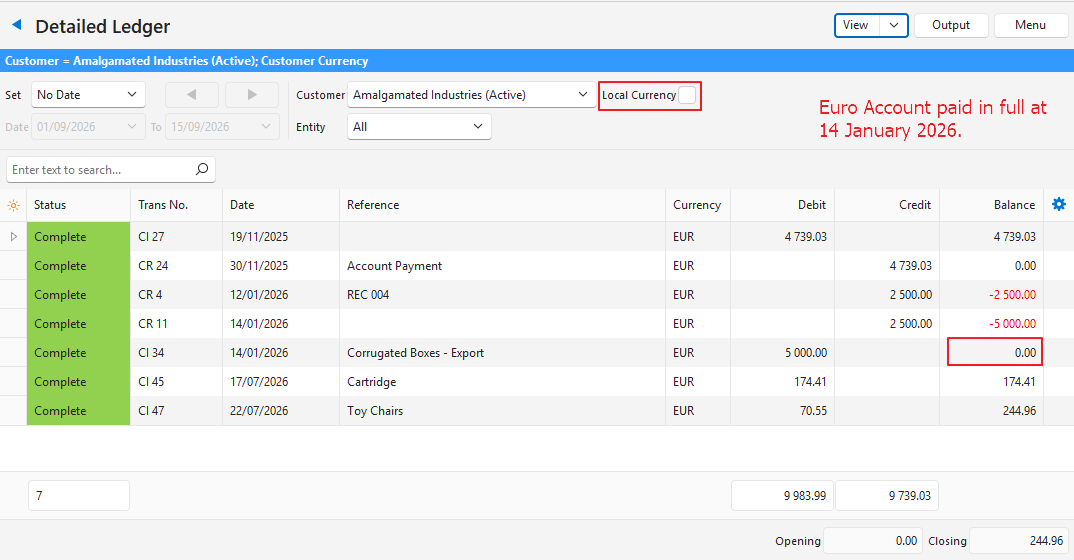
- Allocations in the foreign currency usually do not match allocations in the local currency due to exchange rate fluctuations.
- The transaction’s foreign currency may show an underpayment while showing an overpayment in the local currency and vice versa.
- Always use the transaction’s currency (that is, the foreign currency) to determine if an amount is still due.
- The currency displayed in the Currency column is the transaction’s currency, not the allocation’s currency.
- See Ledger Transaction Tutorials for how to resolve outstanding amounts in the local currency.
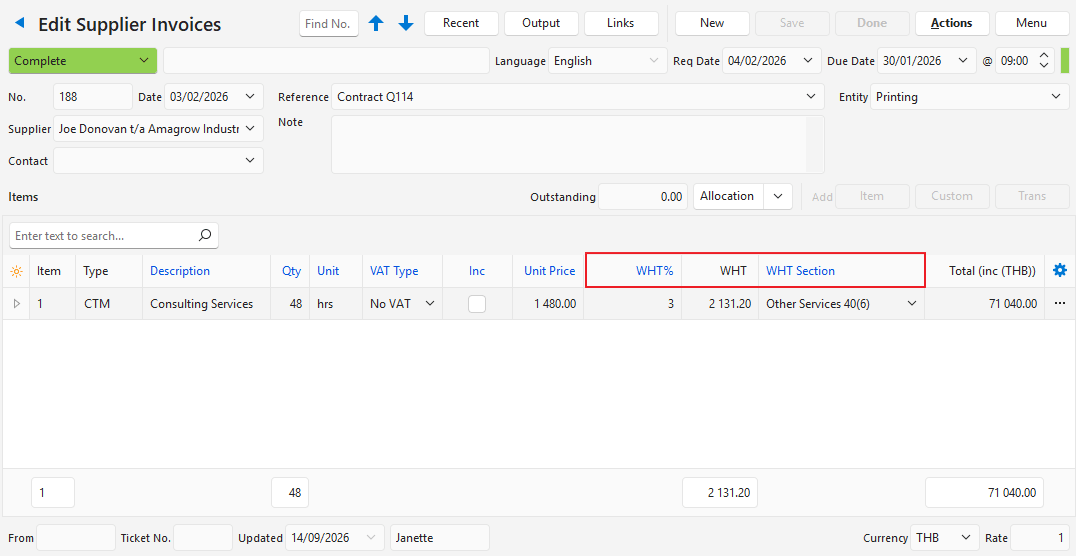
Withholding Tax Allocations Explained
See WHT Tutorials for more information.
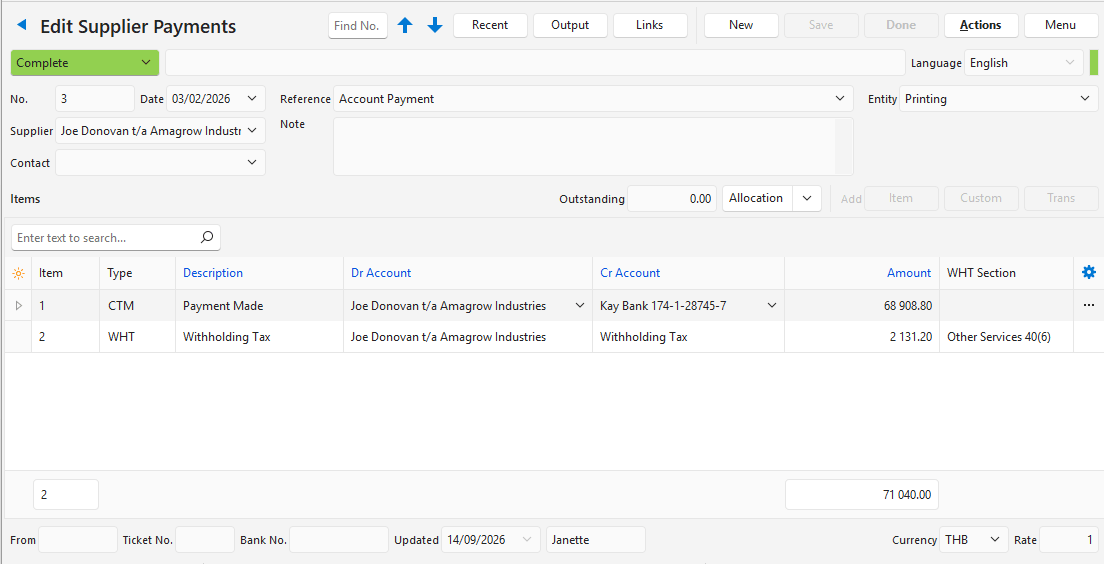
- Create a customer receipt or supplier payment as usual.
- Allocate the amount to an invoice that had the withholding tax filled in.
- On the Allocations popup, click Actions (button) > Update Withholding Tax (WHT).
- Note: If you forget this step, the withholding tax transaction is not created.
- The payment is split into the amount that must be paid and the tax that must be withheld.