
Multi-level BOM Estimates
A Multi-level BOM estimate is built as a tree of assemblies with their materials, tasks and outwork.
Overview
- Each Estimate Type has a Model, which is one of these:
- Standard: The estimate opens in the standard estimate screen, with parts, groups, impositions and several quantities.
- Multi-level BOM: The estimate opens in the BOM window described on this page.
- A Multi-level BOM estimate shows the estimate as a tree. The top of the tree is the Root. Under it are Assemblies (ASM), each with its materials, tasks and outwork, and Assemblies can contain other Assemblies, up to 25 levels deep.
- Material lines can be any of these material types:
- Materials (MAT)
- Substrate Sheets (SHT)
- Substrate Reels (REL)
- Substrate Square Metres (SQM)
Task lines are TSK and outwork lines are OWK.
- A line can be linked to an item in the item master, or it can be a custom line that is not (yet) an item.
- Each line can override the quantity, the prices and the Supplier (materials and outwork) or the Cost Centre (tasks) of its item. The totals are recalculated through all the levels.
- The estimate has a single quantity: the Qty of the transaction item.
- The Costs tab adds up the materials and routing of the whole tree. Production and purchasing use these lines.
An item cannot be added to its own BOM, directly or through a sub-assembly. BOS refuses the change and shows a "BOM cycle" message, and nothing is added.
Setting Up
- Set the Estimate Type's Model to Multi-level BOM on the Estimate Types Edit View.
- Note: The Model cannot be changed once the Estimate Type is used on estimates.
- A Multi-level BOM Estimate Type has no Parts tab.
- The items you can add are Assemblies that have a BOM or routing (materials, tasks or outwork on the item's Costing tab), materials, tasks and outwork. Costing items cannot be added. (A Standard estimate is the opposite: Costing items can be added, but Assemblies cannot.)
- As on a Standard estimate, the Estimate Type's Item Category – Costings setting or its Groups limit the items you can select.
- Item values come from the item master:
- Materials take their Cost Price, and their waste, round up and minimum quantity from the item's Estimate Attributes.
- Tasks and outwork take their values from the item's Estimate Attributes.
- To use estimates in a transaction, add the Transaction Type setting Estimating > Enable Estimating, as for Standard estimates.
BOM Window
- To open this window, create or edit a transaction (for example, a Quotation) that has estimating enabled. Click Estimate (button) and select a Multi-level BOM Estimate Type, or right-click an existing estimate item and select Open Estimate.
- The window opens in place of the transaction, as the standard estimate screen does.
- If you do not have Edit access to the transaction, or the transaction cannot be changed, you can open the window and view the estimate, but you cannot add, edit, move or delete lines.
The window has these areas:
- The buttons and header at the top.
- Three tabs: BOM, Costs and Overrides.
- The totals below the tabs.
- The Summary and the price fields of the estimate on the right.
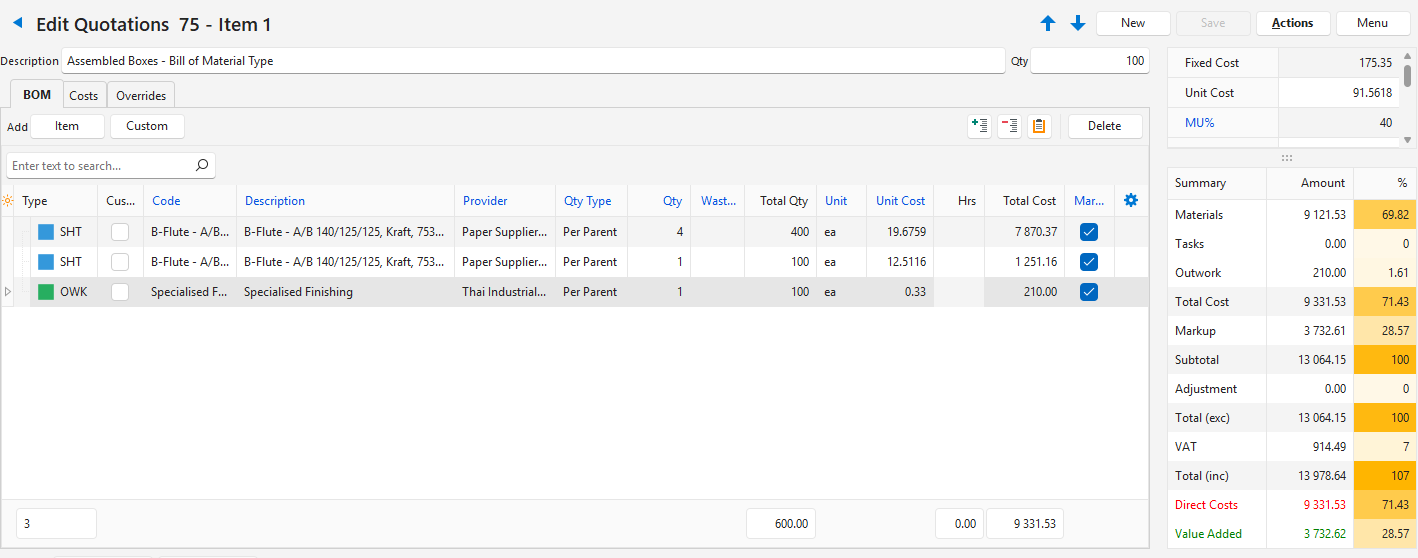
Buttons Explained
| Button | Description |
|---|---|
| Back To Trans Item (icon) | Saves any changes and goes back to the transaction. |
| Arrows | Saves any changes and goes to the previous or next estimate item on the same transaction. An estimate item of a Standard Estimate Type opens in the standard estimate screen. |
| New | Adds a new estimate item to the transaction, with the Estimate Type you select from the dropdown list, and opens it. Hidden if you do not have New access. |
| Save | Saves any changes and recalculates the estimate. |
| Actions |
|
| Menu | Customise Qty Fields: Shows, hides and moves the price fields on the right. |
Fields Explained
| Field | Description |
|---|---|
| Title | Shows the transaction, its number and the number of the estimate item on it (for example, Item 2). |
| Description | Enter a description. This description appears as the item on the transaction. |
| Qty | Enter the quantity. The whole tree is calculated for this quantity. |
| Updated | The user who last updated the estimate item, and the date. |
Totals Explained
| Field | Description |
|---|---|
| Total Cost | The total cost of all the lines of the tree. |
| Markup Cost | The cost of the lines with the Markup checkbox checked. The markup of the estimate is applied to this cost. |
| No Markup Cost | The cost of the lines with the Markup checkbox unchecked. |
| Production rows kept with qty 0 (linked to PO / GI) | The number of lines on the Costs tab that are no longer in the BOM but are linked to a purchase order or a goods issue. These lines are kept with a quantity of 0. Hidden when there are none. |
Summary and Prices Explained
- The Summary breaks down the estimate's total in the same way as on a Standard estimate. See Fields Explained: Summary.
- The price fields work as on the Prices tab of a Standard estimate, for the single quantity of the estimate.
- If the Fix checkbox is checked, you can edit Fixed Sell and Unit Sell, and the MU% is calculated.
- If the Fix checkbox is unchecked, you can edit the MU%, and the sell prices are calculated.
- To show more price fields (for example, VAT Type, Total (inc) or GM%), right-click the fields or select Menu (button) > Customise Qty Fields.
BOM (tab)
- The tree is always shown fully expanded after a change. Lines are recalculated as soon as they are saved.
- Fields marked in blue (✎) can be edited. Some fields cannot be edited on some line types (for example, an Assembly has no Unit Cost, because its cost is the total of the lines below it).
Buttons Explained
| Button | Description |
|---|---|
| Item | Opens the Select Items popup to add items from the item master.
An Assembly is added with one level of its BOM and routing. Assemblies inside it appear as material lines, which you can expand. |
| Custom | Opens the Add Custom Item popup to add a line that is not an item, in the same place as Item. |
| Delete | Deletes the selected lines, if confirmed. Select several lines with Ctrl + left-click or Shift + left-click. An Assembly is deleted with all the lines below it. Unavailable if you do not have Delete access. |
| Expand (icon) | Expands every level of the tree, so that all the lines are shown. The data does not change. |
| Collapse (icon) | Collapses the tree, so that only the top-level lines are shown. The data does not change. |
| Show/Hide Notes (icon) | Shows or hides each line's note below the line. |
Filter Explained
| Filter | Description |
|---|---|
| Find | Enter text to find the lines that contain it. |
Fields Explained
Fields marked in blue (✎) can be edited.
| Field | Description |
|---|---|
| Field Chooser (*) | Add or remove columns. |
| ID | The system-generated number for the line. |
| Type | The line's type:
The footer shows the number of lines. |
| Code | The code of the line, from the item. |
| Description | The description of the line, from the item. |
| Qty Type | Select one of these options:
|
| Qty | Enter the quantity. |
| Waste % | Enter the waste percentage. Materials and Assemblies only. |
| Total Qty | The calculated quantity of the line for the whole estimate.
|
| Unit | The unit of the line. |
| Unit Cost | Enter the cost per unit. Unavailable on an Assembly. |
| Fixed Cost | Enter a cost that is added once, whatever the quantity. Unavailable on an Assembly. |
| Hrs | The total hours of a task: the setup hours plus the run hours. The footer shows the total. |
| Total Cost | The cost of the line, after the minimum cost and the line's adjustment. For an Assembly, the total of the lines below it (shown for information only). The footer shows the total. |
| Markup | Checkbox. If checked, the estimate's markup is applied to the line's cost. Unavailable on an Assembly. |
| Custom | Checkbox. Checked if the line is a custom line that is not linked to an item. |
| Provider | Select the Supplier of a material or outwork line, or the Cost Centre of a task line. Unavailable on an Assembly. |
| Menu (…) | Click the three dots (…) in the last column, or right-click a line, for these options (options that change the tree are hidden if you cannot edit the estimate):
|
Line Edit Window
- To open this window, double-click a line, or right-click it and select Edit.
- The window shows only the fields of the line's type. For example, the Task fields appear only for a task.
Buttons Explained
| Button | Description |
|---|---|
| Arrows (Prev / Next) | Saves the line and goes to the previous or next line of the tree. |
| Open Linked Item | Saves the line and opens its item. Unavailable on a custom line. |
| OK | Saves the line and closes the window. The estimate is recalculated. |
| Cancel | Closes the window without saving the changes to the current line. Closing the window with X does the same. |
Fields Explained
| Field | Description |
|---|---|
| Type | The line's type. |
| Code | The code of the line. |
| Markup | Checkbox. If checked, the estimate's markup is applied to the line's cost. Hidden on an Assembly. |
| Description | The description of the line. |
| Unit | The unit of the line. |
| Qty | |
| Qty Type | Select one of these options:
|
| Qty | Enter the quantity. |
| Fixed Qty | Enter a quantity that is added once, whatever the quantity above it. |
| Material (materials and Assemblies) | |
| Waste % | Enter the waste percentage. |
| Round Up | Checkbox. If checked, the total quantity is rounded up. |
| Min Qty | Enter the minimum total quantity. |
| Task (tasks) | |
| Cost Centre | Select the cost centre. |
| Rate / Hr | Enter the rate per hour. |
| Setup Hrs | Enter the setup hours. |
| Qty / Hr | Enter the speed as the quantity per hour. |
| Hrs / Qty | Enter the speed as the hours per unit. |
| Min / Qty | Enter the speed as the minutes per unit. |
| Cost (materials, tasks and outwork) | |
| Supplier | Select the supplier. Materials and outwork only. |
| Unit Cost | Enter the cost per unit. |
| Fixed Cost | Enter a cost that is added once, whatever the quantity. |
| Min Cost | Enter the minimum cost of the line. |
| Adj % | Enter an adjustment percentage for the line's cost. |
| Totals | |
| Total Qty | The calculated quantity of the line. |
| Hrs | The total hours. Tasks only. |
| Total Cost | The cost of the line. |
| Note | Enter a note for the line. |
Add Custom Item Popup
To open this popup, click Custom (button), or right-click a line and select Add Custom Item to or Add Custom Item to Root.
Buttons Explained
| Button | Description |
|---|---|
| Add | Adds the custom line. You must enter a Description. Otherwise, the message “Please enter a Description.” appears. |
| Cancel | Closes the popup without adding a line. |
Fields Explained
| Field | Description |
|---|---|
| Add to | Shows the Assembly the line is added to, or Root. |
| Type | Select one of these options:
Only an Assembly can have lines below it. A material, task or outwork line cannot. |
| Code | Enter a code. |
| Description | Enter a description. |
| Unit | Enter the unit. |
| Qty (per parent) | Enter the quantity for each unit of the Assembly above it. |
| Unit Cost | Enter the cost per unit. Unavailable for an Assembly. |
| Fixed Cost | Enter a cost that is added once, whatever the quantity. Unavailable for an Assembly. |
Select Items Popup
- The Item button and the Add Item to options open the same Select Items popup as a Standard estimate. See Add Items Popup.
- A Multi-level BOM estimate has no parts, so you select only the items. The popup stays open, so you can add more items; each item appears in the tree as soon as it is added.
- Change to Similar Item opens the popup as Change to Similar Item. It lists only items of the same kind as the line, and you select one item with Select (button).
Costs (tab)
- The Costs tab lists the materials and routing of the whole tree, added up. Production and purchasing use these lines.
- The lines are built from the tree:
- Materials are added up by item and price.
- Tasks and outwork are added up by item.
- Each custom line has its own row.
- The routing lists the lowest level first.
- When the tree changes, the existing rows are updated and keep their Status. A row that is no longer in the tree but is linked to a purchase order or a goods issue is kept, with a quantity of 0.
- Only the Status can be edited. The Status column appears only if the Transaction Type setting Estimating > Enable Estimating is Production.
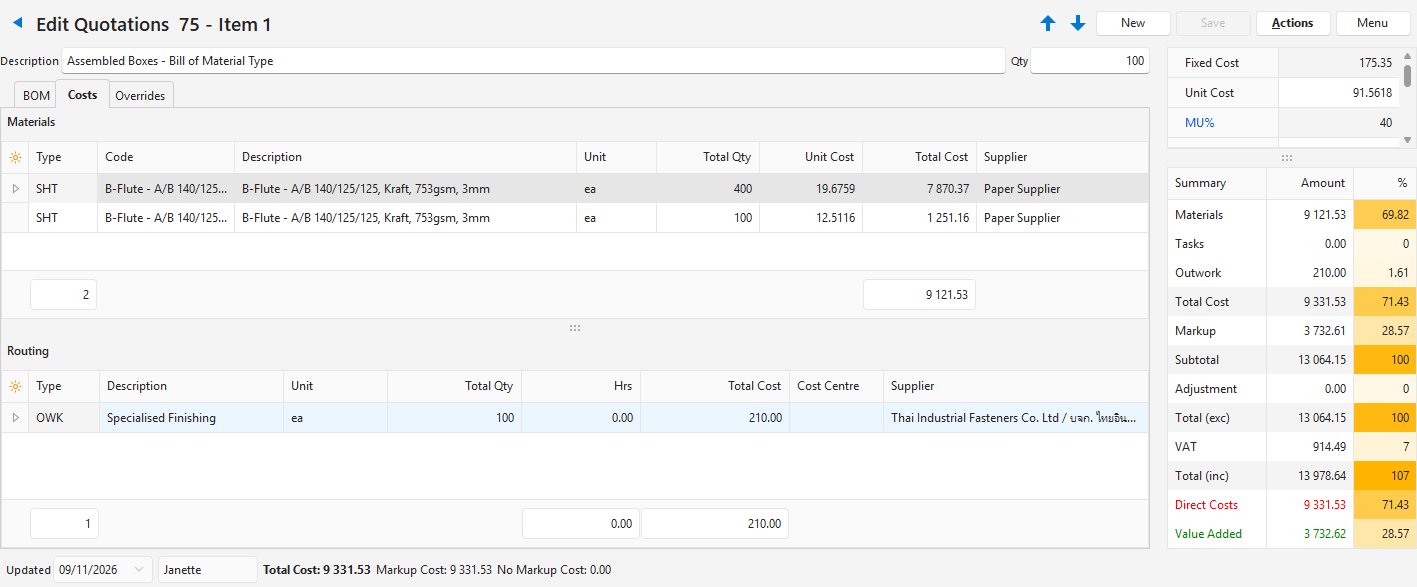
Materials Section
Fields Explained
| Field | Description |
|---|---|
| Field Chooser (*) | Add or remove columns. |
| Status | Select the production status of the line. |
| Type | The material's type. |
| Code | The item's code. |
| Description | The item's description. |
| Unit | The unit. |
| Total Qty | The total quantity of the material in the whole tree. |
| Unit Cost | The cost per unit. |
| Total Cost | The total cost. |
| Supplier | The supplier. |
Routing Section
Fields Explained
| Field | Description |
|---|---|
| Field Chooser (*) | Add or remove columns. |
| Status | Select the production status of the line. |
| Type | TSK (task) or OWK (outwork). |
| Description | The description. |
| Unit | The unit. |
| Total Qty | The total quantity. |
| Hrs | The total hours. |
| Total Cost | The total cost. |
| Cost Centre | The cost centre of a task. |
| Supplier | The supplier of outwork. |
Overrides (tab)
- The Overrides tab lists the linked lines with values that differ from the item master (for example, the code, description, prices, parameters such as waste or speed, quantity or supplier). Custom lines are not listed.
- A warning icon appears on the tab while there are any.
- A value that differs is bold, and the estimate's value is red.
- Double-click a row to show its line on the BOM tab.
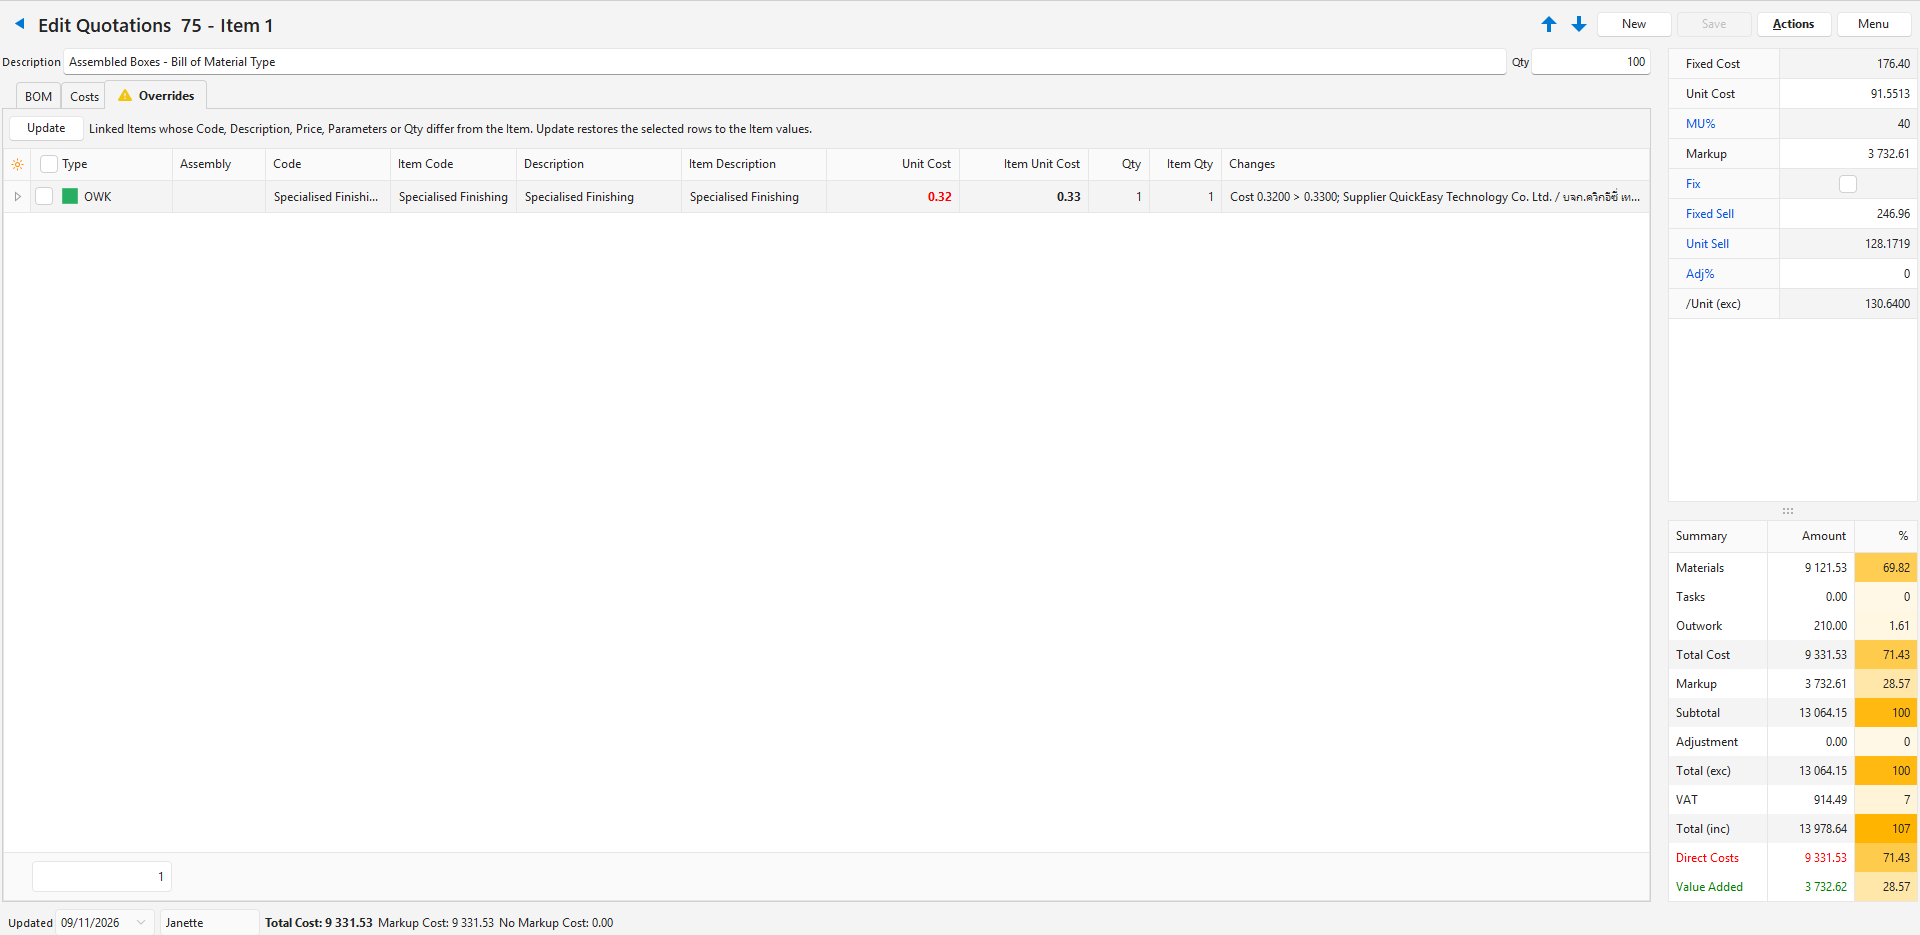
Button Explained
| Button | Description |
|---|---|
| Update | Sets the selected rows back to the item master values (code, description, price, parameters and quantity), if confirmed. Press Ctrl + A to select all the rows. A message shows how many lines were updated. |
Fields Explained
| Field | Description |
|---|---|
| Field Chooser (*) | Add or remove columns. Each value has two columns: the estimate's value and the item master's value (for example, Supplier and Item Supplier). |
| Type | The line's type. |
| Assembly | The path of Assemblies above the line. |
| Code | The line's code in the estimate. |
| Item Code | The item's code in the item master. |
| Description | The line's description in the estimate. |
| Item Description | The item's description in the item master. |
| Unit Cost | The line's unit cost in the estimate. |
| Item Unit Cost | The item's unit cost in the item master. |
| Qty | The line's quantity in the estimate. |
| Item Qty | The quantity on the Assembly item's BOM. |
| Changes | Lists what differs, with the estimate's value and the item master's value (for example, Fixed Cost 10 > 12). |
Create Items From BOM Popup
- To open this popup for the whole BOM, click Actions (button) > Create Items from BOM. To open it for one line and the lines below it, right-click the line and select Create Item.
- The popup lists the custom lines and the linked Assemblies with changed lines.
- Items are created from the lowest level up:
- A custom material becomes a material item, with its cost as the Cost Price.
- A custom task or outwork line becomes an item when it is at the Root or when you create it on its own. Below an Assembly, it stays a custom routing line of the Assembly item.
- A custom Assembly becomes an Assembly item, with the BOM and routing of the lines below it.
- Each line is then linked to its new item. The items' Estimate Attributes are filled in where the attribute set is set up.
Buttons Explained
| Button | Description |
|---|---|
| Create Items | Creates and updates the items, then lists the result in the Result section. Unavailable when there is nothing to create. |
| Close | Closes the popup. If items were created, the estimate is recalculated. |
Fields Explained
| Field | Description |
|---|---|
| Items to create | |
| Type | The line's type. |
| Code | The line's code. |
| Description | The line's description, indented by level. |
| Kind | One of these:
|
| Action | For a changed Assembly, select one of these options:
|
| Result | |
| Description | The line's description. |
| Item Code | The code of the item created or updated. |
| Result | What was done (for example, Created, Created (new Assembly Item), Updated (Item BOM) or Skipped). |
Copying and Deleting
- When a transaction item with a Multi-level BOM estimate is copied, the copy gets its own tree. Changing one does not change the other.
- When the transaction item is deleted, its tree and its Costs lines are deleted too.
How to Add a Multi-level BOM Estimate to a Transaction
The Estimate Type's Model must be Multi-level BOM. See Estimate Type Tutorials.
- Create or edit a transaction (for example, a Quotation).
- Click Estimate (button) and select a Multi-level BOM Estimate Type from the dropdown list.
- Note: The BOM window opens.
- Description = Enter a description for the estimate. It appears on the transaction as the item.
- Qty = Enter the quantity.
- Add items and custom lines to the tree.
- Change the lines as needed.
- Set the prices on the right (for example, MU%, or check Fix and enter Unit Sell).
- Click Save (button).
- Click Back To Trans Item (icon) to return to the transaction.
How to Add Items to the BOM
- On the BOM tab, select the Assembly to add the items to. To add them at the top of the tree, right-click any line and select Add Item to Root instead.
- Note: If you select a line that is not an Assembly, the items are added next to it.
- Click Item (button).
- Select one or more items and click Add (button).
- Note: The items appear in the tree. An Assembly is added with one level of its BOM and routing.
- Add more items, or close the popup.
How to Add a Custom Line
- On the BOM tab, select the Assembly to add the line to (or right-click a line and select Add Custom Item to Root).
- Click Custom (button).
- Type = Select one of these types:
- ASM
- MAT
- TSK
- OWK
- Code = Enter a code.
- Description = Enter a description.
- Unit = Enter the unit.
- Qty (per parent) = Enter the quantity.
- Unit Cost and Fixed Cost = Enter the costs (not for an Assembly).
- Click Add (button).
How to Edit a Line
You can also edit the columns marked in blue (✎) directly in the tree.
- Double-click the line on the BOM tab.
- Change the fields as needed, for example:
- The Qty Type, Qty or Waste %.
- The Unit Cost or Fixed Cost.
- The Supplier of a material or outwork line, or the Cost Centre of a task.
- Click the up or down arrow (Prev / Next) to save the line and edit the previous or next line.
- Click OK (button).
- Note: The totals are recalculated through all the levels. The changed values of a linked line appear on the Overrides tab.
How to Change a Line to a Similar Item
- Right-click the line and select Change to Similar Item.
- Select the new item and click Select (button).
- Note: The line's item is replaced. If the line is an Assembly, its lines are rebuilt from the new item.
How to Expand or Collapse an Assembly
- To expand an Assembly that is shown as a material line, right-click it and select Change Material to Assembly. One level of its BOM and routing is added below it.
- To collapse an Assembly into a material line, right-click it and select Change Assembly to Material. Click Yes (button) to confirm. The lines below it are deleted, and the item's cost price is used again.
- To expand or collapse every Assembly, click Actions (button) > Expand All Assemblies or Collapse All Assemblies, and click Yes (button).
How to Move Lines
- To move a line to another Assembly, drag it onto that Assembly. To move it to the top of the tree, drag it onto an empty part of the tree. A line can be dropped only onto an Assembly, and an Assembly cannot be dropped onto a line below it.
- To change the order within an Assembly, right-click the line and select Move Up or Move Down (or press Ctrl + U or Ctrl + D).
- To sort the whole tree, click Actions (button) > Sort BOM.
How to Delete Lines
- Select the lines on the BOM tab.
- Click Delete (button).
- Confirm the deletion on the popup.
- Note: An Assembly is deleted with all the lines below it.
How to Reset Lines to the Item Master Values
- Click Overrides (tab).
- Select the rows to reset (press Ctrl + A to select all of them).
- Click Update (button).
- Click Yes (button) to confirm.
- Note: A message shows how many lines were updated.
How to Create Items From the BOM
- Click Actions (button) > Create Items from BOM. To create items for one line and the lines below it only, right-click the line and select Create Item.
- For each Changed Assembly, select one of these options in the Action column:
- Create new Item
- Update existing Item BOM
- Skip
- Click Create Items (button).
- Note: The Result section lists each item created, updated or skipped.
- Click Close (button).
How to Set the Production Status of Costs Lines
The Status column appears only if the Transaction Type setting Estimating > Enable Estimating is Production.
- Click Costs (tab).
- Status = Select a status for the line.
- Click Save (button).