
General Settings
- Certain settings affect multiple modules. These are the general settings.
- Each setting has a default value. You only need to add a setting to change its default value.
- When you click Add/Update (button), only the settings not yet added to the list appear. However, a checkbox lets you Show All settings.
General Settings Interface
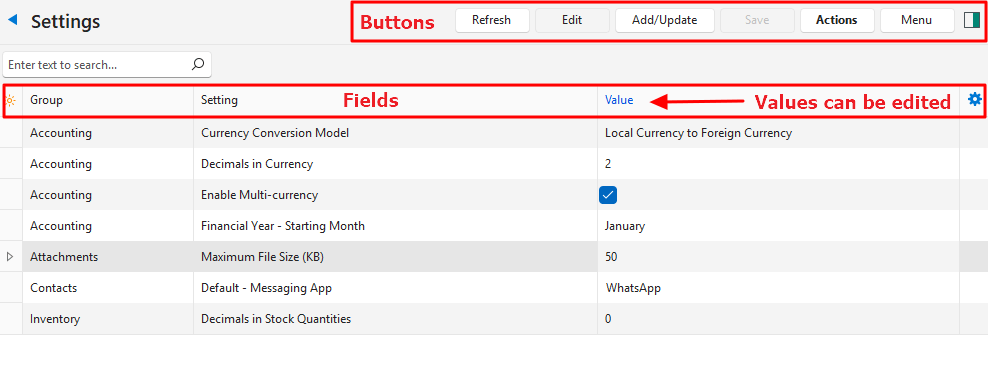
Buttons Explained
| Button | Description |
|---|---|
| Refresh | Refreshes the display. |
| Edit | Edits the fields in the Value column. |
| Add/Update | Adds settings to change their default values. |
| Save | Saves any changes. |
| Actions |
|
| Menu | Layout |
Fields Explained
Fields marked in blue (✎) can be edited.
| Field | Description |
|---|---|
| Field Chooser (*) | Add or remove columns. |
| Editor | The system-generated number of the type of editor (input control) used for the setting’s value. |
| ID | The system-generated number for the entry. |
| ModuleID | The system-generated number for the module. |
| Group | The name of the group to which the setting belongs. |
| Setting | A description of the setting. |
| Value | The value of the setting. |
| Created | The date on which the entry was created. |
| Updated | The date on which the entry was updated. |
| Updated By | The user who last updated the entry. |
 | A submenu with Delete for the entry. Deleted settings revert to their default values and can be added again by clicking Add/Update (button). |
Add/Update Interface Explained
This interface opens when you click Add/Update (button) on the main list of settings.
Buttons and Filters Explained
| Button | Description |
|---|---|
| Add/Update (button) | Adds the selected records to the Settings interface. |
| Show All (checkbox) | Checkbox. If checked, all the available settings appear, including those already added to the Settings interface. |
Fields Explained
| Field | Description |
|---|---|
| Field Chooser (*) | Add or remove columns. |
| ID | The system-generated number for the setting. |
| Group | The group that the setting affects (e.g. Timekeeping, Accounting). |
| Setting | A description of the setting. |
| Default Value | The setting’s default value, which you can change after adding the setting. |
Settings Explained
| Setting | Description | Default |
|---|---|---|
| Accounting > Budget - Enable Financial Position | Checkbox:
See Budgets Interface. | Unchecked |
| Accounting > Currency Conversion Model | The available options are:
See Currency Settings. | Local Currency to Foreign Currency |
| Accounting > Decimals in Currency | The number of decimal places to use when converting currencies. Choose 2 or 3. See Currency Settings. | 2 |
| Accounting > Enable Customer and Supplier Allocations | Checkbox. If checked, payments and credit and debit notes can be allocated to specific invoices. | Unchecked |
| Accounting > Enable Multi-currency | Checkbox:
See Currency Settings. | Unchecked |
| Accounting > Exclude Transaction Types from VAT Reconciliation | Provides a list of Transaction Types when Edit is clicked. Transaction Types can be excluded by moving them from the Available to the Selected section. | None |
| Accounting > Financial Year – Starting Month | Select the month in which your financial (fiscal) year starts from the dropdown list. | January |
| Accounting > VAT Reporting Frequency (Months) | Enter the number of months that a VAT return covers (that is, how often you must report and pay over VAT to the revenue services). | 1 |
| Attachments > Maximum File Size (KB) | The maximum file size that can be uploaded when using the Notes & Attachments feature. If this size is exceeded when uploading an attachment, an error message appears. Captured images (e.g. from a camera) are resized to Max FHD 1920×1080. | 50 KB |
| Contacts > Messaging App | Enter the name of the messaging app. This name appears on forms for you to enter the applicable number. It also appears on the Mobile App, where a button next to the number opens a chat in the messaging app. | |
| Email > Email Stationery | Create a generic email signature for all users. Use the [user_…] data tags ([user_first_names], [user_surname], [user_full_name], [user_email], [user_tel], [user_mobile] and [user_position]), which are filled in with the sending user’s details when an email is generated. The stationery is added wherever an email body template contains the [user_stationery] tag (see Email Templates). If a user has their own Email > Email Stationery user setting, that is used instead. | |
| General > Default - Font name for HTML | Select a font from the fonts installed on the computer. The default font of the HTML editor (notes, email stationery and email bodies): when the editor opens, the toolbar shows this font, and new text, or plain text entered in a new note, is shown in it. The Service Manager Detail tab also uses it. Saved notes and stationery are not changed until they are edited. | Calibri |
| General > Default - Font size for HTML | Enter the default font size of the HTML editor. It works in the same way as Default - Font name for HTML. | 9 |
| General > Enable Rich-Text in Note fields | Checkbox:
Notes written before stay plain text until they are edited in the HTML editor. See Notes and Attachments Panel. | Unchecked |
| General > Locale (not currently active) | Select a country. This setting is not used by BOS yet. | South Africa |
| General > Remove Changelog older than X months (0 = retain all logs) | Enter the number of months to retain logs. Once a day, the first time someone logs in to the database, deletes all the changelog entries that are older than the retention period. If 0, no entries are deleted. | 3 |
| Inventory > Auto Update Stock Price (Weighted Average) | Checkbox:
It can be checked at any time, even when there are already stock transactions. Saved transaction entries are not re-priced, and there is no need to run Rebuild Inventory Report afterwards. See Item Prices Explained. | Unchecked |
| Inventory > Decimals in Stock Quantities | Select from 0 to 4 decimals. | 0 |
| Items > Enable Item Types | Select which item types to enable. The options are:
| Material; Task |
| Items > Enable Qty Types | A dropdown list of all the available quantity types. Click those that you want to use. | Fixed Qty; Job Qty |
| Online Library > Access Key | Enter a key to access the online library. This key is used by an external database to gain access to this database. See Online Libraries. |