
Estimates Interface
Settings
- To use estimates in transactions, add the Transaction Type setting: Estimating > Enable Estimating and select Quotations or Production from the dropdown list in the Value column. Production is usually selected for Work Orders and activates Production Planning functions.
Estimates and Transactions
- Estimates are entries on a transaction. To add one, click the Estimate button, directly above the items on the right.
- The Estimate button opens a dropdown list of Estimate Types. If there is only one Estimate Type, the estimate is added automatically.
- You can add several estimates to a transaction.
- An estimate of a Multi-level BOM Estimate Type opens in the BOM window instead, where the estimate is a tree of Assemblies with their materials, tasks and outwork. See Multi-level BOM Estimates.
- Assembly items can be converted to limited estimates, manually or automatically. After conversion, a single tab shows the materials and routing and lets you edit the quantity and costs.
- Automatically:
- Activate this feature by adding the setting Estimating > Convert Assembly (ASM) Items to Estimates to the applicable Transaction Type and checking the box.
- If the box is checked, all the assembly items added to the transaction are converted immediately.
- Right-click the assembly item on the transaction and select Open Estimate to view and edit the estimate.
- Manually:
- If the automatic feature is disabled, assembly items can be converted to estimates by right-clicking the entry on the transaction and selecting Convert to Estimate.
- After conversion, you can open the estimate from the item’s right-click menu.
- Automatically:
- Estimates can only be added to transactions in the local currency. As a workaround, create an Estimating/Costing transaction and copy it to a transaction that supports foreign currency (e.g. a Quotation). However, the workaround only works with a single quantity.
This page explains the screen that opens when you add an estimate to a Quotation. Fields marked in blue (✎) can be edited.
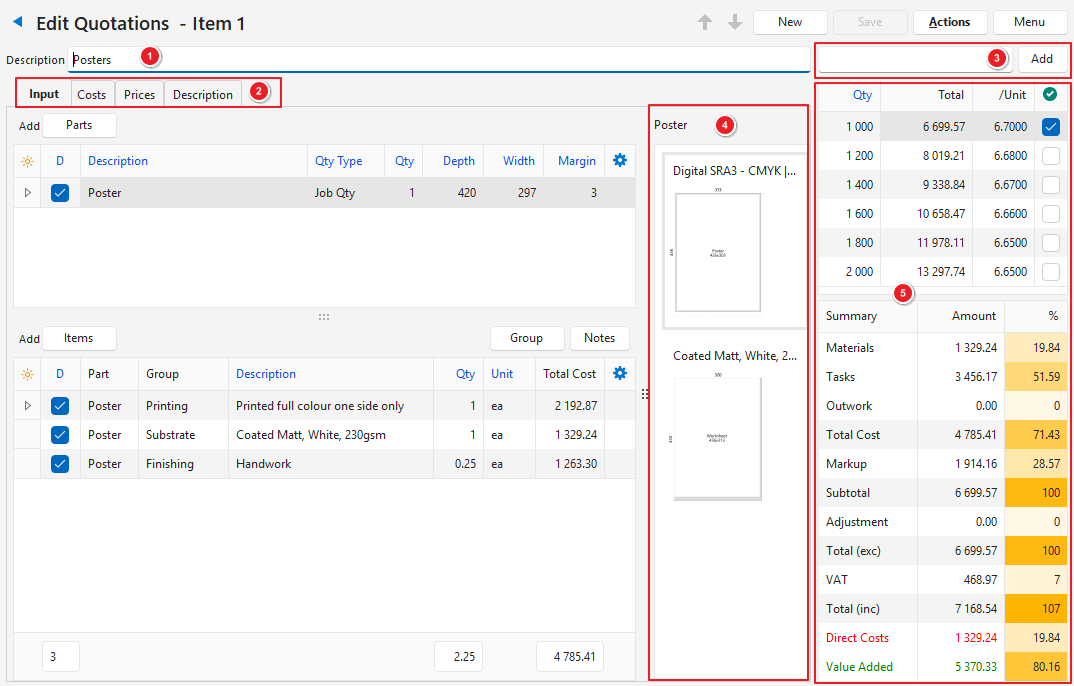
- Description: Appears on the quotation and as a header on the quote letter.
- Tabs: The tabs to complete.
- Quantity: The quantity of items ordered, with an option to add more quantities. The added quantities are inactive quantities. They appear with their prices on the quote letter to show the customer the prices for different quantities.
- Imposition: Can be edited.
- Summary: For information only. The Direct Costs (materials and outwork) appear in red. The Value Added amount, which can recover labour costs and overheads, appears in green.
Buttons Explained
To open this screen, create or edit a transaction (e.g. a Quotation) that has estimating enabled. Click Estimate (button) and select an Estimate Type from the dropdown list.
| Button | Description |
|---|---|
| Arrows | Navigates between the estimates linked to the same transaction (e.g. a Quotation). An estimate of a Multi-level BOM Estimate Type opens in the BOM window. |
| New | Adds an estimate of the Estimate Type you select from the dropdown list. If there is only one Estimate Type, the estimate is added automatically. Hidden in an estimate that was created from an Assembly item (shown as No Estimate Type). |
| Save | Saves any changes. |
| Actions |
|
| Menu | Layout |
Header Explained
| Header | Description |
|---|---|
| Description | Enter a description. This description appears as the entry on the transaction. It also appears as a header on the quote letter. |
| Quantity | Enter more quantities in the field before Add (button). These inactive quantities show customers the pricing options for different quantities. See Summary Section. |
Input (tab)
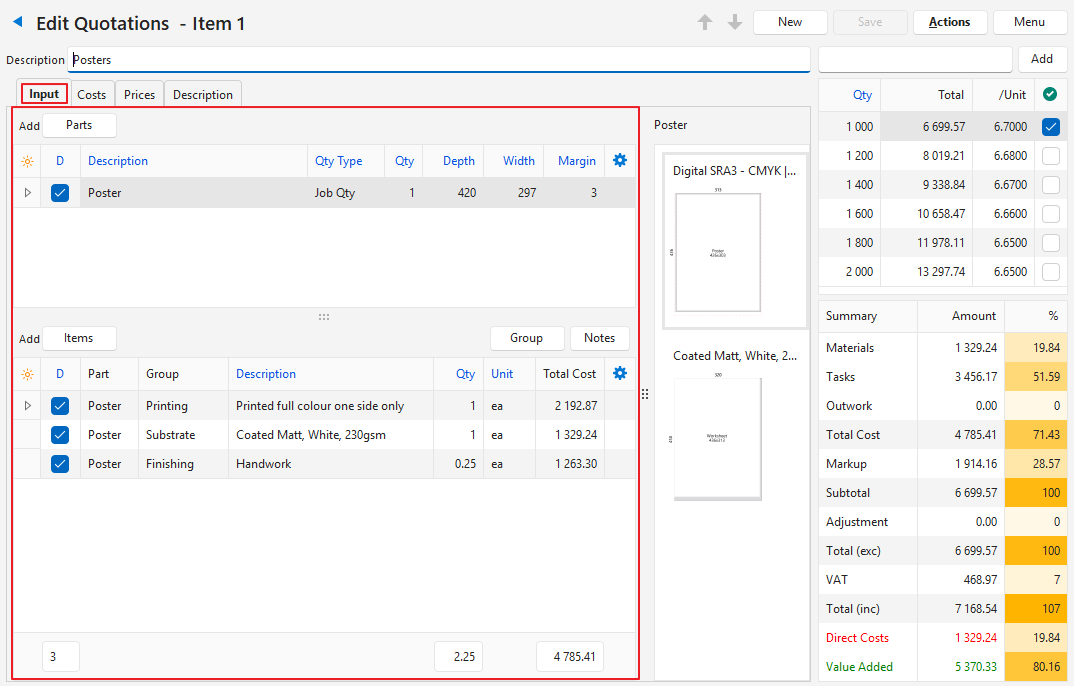
Buttons Explained
| Button | Description |
|---|---|
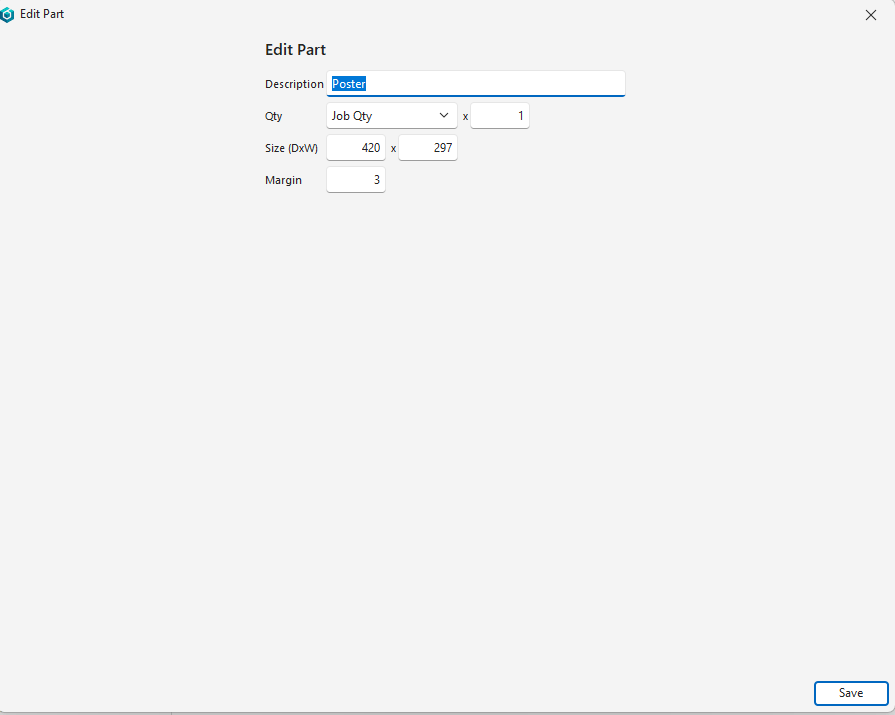
| Parts | Opens a list of parts (items) to add to the estimate. Once a part is selected, a popup lets you change the Description, Quantity and Dimensions. |
| Items | Opens a list of items to add to the estimate. The list depends on the Estimate Type. If the Estimate Type has General > Enable Parts checked, add a part first. Otherwise, the message “Please add a Part.” appears. |
| Group | Groups the items. The options are:
|
| Notes | Shows or hides the notes. |
Parts Popup
The Parts popup appears when you click Parts (button). Select the parts to add. After you select a part and click Add (button), a popup opens for you to edit the part.
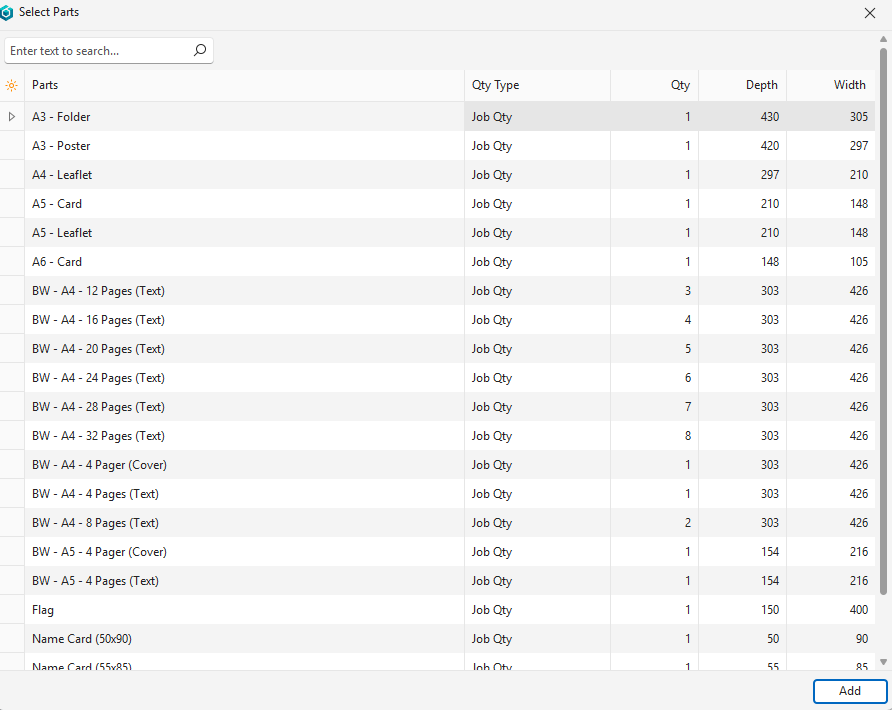
| Button & Fields | Description |
|---|---|
| Add (button) | Adds the selected parts to the estimate. |
| Parts | The part’s description, which you can edit. |
| Qty Type | The part’s Quantity Type. |
| Qty | The quantity of the part that is needed to produce one unit of the product that the estimate is for. |
| Depth | The depth of the part. |
| Width | The width of the part. |
Fields Explained: Parts Section
Fields marked in blue (✎) can be edited.
| Field | Description |
|---|---|
| Field Chooser (*) | Add or remove columns. |
| ID | A system-generated number allocated to the entry. |
| Esttype ID | The system-generated number of the linked Estimate Type. |
| From | The ID of the entry on the Estimate Type. |
| Order ID | A sequential number allocated to each entry. |
| D | Checkbox. If checked, the item’s Description is included on the Quotation. |
| Description | The item’s prefilled Description. |
| Qty Type | The item’s prefilled Quantity Type. |
| Qty | The item’s prefilled Quantity (that is, how many of that part are needed to create one unit of the estimated item). |
| Depth | The item’s prefilled Depth. |
| Width | The item’s prefilled Width. |
| Margin | The item’s prefilled Margin. |
| Created | The date on which the entry was created. |
| Updated | The date on which the entry was last updated. |
| Updated By | The user who last updated the entry. |
 | A submenu with these options (also available by right-clicking the entry):
|
Fields Explained: Items Section
Fields marked in blue (✎) can be edited.
| Field | Description |
|---|---|
| Field Chooser (*) | Add or remove columns. |
| ID | The system-generated number for the entry. |
| Esttype ID | The system-generated number allocated to the linked Estimate Type. |
| Item ID | The system-generated number for the item. |
| Est Group ID | The system-generated number allocated to the item that indicates its group. |
| Order ID | A sequential number allocated to each entry. |
| D | Checkbox. If checked, the description is included on the Quotation (Quote Letter). |
| Part | The name of the part. |
| Group | The name of the group. |
| Description | Prefilled with the Item’s Description. |
| Qty | The item’s prefilled Quantity (that is, how many of that part are needed to create one unit of the estimated item). |
| Created | The date on which the entry was created. |
| Updated | The date on which the entry was last updated. |
| Updated by | The user who last updated the entry. |
| Unit | The item’s Unit. |
| Total Cost | The Total Cost of the item. |
| A submenu with these options (also available by right-clicking the entry):
|
Add Items Popup
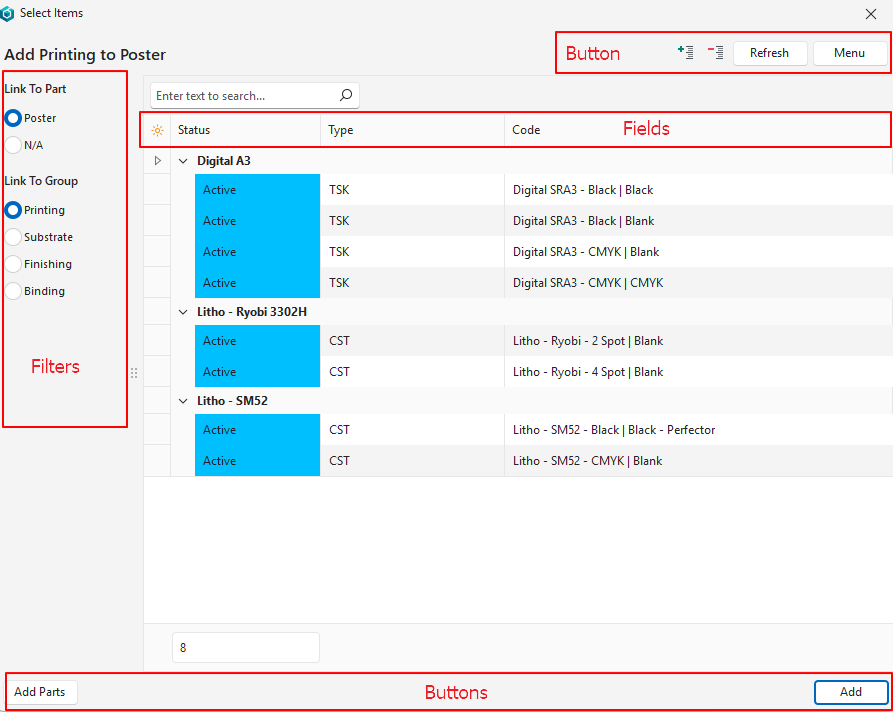
Buttons Explained
| Button | Description |
|---|---|
| Refresh | Updates the list. |
| Menu | Layout |
| Add (bottom right corner) | Adds the selected items to the estimate. |
| Add Parts (bottom left corner) | Opens a list of items, to add more parts to the estimate. |
Filters Explained
| Filter | Description |
|---|---|
| Link To Part | Radio buttons with the names of the parts in the Parts section, or N/A for an unlinked item. You must select an option. |
| Link to Group | Radio buttons that let you link the parts to a group. The available Groups are those created for the Estimate Type. |
Fields Explained
The items that can be added depend on the selected group (that is, the radio button selected under Link to Group).
| Field | Description |
|---|---|
| Field Chooser (*) | Add or remove columns. |
| Status (Item) | The status of the item. |
| Type | The item’s Type. |
| Code | The item’s Code. |
| Categories | The item’s Categories. |
Imposition / Illustration
- A picture of the estimated item.
- To resize the illustration, drag the line between it and the sections on the left.
- To edit the illustration, right-click the part in the Parts section and select View/Edit Imposition, or double-click the illustration.
View/Edit Imposition Interface
Double-click the images to open the imposition interface.
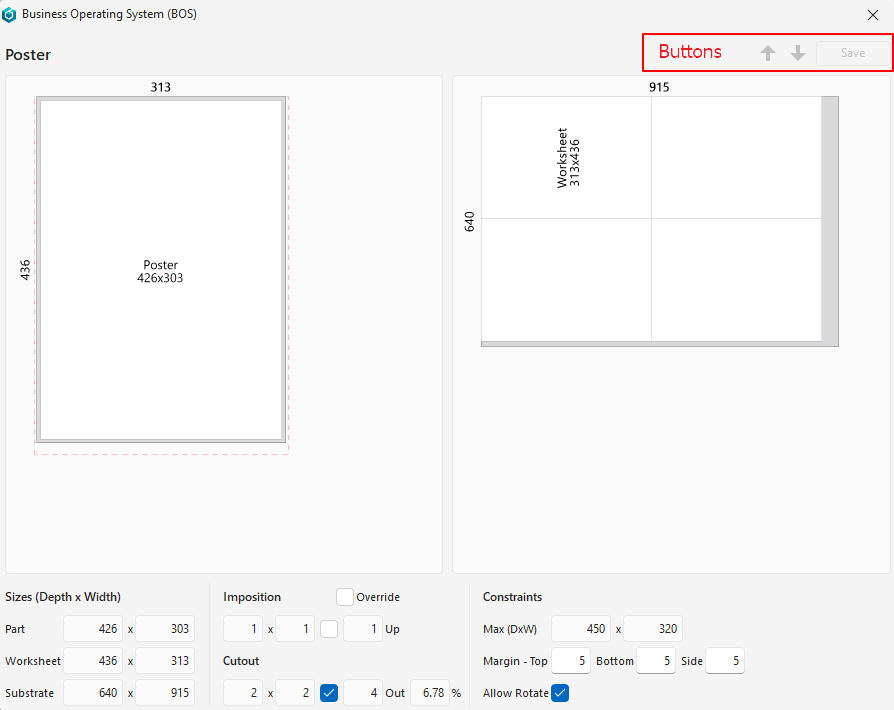
Buttons Explained
| Button | Description |
|---|---|
| Arrows | Navigates between impositions. Greyed out if there are no other impositions. |
| Save | Saves any changes made to the fields below the imposition. |
Fields Explained
| Field | Description |
|---|---|
| Sizes (Depth x Width) | |
| Part | The Depth and Width of the part. |
| Worksheet | The Depth and Width of the worksheet. |
| Substrate | The Depth and Width of the substrate. |
| Imposition | |
| Override Checkbox | Overrides certain settings. Unavailable if settings cannot be changed. |
Fields that show the number of items that can fit on a worksheet (e.g. 1 x 1 x 1 Up). Checked if this option is Active. | |
| Cutout | |
Fields that show the number of items that can be cut out with a Percentage Wasted (e.g. 2 x 2 x 4 Out 6.78%). Checked if this option is Active. | |
| Constraints | |
| Max (DxW) depth x width | The Maximum Depth x Maximum Width of the Worksheet. This field is hidden if the substrate is a reel. |
| Margin – Top, Bottom, Side | The margins needed for non-printable areas. |
| Allow rotate | Checkbox. If checked, the worksheet can be rotated. |
Costs (tab)
The Costs tab is prefilled from the Input tab. However, you can edit the fields marked in blue (✎).
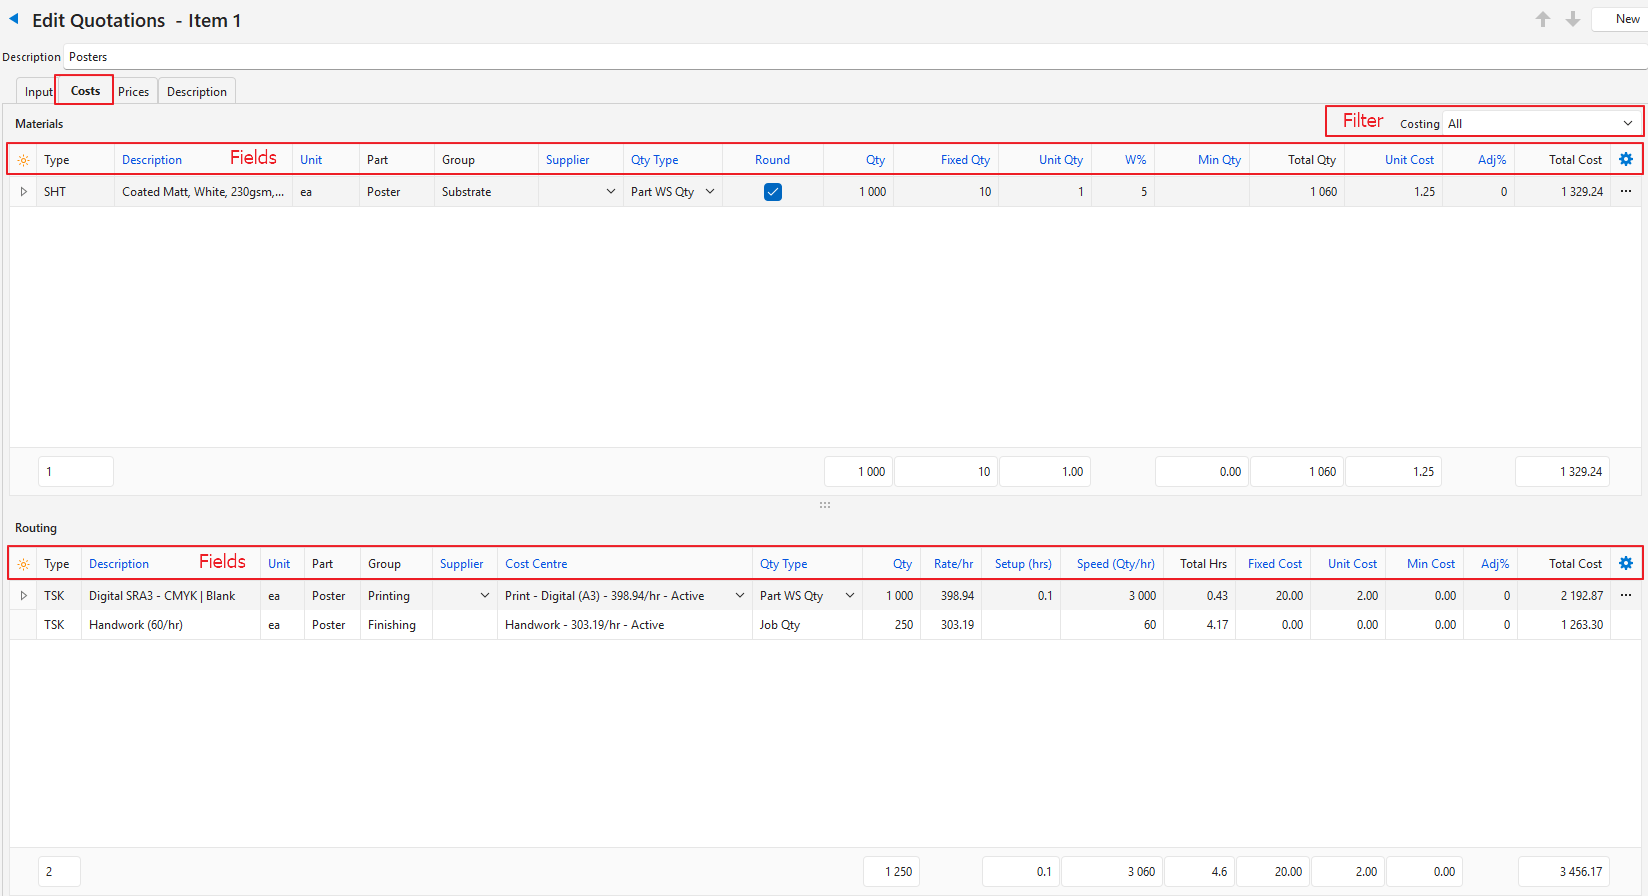
Materials Section
Filters Explained
| Filter | Description |
|---|---|
| Costing | Select a specific Costing or All from the dropdown list. |
Fields Explained
Fields marked in blue (✎) can be edited.
| Field | Description |
|---|---|
| Field Chooser (*) | Add or remove columns. |
| ID | The system-generated number for the entry. |
| Item From | The system-generated number for the source transaction. |
| Order ID | A sequential number allocated to each entry. |
| Type | The item’s Type. |
| Description | The item’s prefilled Description. |
| Unit | The item’s prefilled Unit. |
| Part | The name of the part. |
| Costing | The costing’s description. |
| Group | The costing’s group. |
| Supplier | The item’s prefilled Supplier from the Prices tab. For example, if the Cost Price is calculated from the Highest Supplier Price, the name of that supplier appears. You can select a different supplier from the dropdown list. |
| Qty Type | The Quantity Type selected for the item. To change it, select another from the dropdown list. |
| Round | Checkbox. If checked, the quantity is rounded up. Rounding happens in this order:
|
| Qty | The item’s calculated quantity included in the estimate (see Round). |
| Fixed Qty | The prefilled Fixed Quantity included in the estimate. |
| Unit Qty | The prefilled Unit Quantity included in the estimate. |
| W% | The prefilled Wastage percentage. |
| Min Qty | The prefilled Minimum Quantity that can be ordered. |
| Total Qty | The calculated Total Quantity (the quantity is rounded). |
| Unit Cost | The prefilled Unit Cost of the item. |
| Subtotal | The calculated subtotal before adjustments. |
| Adj% | The percentage by which the item is marked up (positive number) or discounted (negative number). After you enter an amount, click Save (button) to recalculate the totals. |
| Total Fixed Cost | The calculated Total Fixed Cost. |
| Total Unit | The calculated Total Unit Cost. |
| Adjustment | The value of the Adjustment. |
| Total Cost | The Total Cost. |
| Created | The date on which the entry was created. |
| Updated | The date on which the entry was last updated. |
| Updated by | The user who last updated the entry. |
| A submenu with these options (also available by right-clicking the entry):
|
Routing Section
The items in the routing section must be in the right order. The items are prefilled from the Input tab. To change their order in the routing section, change the order of the items on the Input tab.
Fields Explained
Fields marked in blue (✎) can be edited.
| Field | Description |
|---|---|
| Field Chooser (*) | Add or remove columns. |
| ID | The system-generated number for the entry. |
| Item From | The system-generated number for the source transaction. |
| Order ID | A sequential number allocated to each entry. |
| Type | The item’s Type. |
| Description | The item’s prefilled Description. |
| Unit | The item’s prefilled Unit. |
| Part | The name of the part. |
| Group | The costing’s Group. |
| Costing | The prefilled costing’s Description. |
| Supplier | The item’s prefilled Supplier. |
| Cost Centre | The item’s Cost Centre. |
| Workstation | The prefilled Workstation. |
| Qty Type (prefilled) | The Quantity Type, which determines how the Quantity field is used to calculate the unit cost. |
| Qty | The prefilled Quantity that is needed. |
| Rate/hr | The prefilled Rate per Hour. |
| Setup (Hrs) | The prefilled Setup Hours. |
| Speed (Qty/hr) | The prefilled output that can be achieved in an hour. If entered, updates the Speed (Hrs) and Speed (Min) fields. |
| Speed (Hrs) | The number of hours it takes to produce one unit. If entered, updates the Speed (Qty/hr) and Speed (Min) fields. |
| Speed (Min) | The number of minutes it takes to produce one unit. If entered, updates the Speed (Hrs) and Speed (Qty/hr) fields. |
| Total Hrs | The calculated total hours needed for the routing item. |
| Fixed Cost | The prefilled Fixed Cost. |
| Unit Cost | The prefilled Unit Cost. |
| Min Cost | The prefilled Minimum Cost of the Routing. |
| Subtotal | The calculated subtotal before adjustments. |
| Adj% | The percentage by which the item is marked up (positive number) or discounted (negative number). |
| Adjustment | The amount of the adjustment. |
| Total Fixed | The calculated Total Fixed Cost. |
| Total Unit | The calculated Total Unit Cost. |
| Total Cost | The Total Cost per Unit (Fixed + Unit Costs). |
| Created | The date on which the entry was created. |
| Updated | The date on which the entry was last updated. |
| Updated by | The user who last updated the entry. |
| A submenu with these options (also available by right-clicking the entry):
|
Prices (tab)
Information on pricing:
- Fixed Cost and Fixed Sell Prices are applied once, regardless of the quantity.
- Unit Cost and Unit Sell Prices are multiplied by the quantity.
- The Material and Routing Costs are summed to the Fixed Cost and Unit Cost fields in the Prices table (Prices tab).
- The markup percentage (MU%) is applied to the fixed cost and the unit cost to calculate the Fixed Sell and Unit Sell prices, respectively.
- If the checkbox in the Fix column is checked, you can override the Fixed Sell and Unit Sell prices and the MU% is calculated accordingly.
- If the checkbox in the Fix column is unchecked, you can change the MU% and the sell price is calculated accordingly.
- An additional discount, Adj%, can be applied to the Sell Prices if discounts are shown to customers (e.g. if they have an override commission).
- You can change the VAT Type and the Inc (VAT Included) setting on the Active Qty. The changes cascade to the other quantities.
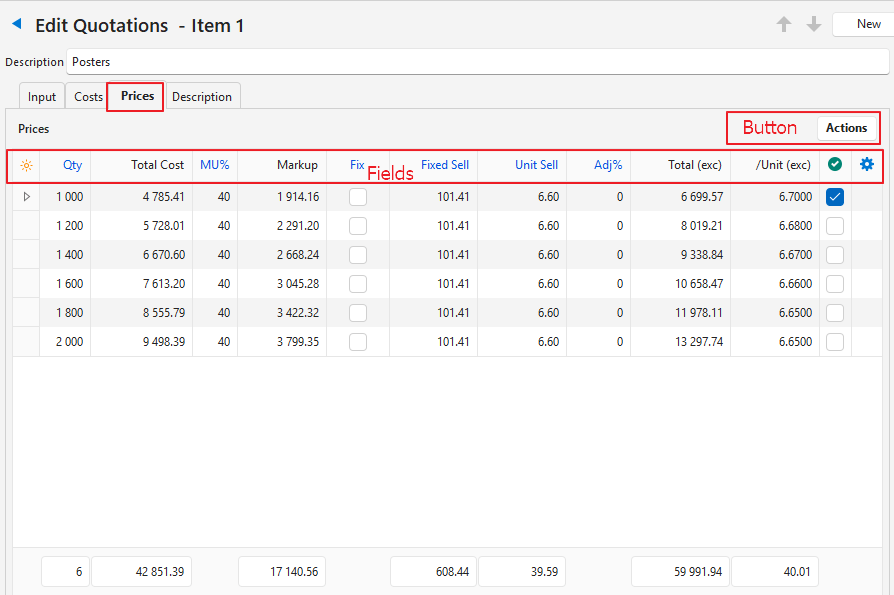
Button Explained
| Button | Description |
|---|---|
| Actions | Add Quantities: Adds a range of Quantities automatically (e.g. 1000 to 2000 step 100 adds 1000, 1100, 1200, 1300 up to 2000). |
Batch Update: Updates all the selected entries. The options are:
| |
| Delete: Deletes all the selected entries. The active quantity is skipped and stays on the estimate. |
Fields Explained
Fields marked in blue (✎) can be edited.
| Field | Description |
|---|---|
| Field Chooser (*) | Add or remove columns. |
| ID | The system-generated number for the entry. |
| Qty | Prefilled with the quantity included in the estimate. |
| Fixed Cost | Prefilled with the fixed cost of the estimate. A Fixed Cost or Sell Price is applied once, regardless of the quantity. |
| Fixed Cost (Adj) | Prefilled with the fixed cost including any Adjustment. |
| Unit Cost | Prefilled with the unit cost. A Unit Cost or Sell Price is multiplied by the quantity. |
| Unit Cost (Adj) | Prefilled with the unit cost including any Adjustment. |
| Total Cost | The Total Cost of the estimate. |
| MU% | The Markup Percentage. If the box in the Fix column is unchecked, you can edit the MU%. If the box in the Fix column is checked, the MU% is calculated and cannot be edited. |
| Markup | The Markup Amount. |
| Fix | Checkbox. If checked, you can edit the Fixed and Unit Sell Prices, and the markup percentage is calculated from them automatically. |
| Fixed Sell | The Fixed Selling Price. Editable only if the box in the Fix column is checked. |
| Unit Sell | The Unit Selling Price. Editable only if the box in the Fix column is checked. |
| Subtotal | The Subtotal before any adjustments. |
| Adj% | The Adjustment Percentage, which can be positive (markup) or negative (discount). |
| Adjustment | The adjustment amount. |
| VAT Type | The applicable VAT Type. |
| VAT % | The applicable VAT Percentage as per the selected VAT Type. |
| Total (exc) | The Total VAT Exclusive Price. |
| VAT | The amount of VAT Included. |
| Total (inc) | The Total VAT Inclusive Price. |
| /Unit (exc) | The Unit Price Excluding VAT. |
| GM% | The Gross Margin Percentage. |
| Gross Margin | The Gross Margin Amount. |
| Active | Checkbox. If checked, the entry is Active and its quantities and prices appear in the Summary section. |
| Created | The date on which the entry was created. |
| Updated | The date on which the entry was last updated. |
| Updated by | The user who last updated the entry. |
| A submenu with these options (also available by right-clicking the entry):
|
Description (tab)
- The description follows the order of the groups.
- The description shown on a Quotation (Quote letter) is generated as follows:
- Caption
- Note
- Part Name: Item descriptions linked to the part.
- Group Names (not linked to Parts): Item descriptions linked to the group.
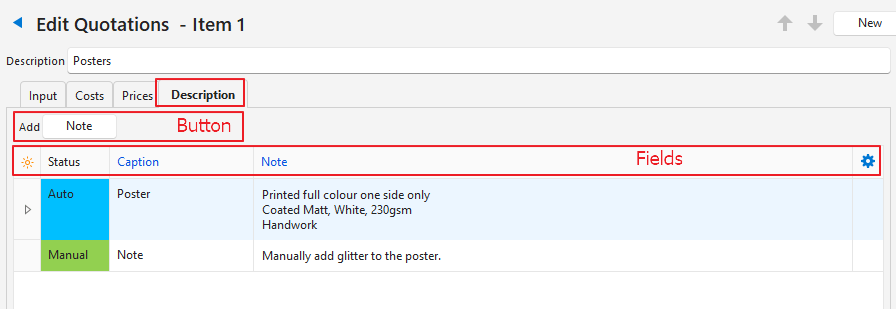
Button Explained
| Button | Description |
|---|---|
| Note | Adds a note to the estimate’s description. |
Fields Explained
Fields marked in blue (✎) can be edited.
| Field | Description |
|---|---|
| Field Chooser (*) | Add or remove columns. |
| ID | The system-generated number for the entry. |
| OrderID | The system-generated number for the entry’s order. |
| Status | The status of the description, which is one of these:
|
| Caption | The Caption provided for the estimate. |
| Note | Additional information to include on the estimate. |
| Created | The date on which the entry was created. |
| Updated | The date on which the entry was last updated. |
| Updated By | The user who last updated the entry. |
| A submenu with these options (also available by right-clicking the entry):
|
Summary Section
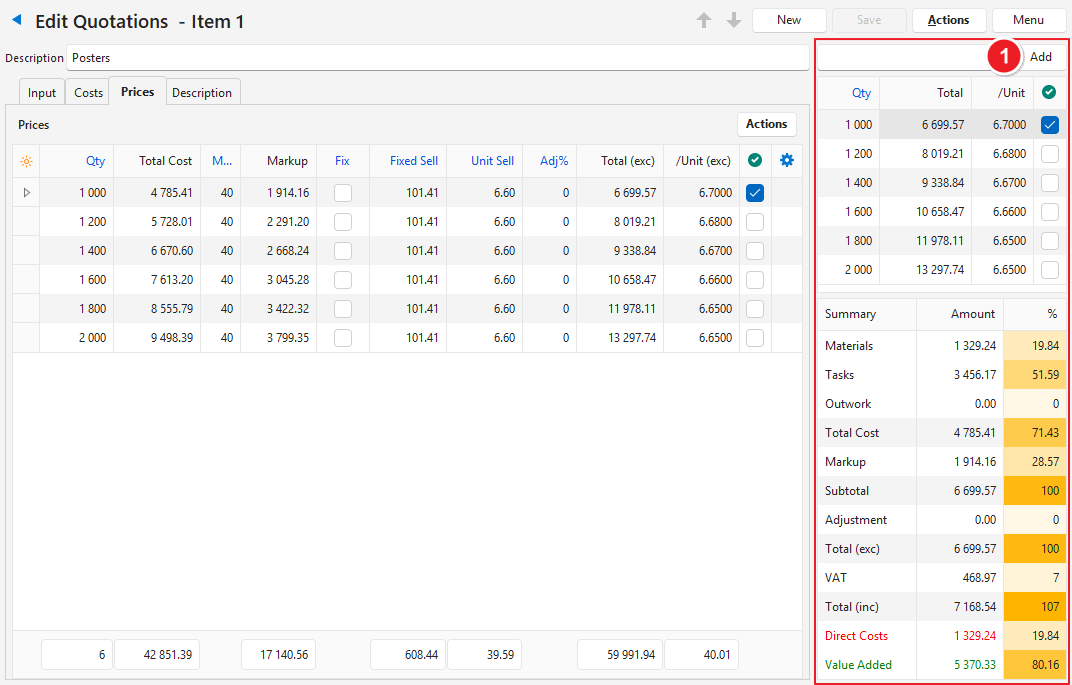
Fields Explained: Top Section
- Enter the estimate’s quantities in this section (that is, to show the pricing options for different quantities).
- To delete a quantity, right-click it and select Delete.
- Fields marked in blue (✎) can be edited.
| Field | Description |
|---|---|
| Qty | To add several quantities, use Actions (button) > Add Quantities on the Prices tab. To add a single quantity, enter it in the field marked 1 and click Add (button). To edit a quantity in the summary section, enter a new value. Click Save (button) after editing to update the totals. |
| Total | The Total Price for that quantity. |
| /Unit | The Unit Price for that quantity. |
| Active Checkbox | If checked, the quantity is Active (the main quantity). If unchecked, the quantity is Inactive (but can still appear as an option on the Quote Letter). To change the active quantity, right-click a quantity and select Set Active Qty. The Summary section updates automatically. |
Fields Explained: Summary
This section is for information only and is not editable. The values are for the Active quantity only.
| Field | Description |
|---|---|
| Summary | Lists the Total Costs broken down by:
Shows the markup that is added to the Total Cost. Shows any adjustments. Shows the VAT-exclusive amount. Shows the VAT amount. Shows the VAT-inclusive amount. Breaks down the VAT-exclusive total into:
|
| Amount | The amount for each of the summary items. |
| % | The percentage of the VAT-exclusive total (100%) for each of the summary items. |