
Assets List Views
The Assets module can be used in many ways. Businesses that provide services for assets (e.g. motor vehicles or computer equipment) can enter their customers’ assets and link these assets to the customer accounts and service tickets. Businesses that use assets to produce income (e.g. printers) can link these assets to production features to work out each asset’s profitability.
The Equipment and Vehicles asset types provide additional fields such as serial numbers. If you do not need these fields, use the Other type instead.
The Assets module is part of the setup menu and can be added to any other Menu Group.
The module has several views:
- The Actions button is available only on the Default view.
- The Vehicles and Equipment views include additional fields for the asset’s attributes.
- The Depreciation view lists the assets that have the Depreciation attribute set and summarises their depreciation.
Buttons Explained
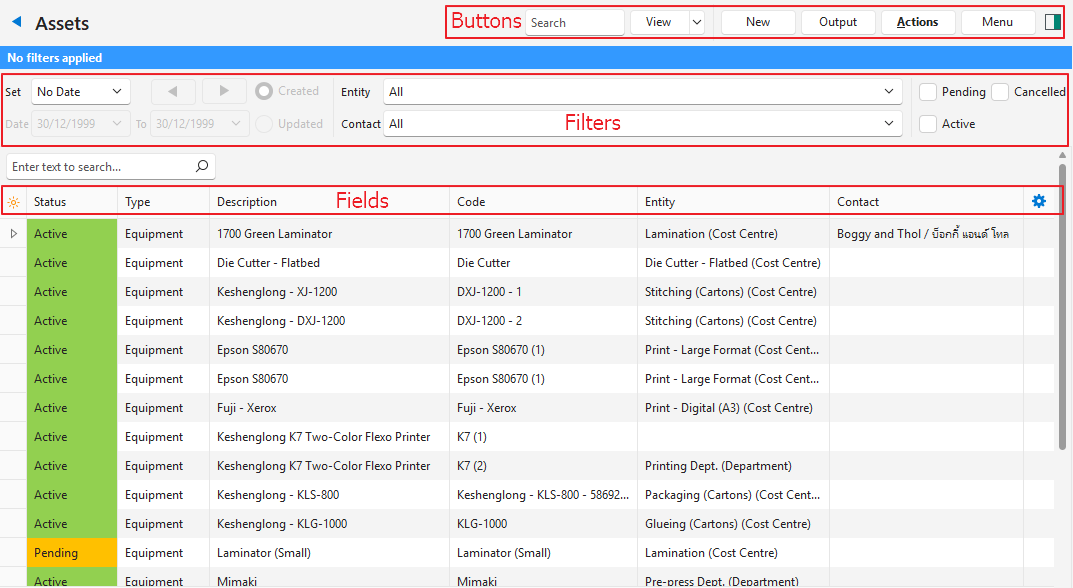
| Button | Description |
|---|---|
| View | Lists the entries that match the selected filters. |
| Arrow on View (button) | Reset Data Filter: Resets all the data filters. |
| Recent | A dropdown list of recently viewed records, for quick access. The button is hidden when there are no recent items. |
| New | Creates an asset of the type selected. The available types are:
|
| Output | Prints, previews or emails the output if Output Templates are set up for the module. Export: Exports the list in .xlsx, .htm or .csv format. |
| Actions | Available only in the Default view. Batch Update: Applies the changes to all the selected records when you click Update (button) and confirm the changes. The options are:
|
| Menu | Show Notes: Shows or hides the notes. Views: Settings
|
Filters Explained
| Filter | Description |
|---|---|
| Set | A dropdown list of date options, including No Date, which shows all records. |
| Arrows | Adjusts the dates in the direction of the arrows. |
| Date | Customise the dates. |
| Created | If selected, shows the assets created on the selected date. |
| Updated | If selected, shows the assets updated on the selected date. |
| Entity | Select a specific entity from the dropdown list. |
| Contact | Select a specific contact from the dropdown list. |
| Status Checkboxes | Checkboxes. Only entries with the checked statuses appear. If no boxes are checked, all the entries appear. |
Fields Explained: Default
| Field | Description |
|---|---|
| Field Chooser (*) | Add or remove columns. |
| ID | The system-generated number for the entry. |
| Status | The entry’s status. |
| Type | The type of asset. |
| Parent | The code of the asset’s parent asset (see Asset Edit Views, Relationships tab). |
| Description | The asset’s description. If auto-generated, the description is created as follows:
|
| Code | The asset’s code, which is used in all lookup lists. If auto-generated, the code is created as follows:
|
| Override | Checkbox. If checked, you can edit the description and code (in the edit view). |
| Entity | The entity to which the asset is allocated. An asset can be allocated to only one entity, but an entity can have multiple assets. |
| Contact | The contact to which the asset is allocated. An asset can be allocated to only one contact, but a contact can have multiple assets. |
| Groups | The groups to which the asset belongs. |
| Created | The date on which the asset was created. |
| Updated | The date on which the asset was last updated. |
| Updated By | The user who last updated the asset. |
 | A menu with these options:
|
Fields Explained: Vehicles
| Field | Description |
|---|---|
| Field Chooser (*) | Add or remove columns. |
| ID | The system-generated number for the entry. |
| Status | The entry’s status. |
| Description | The vehicle’s description. |
| Code | The vehicle’s code. |
| Entity | The entity to which the asset is allocated. |
| Contact | The contact to which the asset is allocated. |
| Groups | The groups to which the asset belongs. |
| VIN | The vehicle’s identity number. |
| Engine No. | The vehicle’s engine number. |
| Registration No. | The vehicle’s registration number. |
| Make | The vehicle’s make. |
| Model | The vehicle’s model. |
| Year | The year of manufacture. |
| Body Type | The vehicle’s body type. |
| Colour | The vehicle’s colour. |
| A menu with these options:
|
Fields Explained: Equipment
| Field | Description |
|---|---|
| Field Chooser (*) | Add or remove columns. |
| ID | The system-generated number for the entry. |
| Status | The entry’s status. |
| Description | The asset’s description. |
| Code | The asset’s code, which is used in all lookup lists. |
| Entity | The entity to which the asset is allocated. |
| Contact | The contact to which the asset is allocated. |
| Groups | The groups to which the asset belongs. |
| Serial No. | The asset’s serial number. |
| Make | The asset’s make. |
| Model | The asset’s model. |
| Year | The asset’s year of manufacture. |
| Colour | The asset’s colour. |
| A menu with these options:
|
Fields Explained: Depreciation
| Field | Description |
|---|---|
| Field Chooser (*) | Add or remove columns. |
| ID | The system-generated number for the entry. |
| Status (Asset) | The asset’s status. |
| Type | The type of asset. |
| Description | The asset’s description. |
| Code | The asset’s code, which is used in all lookup lists. |
| Entity | The entity to which the asset is allocated. |
| Contact | The contact to which the asset is allocated. |
| Groups | The groups to which the asset belongs. |
| Status (Depreciation) | The asset’s depreciation status: Pending, Active or Complete. |
| Purchase Date | The date on which the asset was purchased (from the Financial attributes). |
| Purchase Value | The asset’s purchase price (from the Financial attributes). |
| Starting Date | The date from which the asset is depreciated. |
| Starting Value | The asset’s value at the starting date. |
| Residual Value | The asset’s value at the end of its useful life. |
| Months | The number of months over which the asset is depreciated. |
| Monthly Cost | The monthly depreciation amount: (Starting Value − Residual Value) ÷ Months. |
| Depreciation | The total depreciation posted to date. This amount is the total of the transaction entries linked to the asset, excluding deleted and cancelled transactions. |
| Book Value | The asset’s current value: Starting Value − Depreciation. |
| Created | The date on which the asset was created. |
| Updated | The date on which the asset was last updated. |
| Updated By | The user who last updated the asset. |
| A menu with these options:
|
Asset Settings Window Explained
Click Menu (button) > Edit Statuses in the list view or the edit view to open the Asset Settings window on its Statuses tab. The statuses work as described in Statuses.
Buttons Explained
| Button | Description |
|---|---|
| Add/Edit | Lets you add and edit statuses. Click it again to make the list read only. |
| Save | Saves any changes. |
| Menu | Layout |
| Add Default Statuses | Adds the default statuses Pending, Active and Cancelled. The button works only when the list is empty. Otherwise, the message “The default Status list can only be created if the list is empty.” appears. |
Statuses (tab)
Fields Explained
| Field | Description |
|---|---|
| Field Chooser (*) | Add or remove columns. |
| Code | Enter a short name for the status. |
| Description | Enter a longer name for the status. If left blank, the code is used. |
| Group | Select the Status Group:
|
| Colour | Select the status’s colour (white by default). |
| Menu (…) | Right-click a status, or click its three dots (…), for these options:
|