
Report Example – Quotations This Month
The report opens with the period set to This month, so it always shows the current month’s quotations. You can choose another period above the report. Right-clicking a quotation opens it, or opens the customer. A second version, fixed to the current month, shows the quotations as a chart on the Mobile App Dashboard.
💡This example shows how to create a custom report that lists the quotations for the current month, with their customer, status and totals.
You must be familiar with SQL to create custom reports (see Edit Reports Tutorials).
A custom report reads the database directly. This report lists the quotations of every entity, to every user you give access to it, whatever their access to transactions.
What the Report Shows
| Column | Description |
|---|---|
| Quotation | The Transaction Type’s code and the quotation number (e.g. QT 62). |
| Date | The date of the quotation. |
| Expires | The date the quotation expires. |
| Customer | The customer the quotation is for. |
| Contact | The contact person at the customer. |
| Rep | The rep on the quotation. |
| Reference | The quotation’s reference. |
| Status | The quotation’s status (e.g. Pending). |
| Total (exc) | The total excluding VAT, in the local currency. The total of the column appears at the bottom. |
| VAT | The VAT, in the local currency. |
| Total (inc) | The total including VAT, in the local currency. |
Before You Start
Find the code of your Quotations Transaction Type: it is in the Code column of the Transaction Types list (e.g. QT; the Setup Example – Quotations uses CUS QT). The SQL below uses QT; replace it with your code.
How to Create the Report
- Navigate to Edit Reports.
- Click New (button) and fill in the fields as follows:
- Description = Enter Quotations.
- Code = Enter Quotations.
- Chart Type = Leave Column diagram selected.
- Note = Enter Lists the quotations for the selected period (this month by default). (optional).
- Click Save (button).
How to Add the SQL
- Click Actions (button) > Edit SQL.
- Paste the SQL below into the editor. Replace QT in the WHERE line with the code of your Quotations Transaction Type.
- Click Test (button). A message says “Test passed.” and lists the parameters date_start and date_end. Click OK (button).
- Click Save (button).
- Close the SQL popup (X in the top corner) and wait a few seconds while the fields are generated.
SELECT
  th.trans_header_id,
  th.contact_id_entity AS customer_id,
  ts.code || ' ' || COALESCE(th.trans_no_text, th.trans_no::varchar) AS quotation_no,
  th.date_trans,
  th.date_expires,
  COALESCE(cus.full_name, cus.nickname) AS customer,
  COALESCE(per.full_name, per.nickname) AS contact,
  COALESCE(rep.full_name, rep.nickname) AS rep,
  th.description AS reference,
  st.code AS status,
  th.total AS total_exc,
  th.vat,
  th.total_vat AS total_inc
FROM trans_headers th
JOIN trans_setup ts ON ts.trans_setup_id = th.trans_setup_id
LEFT JOIN contacts cus ON cus.contact_id = th.contact_id_entity
LEFT JOIN contacts per ON per.contact_id = th.contact_id_person
LEFT JOIN contacts rep ON rep.contact_id = th.contact_id_rep
LEFT JOIN status st ON st.status_id = th.status_id
WHERE ts.code = 'QT'          -- the code of your Quotations Transaction Type
  AND th.deleted_id <> 1      -- leave out deleted quotations
  AND (CAST(:date_start AS date) IS NULL
       OR th.date_trans BETWEEN CAST(:date_start AS date) AND CAST(:date_end AS date))
ORDER BY th.date_trans, th.trans_no
How the SQL Works
| Part | What it does |
|---|---|
FROM trans_headers th | Reads the transactions (one row per transaction). |
JOIN trans_setup ts | Adds the Transaction Type, so that ts.code = 'QT' keeps only the quotations. |
LEFT JOIN contacts (three times) | Adds the names of the customer, the contact person and the rep. LEFT JOIN keeps a quotation that has no contact person or rep. |
LEFT JOIN status st | Adds the status code. |
COALESCE(th.trans_no_text, th.trans_no::varchar) | Uses the transaction number as text where one was entered (Transaction Number = Edit (Text)); otherwise the number. |
th.deleted_id <> 1 | Leaves out deleted quotations. |
:date_start and :date_end | The report’s Period filter. Edit Reports creates the filter because the SQL uses these two parameters, and the report opens with This month selected. If you select No Date, both are empty and |
trans_header_id and customer_id | The IDs the drilldowns use to open the quotation and the customer. They are hidden on the report. |
How to Set Up the Fields
On the Fields tab, click Edit (button) if it is not blue, and edit each field as follows. The Name and Data Type columns are filled in from the SQL and cannot be changed. The captions of hidden fields do not matter.
| Field | Caption | Editor | Alignment | Summary | Visible | Decimals |
|---|---|---|---|---|---|---|
| trans_header_id | ID | Number | Left | None | Unchecked | 0 |
| customer_id | Customer ID | Number | Left | None | Unchecked | 0 |
| quotation_no | Quotation | Text | Left | Count | Checked | 0 |
| date_trans | Date | Date | Left | None | Checked | 0 |
| date_expires | Expires | Date | Left | None | Checked | 0 |
| customer | Customer | Text | Left | None | Checked | 0 |
| contact | Contact | Text | Left | None | Checked | 0 |
| rep | Rep | Text | Left | None | Checked | 0 |
| reference | Reference | Text | Left | None | Checked | 0 |
| status | Status | Text | Left | None | Checked | 0 |
| total_exc | Total (exc) | Number | Right | Sum | Checked | 2 |
| vat | VAT | Number | Right | Sum | Checked | 2 |
| total_inc | Total (inc) | Number | Right | Sum | Checked | 2 |
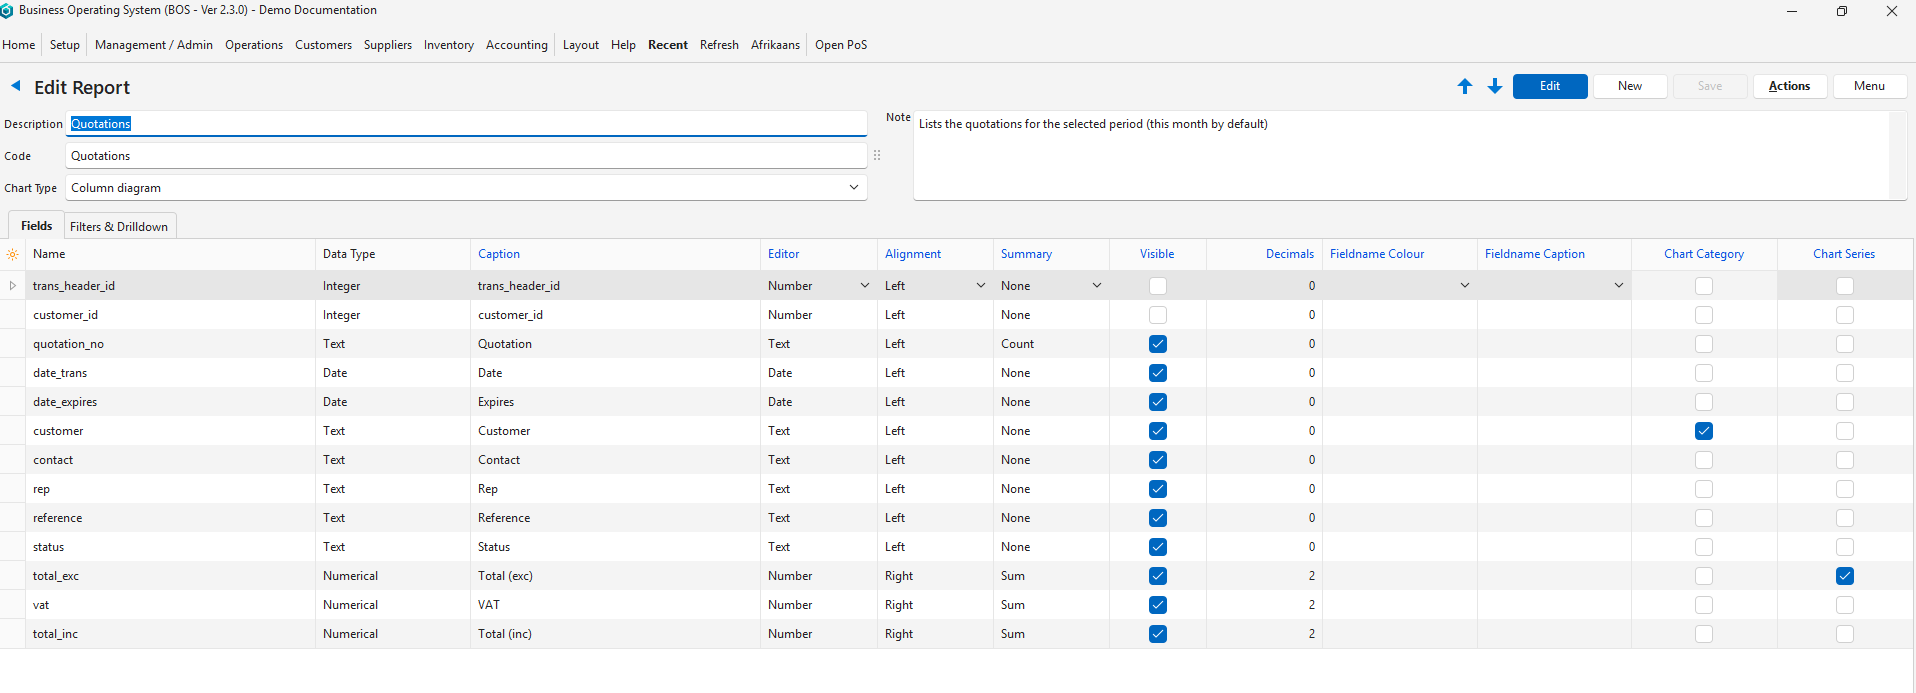
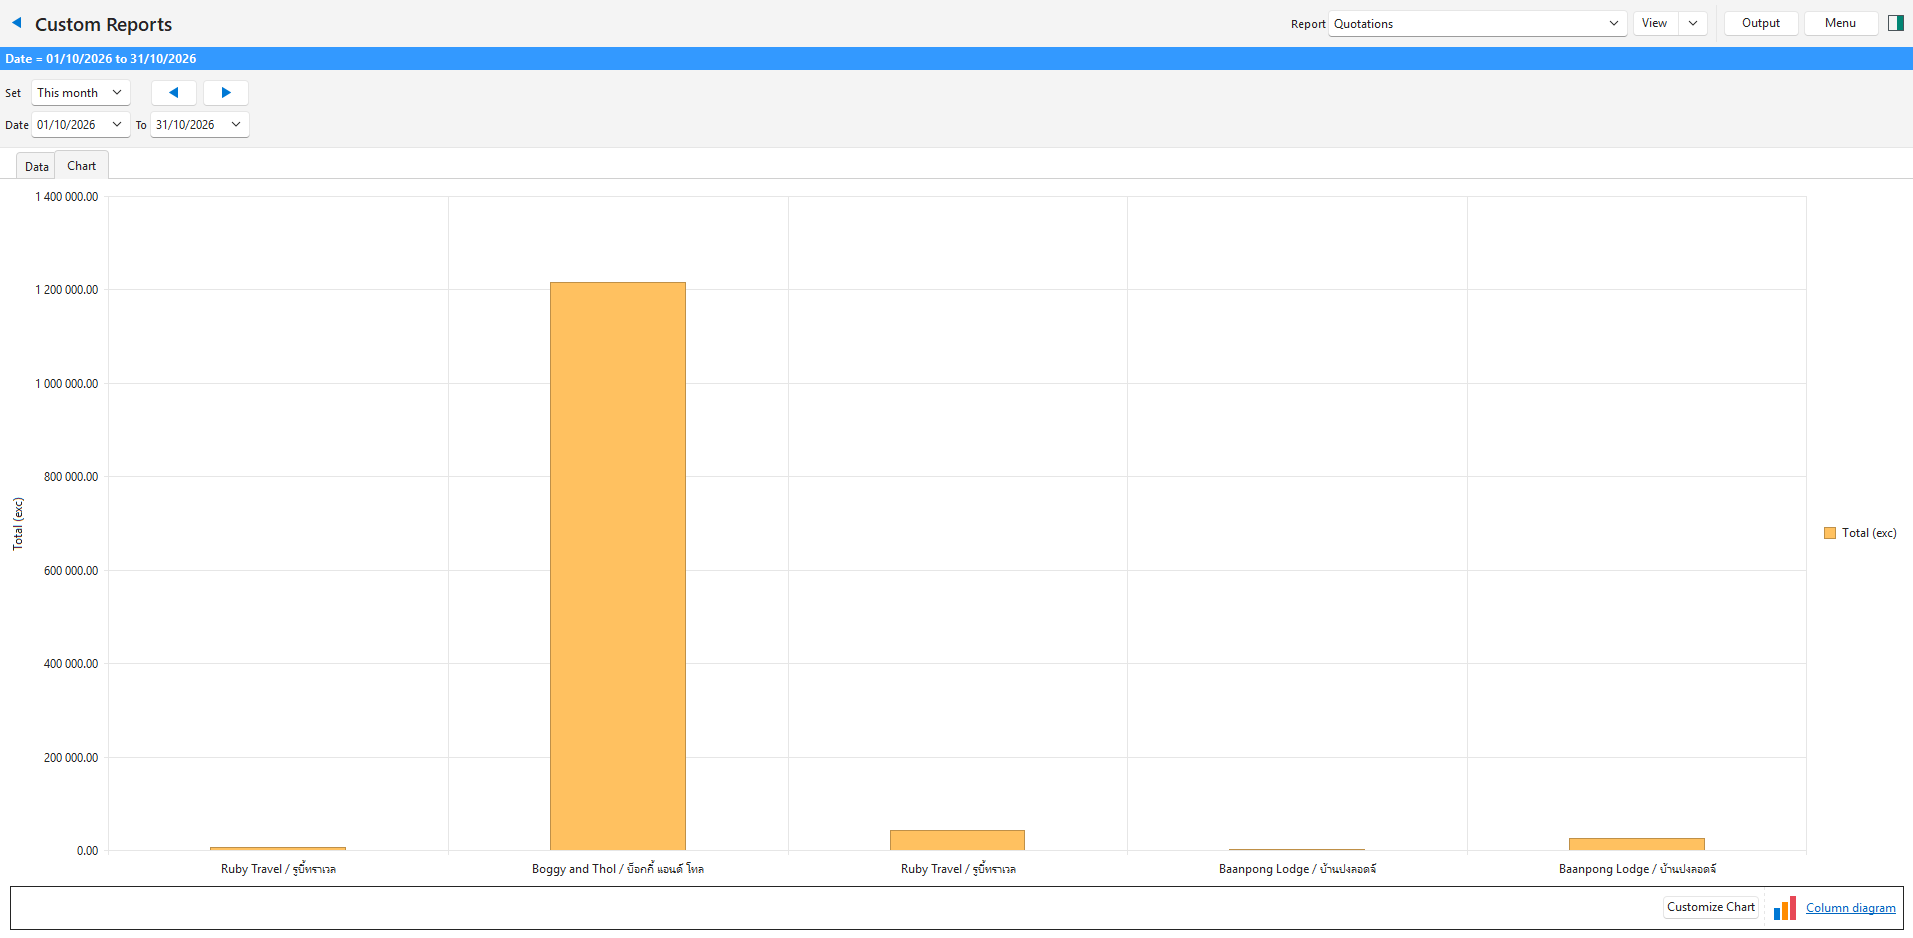
To add a chart, check Chart Category for customer and Chart Series for total_exc (optional). The report’s Chart tab then shows one bar per quotation, labelled with the customer. Click Save (button).
How to Check the Period Filter
- Click Filters & Drilldown (tab).
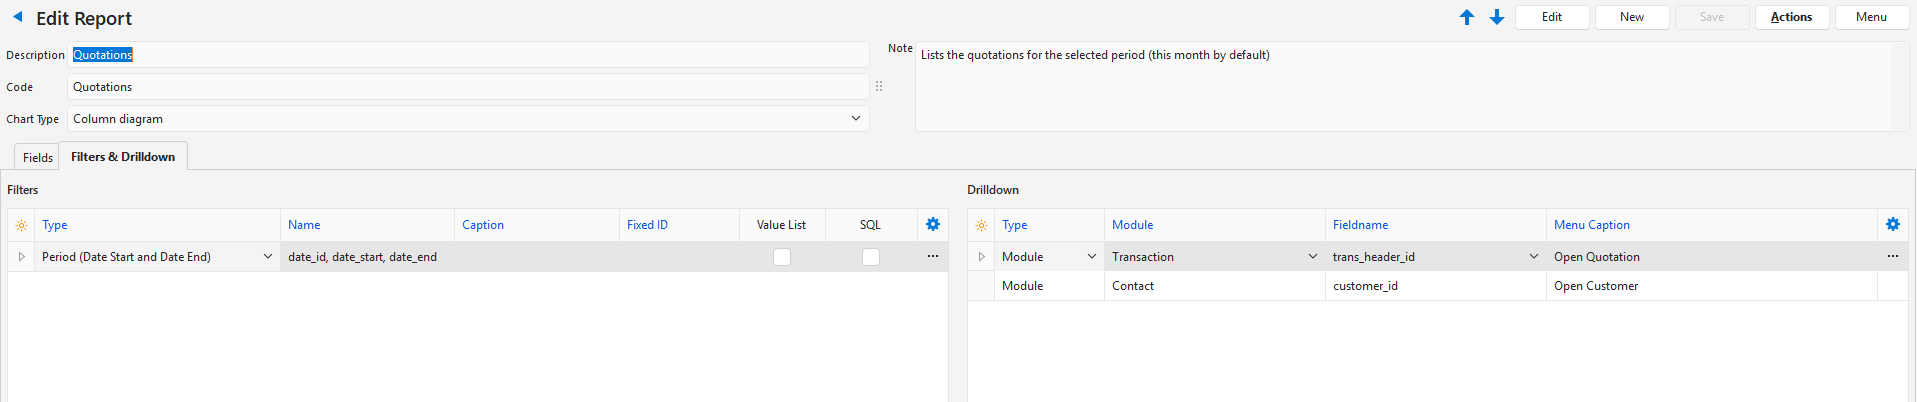
- Check that the Filters section has a Period (Date Start and Date End) filter. Edit Reports adds it when it generates the fields, because the SQL uses
:date_startand:date_end. Its caption cannot be changed.
How to Add the Drilldowns
- On the Filters & Drilldown tab, click Edit (button) if it is not blue.
- In the Drilldown section, add a row for the quotation:
- Type = Select Module.
- Module = Select Transaction.
- Fieldname = Select trans_header_id.
- Menu Caption = Enter Open Quotation.
- Click Save (button).
- Note: An empty row is added for the next drilldown.
- In the new row, add the drilldown for the customer:
- Type = Select Module.
- Module = Select Contact.
- Fieldname = Select customer_id.
- Menu Caption = Enter Open Customer.
- Click Save (button).
How to Give Users Access
- Click Menu (button) > Edit User Access.
- Move the users who may see the report from the Available section to the Selected section.
- Click Save (button).
How to View the Report
- A new report appears in the Custom Reports dropdown list only after you restart QuickEasy BOS.
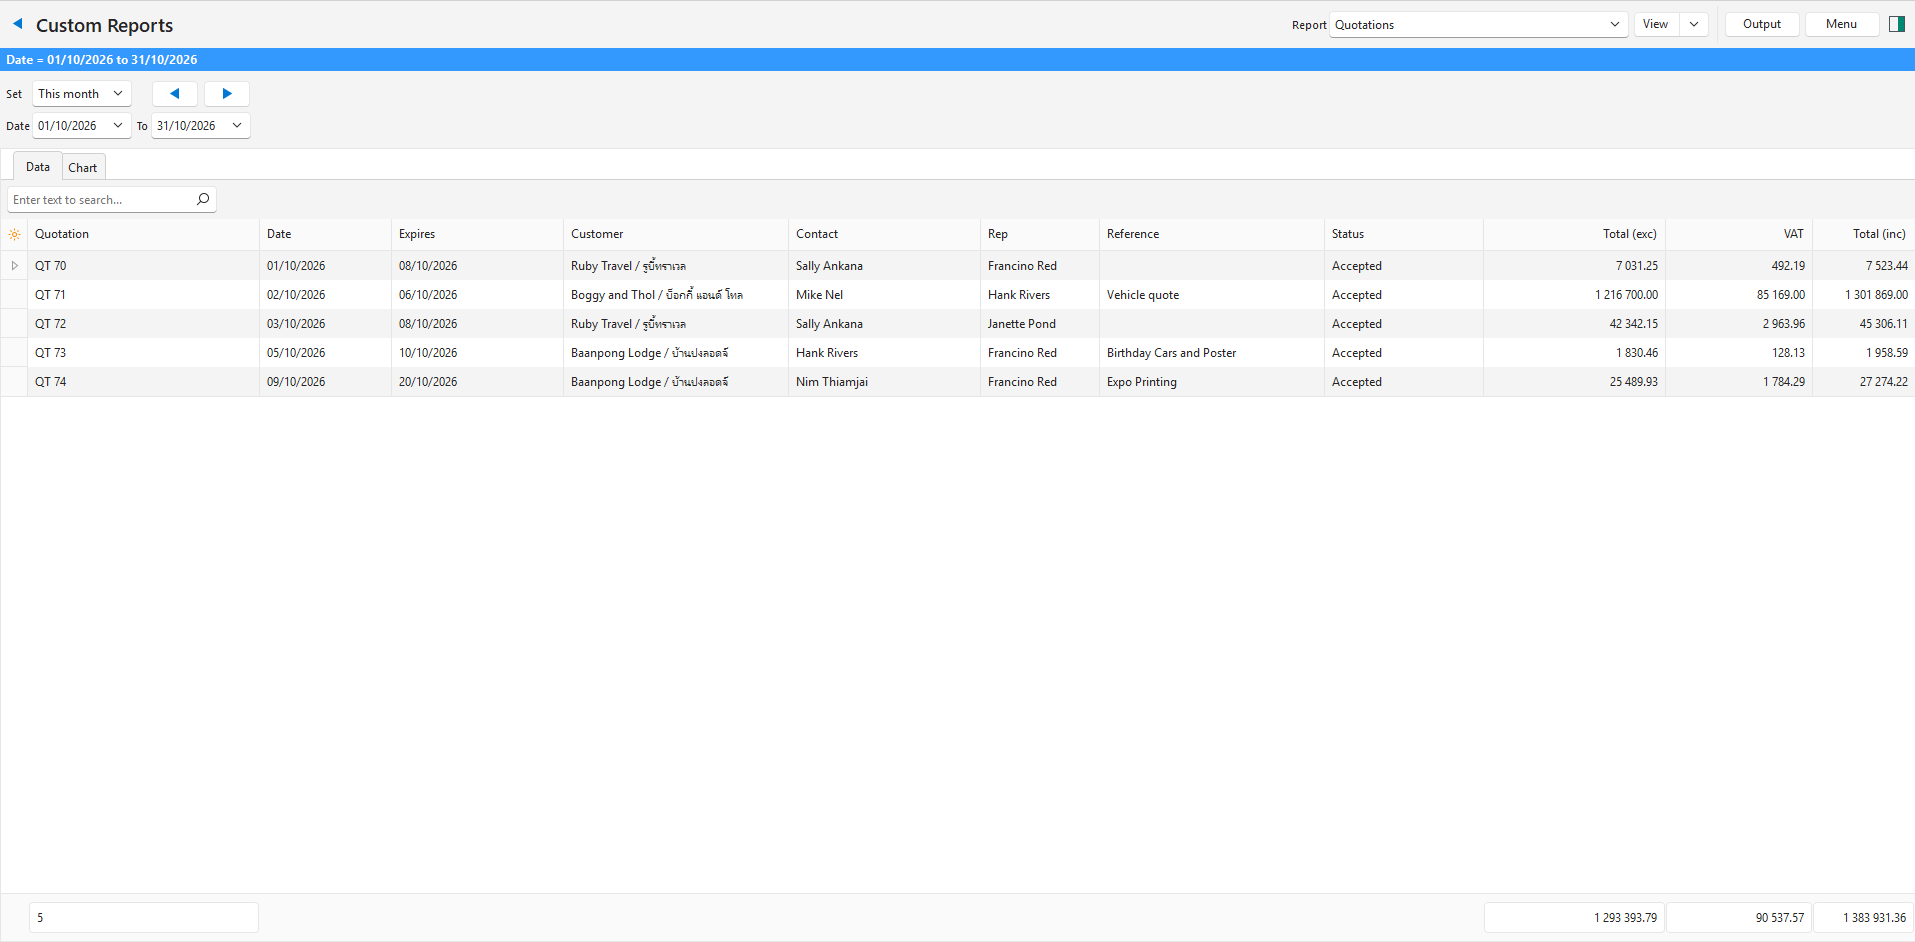
- The Data tab lists the quotations, with the number of quotations and the totals at the bottom. The Chart tab shows the chart, if the report has one.
- Close QuickEasy BOS and open it again.
- Add the report to a Menu Group, on its own or with your other custom reports (see Menu Groups).
- Open Custom Reports from the menu and select Quotations in the report filter (if the menu has more than one report).
- Check that the period is This month, or select another period.
- Click View (button).
- Right-click a quotation and select Open Quotation or Open Customer to open it.
How to Show the Report on the Mobile App
The Mobile App Dashboard runs a custom report’s SQL exactly as it is saved. It has no filters or drilldowns, so the SQL cannot use parameters such as :date_start, and it shows each report as a chart. Create a second report for the Mobile App, with the current month fixed in the SQL.
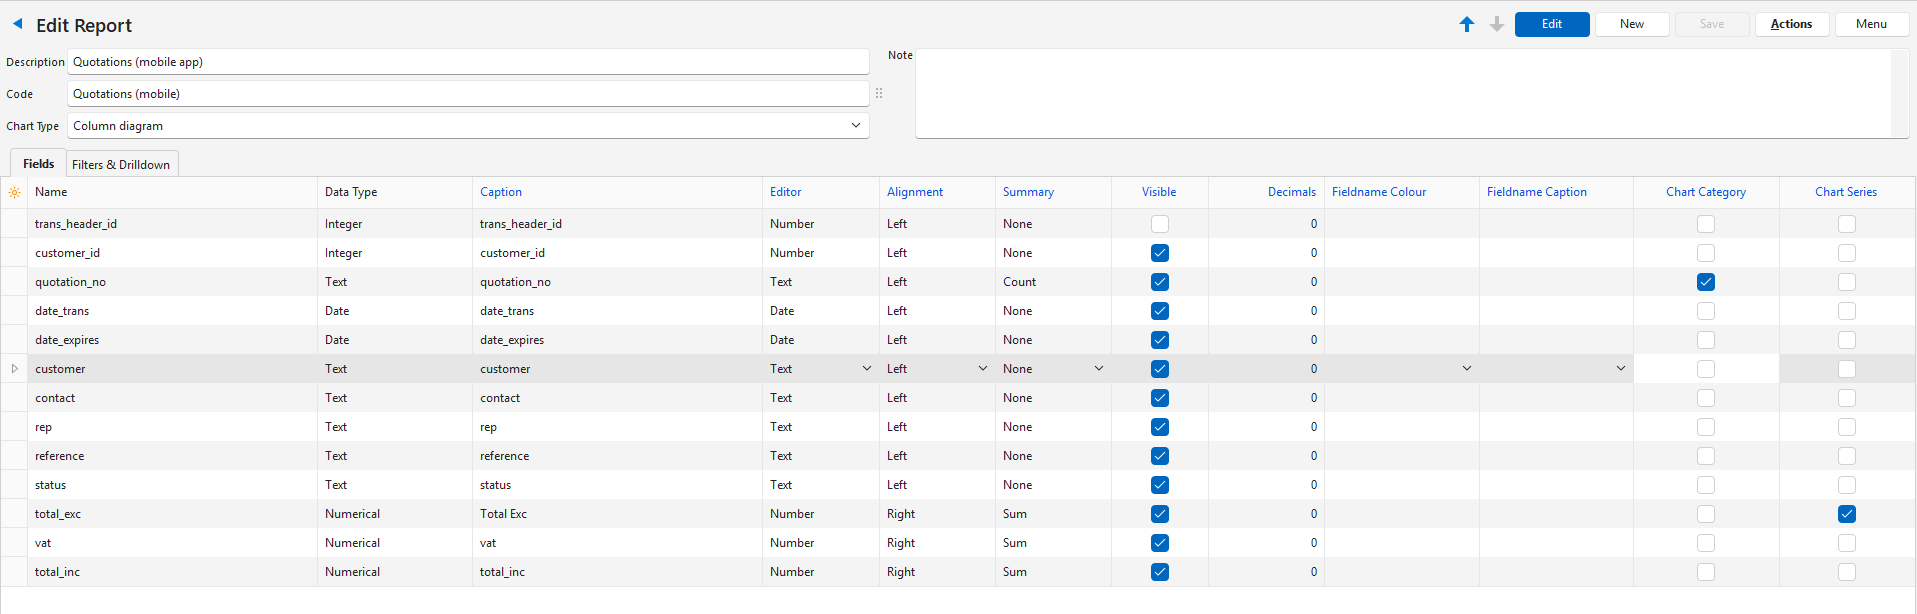
- Create a new report as described in How to Create the Report, with Description = Quotations (mobile app) and Code = Quotations (mobile).
- Add the SQL below, as described in How to Add the SQL. It is the same SQL with the two date lines replaced, so the report always shows the current month. When you click Test (button), the message “Test passed.” appears.
- On the Fields tab, set up the chart:
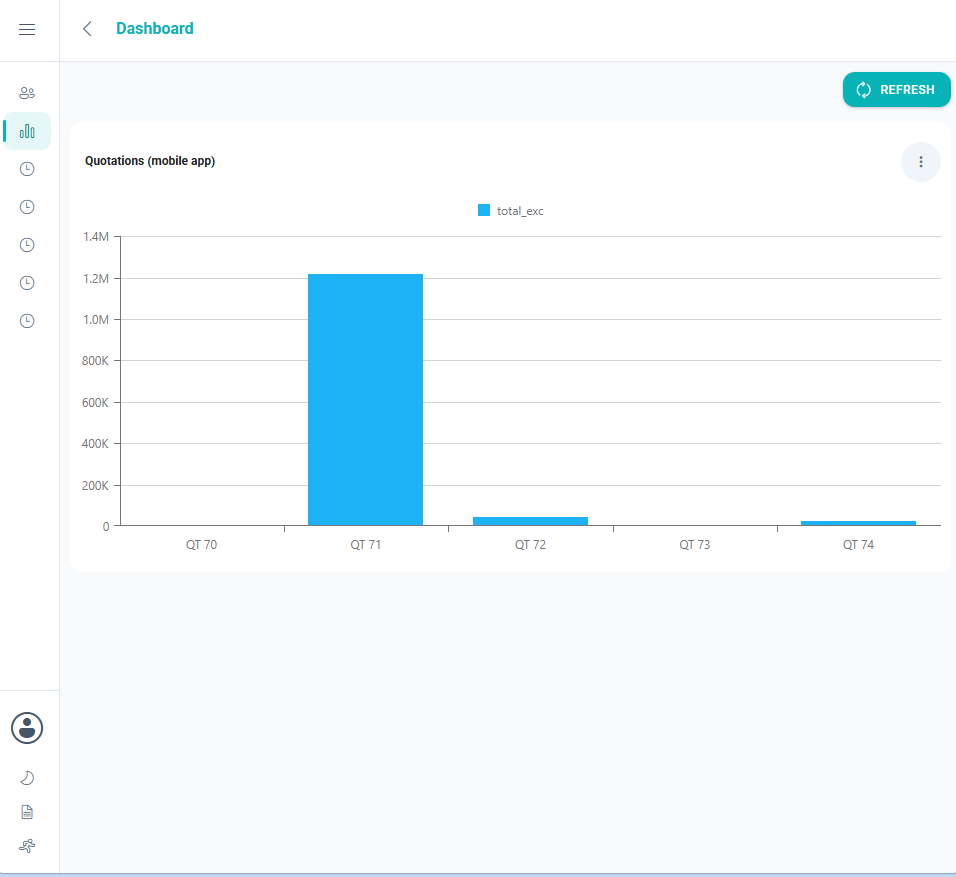
- Chart Category = Check it for quotation_no (one bar per quotation). Exactly one field can be the category.
- Chart Series = Check it for total_exc (and total_inc if you want a second bar).
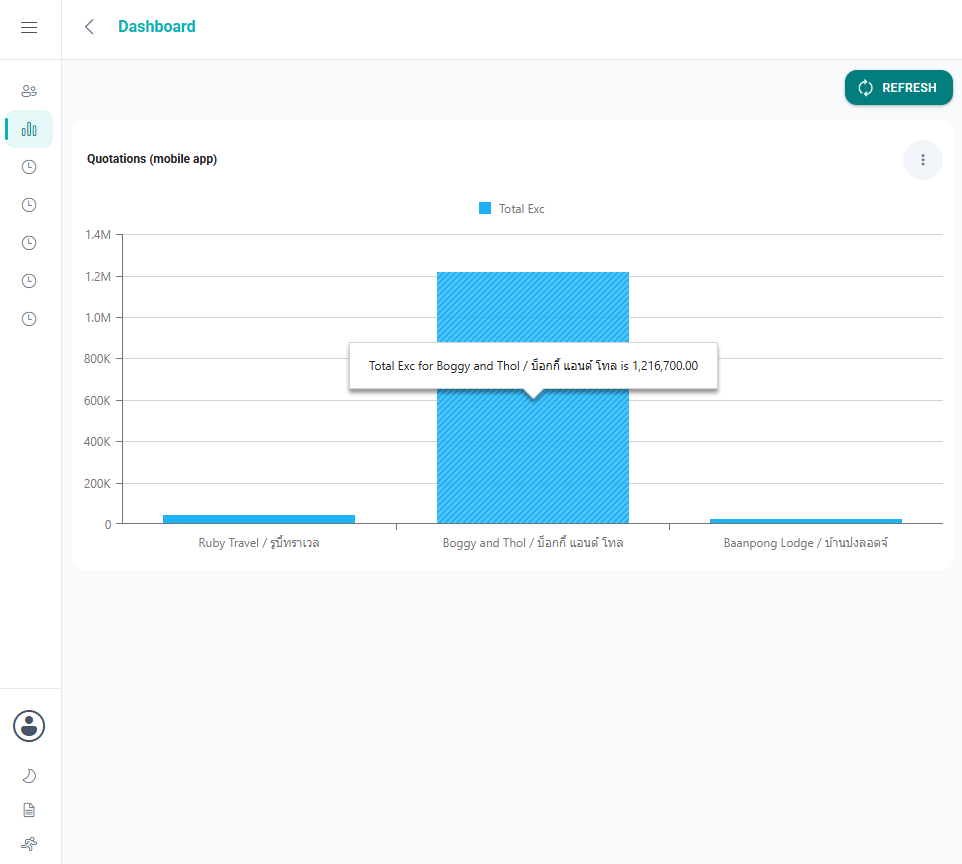
- Note: The other field settings, including the captions, do not matter, because the Mobile App shows only the chart. The caption of the Chart Series field appears in the chart’s legend (e.g. total_exc, or Total Exc if you change it).
- Click Save (button).
- Note: No Period filter is created, and no drilldowns are needed.
- Give the users access to the report (see How to Give Users Access).
- For each user who must see the chart, add the report to their Mobile > Dashboard (Select from Custom Reports) user setting: in Users, right-click the user and select View/Edit User Settings, click Edit (button) in the setting’s Value column, and move the report from Available to Selected.
- On the Mobile App, open the Dashboard and click Refresh (button).
SELECT
  th.trans_header_id,
  th.contact_id_entity AS customer_id,
  ts.code || ' ' || COALESCE(th.trans_no_text, th.trans_no::varchar) AS quotation_no,
  th.date_trans,
  th.date_expires,
  COALESCE(cus.full_name, cus.nickname) AS customer,
  COALESCE(per.full_name, per.nickname) AS contact,
  COALESCE(rep.full_name, rep.nickname) AS rep,
  th.description AS reference,
  st.code AS status,
  th.total AS total_exc,
  th.vat,
  th.total_vat AS total_inc
FROM trans_headers th
JOIN trans_setup ts ON ts.trans_setup_id = th.trans_setup_id
LEFT JOIN contacts cus ON cus.contact_id = th.contact_id_entity
LEFT JOIN contacts per ON per.contact_id = th.contact_id_person
LEFT JOIN contacts rep ON rep.contact_id = th.contact_id_rep
LEFT JOIN status st ON st.status_id = th.status_id
WHERE ts.code = 'QT'          -- the code of your Quotations Transaction Type
  AND th.deleted_id <> 1      -- leave out deleted quotations
  AND th.date_trans >= date_trunc('month', CURRENT_DATE)::date                      -- from the 1st of this month
  AND th.date_trans < (date_trunc('month', CURRENT_DATE) + INTERVAL '1 month')::date  -- up to the 1st of next month
ORDER BY th.date_trans, th.trans_nodate_trunc('month', CURRENT_DATE) is the 1st of the current month. The report keeps the quotations from that date up to (not including) the 1st of next month, so it moves on to the new month by itself.
In the second example below, customer was selected as the Chart Category instead of quotation_no, and the caption of total_exc was changed to Total Exc.
Variations
| To show | Change the SQL |
|---|---|
| Only the quotations still open (not complete or cancelled) | Add a line to the
|
| Another Transaction Type (e.g. Sales Orders) | Replace 'QT' with that Transaction Type’s code, and change the report’s description and captions. |
| Several Transaction Types | Replace ts.code = 'QT' with ts.code IN ('QT', 'SO'). |
Troubleshooting
| Problem | What to check |
|---|---|
| The report is not on the Custom Reports dropdown list | Restart QuickEasy BOS. A new report appears on the list only after a restart. Also check that you are on the report’s User Access (Menu (button) > Edit User Access). |
| The Mobile App shows Incomplete chart configuration… or This chart layout supports grouping by a single category only… | On the report’s Fields tab, check Chart Category for exactly one field and Chart Series for at least one field. |
| The chart does not load on the Mobile App | Use the Mobile App version of the SQL. The Mobile App cannot fill in parameters such as :date_start, so the desktop version of the report fails there. |
| The report is empty |
|
| No SQL Statement Provided | The SQL was not saved. Open the report, click Actions (button) > Edit SQL, paste the SQL and click Save (button). |
| The Period filter is missing | Close and reopen the SQL popup so that the fields and filters are generated again, and check that the SQL still contains :date_start and :date_end. |
| Open Quotation does nothing | The drilldown’s Fieldname must be trans_header_id and its Module must be Transaction. |