
Bank Imports Tutorials
Before you import bank entries for the first time, complete the setup steps on Bank Imports, where the module and its statuses are also explained.
💡These tutorials explain how to create transactions from imported bank statement entries and update imported transactions.
Note
- When importing bank data, the bank account is verified by checking that the Account lookup contains the bank account number.
- The field does not have to consist of only the bank account number (e.g. Kay Bank 174-1-22222-7).
- The bank account must be in the format in which it appears on the statement, including hyphens and spaces.
- Error messages appear if:
- There is an incorrect character set.
- There is an incorrect lookup.
- No records were returned.
- No bank account is selected in the header (“Please select Account.”).
- The bank account’s Bank Profile has no parser function (“Invalid Parser Function setting. See Menu button > Settings > Edit Accounting > Bank Profiles.”).
- The parser function in the Bank Profile does not exist (“Invalid Parser Function: <name>”, where <name> is the parser function).
- The header status is not editable and not cancelled (“Upload Failed. The selected Bank is not in an editable status.”).
How to Create Bank Import Transactions
Note
When you capture a transaction, the bank account is filled in for either the debit or credit account, whichever applies. An account must be selected for the non-bank entry.
- Navigate to Bank.
- Note: The module is named Bank; however, it might be renamed on the menu (e.g. to Bank Reconciliation or Bank Import). It can be added to any Menu Group (e.g. Accounting).
- Click New (button) and select the bank account under Bank Import.
- Find the file on your computer and click it.
- Click Open (button).
- Read the information on the import popup and click OK (button).
- Note: A list of transactions from the bank import appears on the left. In the header, the bank statement balance is filled in from the import, and a variance appears (the difference between the ledger and the bank statement).
- Enter the bank statement balance if it is not filled in automatically.
- To create a transaction:
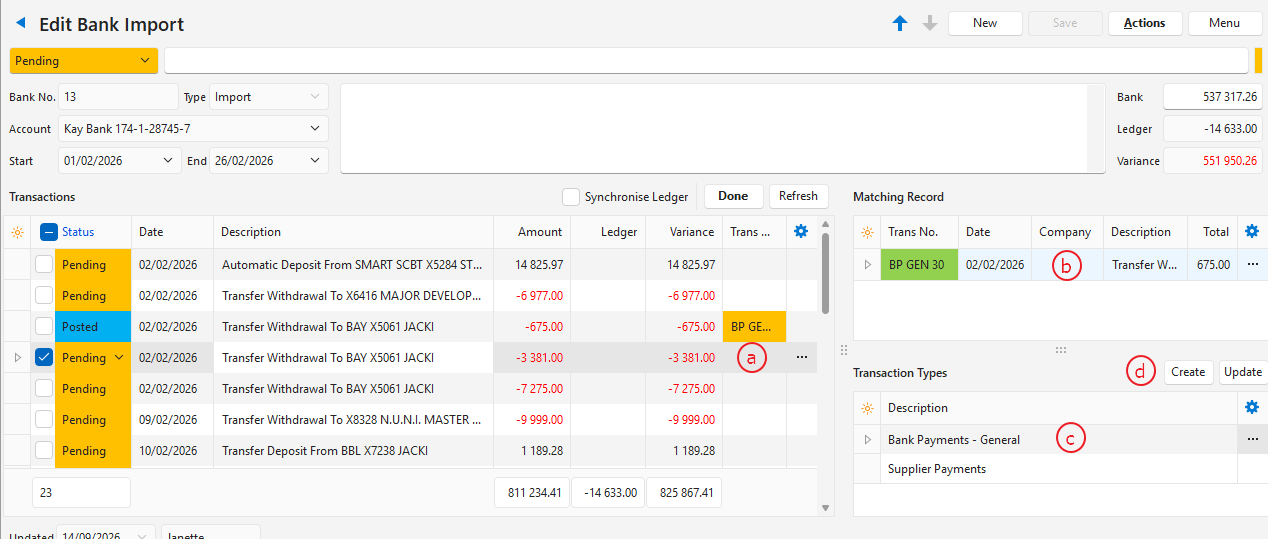
- Click the entry on the left that you want to create a transaction for (see (a) on the screenshot).
- If there are matching transactions (see (b) on the screenshot), right-click a matching transaction and select one of these options:
- Copy & Link: Creates a new transaction from a previous, similar one (matched on the description) and links it to the bank import entry. The transaction is copied with the bank import entry’s date and description, and opens on the right.
- Edit the amounts to match the bank import amount if necessary (they are copied from the matching transaction).
- Click Done (button) or change the status to Complete.
- Link Transaction: Links an existing transaction that has the same date and amount as the bank import entry. The option is available only for existing transactions that match on date and amount. The transaction number is filled in next to the bank import entry.
- Copy & Link: Creates a new transaction from a previous, similar one (matched on the description) and links it to the bank import entry. The transaction is copied with the bank import entry’s date and description, and opens on the right.
- If there are no matching transactions, click the Transaction Type you want to create (see (c) on the screenshot). If there is only one, it is selected automatically.
- Click Create (button) (see (d) on the screenshot).
- Capture the transaction as usual:
- Enter or select a reference.
- Select a Dr Account or Cr Account, whichever applies.
- Select a different VAT Type if necessary.
- If applicable, click Allocate (button) and allocate the receipt or payment.
- Repeat Step 7 until all the entries are captured and the variance is zero.
- Select all the posted transactions.
- Click Done (button).
- Note: Done needs a default Complete item status (Menu (button) > Edit Statuses (Bank Item)). Otherwise, the message “Bank Items default Complete Status has not been set.” appears.
How to Update Imported Transactions
- Open the applicable bank import.
- Click the entry you want to update (with an Active status, such as Posted, or a Pending status).
- Click Update (button).
- Note: If a transaction was created, it opens on the right for editing. If not, the Transaction Type opens so that you can create it. A completed entry cannot be updated: the message “The selected Bank Item has been completed.” appears.