
Item Creation and Editing Tutorials
The item types, and how Costings and Assemblies work, are explained on Item Creation and Editing Interface.
💡These tutorials explain how to create, edit, copy, delete and translate items and complete each tab, including prices and costings.
How to Create an Item
- Each step below links to its own tutorial.
- New (button) needs item statuses, VAT Types and currencies to be set up first. If any of them are missing, BOS shows one of these messages and does not create the item:
- Invalid Setting Status. See Menu button > Settings > Edit Statuses.
- Invalid Setting VAT Types. See Menu button > Settings > Edit Accounting.
- Invalid Setting Currencies. See Menu button > Settings > Edit Accounting.
- From Items, click New (button) and choose an Item Type.
- Complete the Header.
- Complete the Detail (tab).
- Complete the Prices (tab).
- Complete the Inventory (tab) if applicable.
- Complete the Costing (tab) if applicable.
- Complete the Notes & Attachments (tab) (optional).
- Change the status on the status bar to Active (or a similar status).
- Note: Only items with a status in the Active Status Group can be used in transactions.
- Click Save (button).
How to Choose an Item Type
An Item Type cannot be changed afterwards. The available Item Types are set by the general setting Item > Enable Item Types.
- Read the information on Extension Types (optional).
- Click New (button) and select an item type:
- Materials
- Standard (MAT): A flexible item for general inventory or services.
- Substrate (Sheets) (SHT): An extension mainly for the printing industry. Includes Attributes and Units applicable to Substrate Sheets.
- Substrate (Reels) (REL): An extension mainly for the printing industry. Includes Attributes and Units applicable to Substrate Reels.
- Substrate (Square Metres) (SQM): An extension mainly for the printing industry. Includes a base unit of sq.m and Attributes for the Substrate.
- Assembly (ASM): Includes a Costing tab on which Materials, Tasks and Outwork can be added. This type is often used for nested Bills of Materials.
- Tasks
- Task (TSK): Services rendered and the labour component of a production or manufacturing process (e.g. finishing tasks).
- Outwork (OWK): The parts of production that are outsourced.
- Costing (CST): Includes a Costing tab containing Materials (excluding Assemblies), Tasks and Outwork. This type is mainly used for Estimating.
- Materials
How to Complete the Header
- Description = Enter a description that customers and suppliers understand.
- Code = Enter a code for internal use, or leave the field blank.
- Note: If the code is blank, the description is copied to the code when you click Save.
- Note = Enter a note about the item (optional).
- Note: To format the note (for example, bold or coloured text), see How to Format an Item Note.
- Base Unit: For information only. The base unit is set on the Detail tab.
How to Format an Item Note
- Formatted (HTML) notes are available only when the General Setting General > Enable Rich-Text in Note fields is checked. When it is unchecked, the note is plain text.
- When the item is added to a transaction, the note is copied as it was saved (formatted). If the setting is unchecked, it is copied as plain text.
- Translate sends the note as plain text. Format the translated note again with View/Edit Note on the language.
- Open the item and click Edit (button) if it is not blue.
- Click View/Edit Note (button) next to the Note to open the HTML editor.
- Enter or edit the note on the Editor tab.
- Note: On the Code tab, you can paste HTML copied from elsewhere.
- Format the note with the toolbar (for example, make the first line bold and red).
- Save the note.
- Note: The Note box shows the formatted note (read-only).
- Click Save (button) to save the item.
- To change the note later, double-click the Note box. To make it plain text again, right-click the box and select Clear Formatting.
How to Complete Detail (tab)
- Unit Section:
- Units are prefilled for the item types Substrate (Sheet) and Substrate (Reel).
- Units default to ea (each) for other Item Types.
- Click Unit (button) next to Add to add more units.
- Description = Enter a description for the unit.
- Convert Qty = (see the example below)
- Enter 1 if this unit is the base unit.
- Otherwise, enter the number by which the unit is multiplied to convert it to the base unit.
- Check the box in the Base Unit column if the unit is the base unit.
- Note: To change the base unit, first uncheck the existing base unit, then check the new one, so that the conversion is applied automatically. If you check more than one unit, only one becomes the base unit (usually the last one checked).
- Check the box in the Costing Unit column if the unit is used for costings.
- Note: Applies only to Costing and Assembly items. Only one unit can be the costing unit.
- Attributes Section:
- Click Attributes (button) and select Add.
- Click one of these sets (you can add several sets, but each set only once):
- Estimating
- Substrate Waste
- Constraints
- Attributes (adds all the custom attributes)
- Click one of these sets (you can add several sets, but each set only once):
- For each attribute, enter the information in the Value column.
- Note: Attributes are prefilled if the item type is Substrate (Sheet) or Substrate (Reel).
- Click Attributes (button) and select Add.
- Categories Section:
- Click Categories (button):
- Click the categories on the list (use Ctrl + left-click to select several).
- Click Select (button).
- Click Categories (button):
Example of a Conversion:
| Convert Qty | Units |
|---|---|
| 1 | 1m (Base Unit) |
| 0.16667 | 6m |
| 5 | 20cm |
| 0.5 | 200cm |
How to Complete Prices (tab)
- Click Price (button) and select:
- Supplier: Used in Materials and Outwork.
- Cost: Used in Estimating and Transactions that use Cost Price.
- Sell: Used in Transactions that use Sell Price (e.g. Quotations, Customer Invoices).
- Unit prices can include up to four decimal places.
How to Create or Edit Supplier Prices
- Supplier Prices:
- Apply to items that are purchased from or outsourced to Suppliers (e.g. raw materials, parts or finished goods).
- Are unavailable for Task Item Types.
- Should be VAT Exclusive, but do not have to be.
- Can be added for any Unit linked to the item.
- Can be in any currency.
- Several supplier prices can be added.
- The columns of the prices grid are listed under Item Creation and Editing Interface.
- To delete a supplier price, right-click the entry and select Delete.
- From editing an item, click Prices (tab).
- Click Price (button) > Supplier Price and fill in the details as follows:
- Status = Select a status from the dropdown list (usually Active or Inactive).
- Supplier = Select a supplier from the dropdown list.
- Reference = Enter the supplier’s reference (e.g. the supplier’s item code).
- Currency = Select the supplier’s currency from the dropdown list.
- VAT Type = Select the supplier’s VAT Type.
- Inc = Check the box if the supplier’s price includes VAT.
- Adj% = Enter the adjustment. Adjustments can be only negative (e.g. to record override commissions or discounts).
- Unit Price = Enter the supplier’s unit price for the item.
- Unit = Select the unit that the price applies to from the dropdown list.
- Click Save (button).
How to Create or Edit Cost Prices
- Cost Prices:
- Apply to all Items.
- Can be entered manually or calculated automatically from the Highest Supplier Price or from a Costing.
- Must be in the local currency.
- Must exclude VAT.
- Must be unique: only one Cost Price per unit is allowed.
- To delete a cost price, right-click the entry and select Delete.
- From editing an item, click Prices (tab).
- Click Price (button) > Cost Price and fill in the details as follows:
- Status = Select a status from the dropdown list (usually Active or Inactive).
- Price From = Click the arrow and select an option from the dropdown list:
- Blank: If no option is selected, the price is not calculated or updated automatically. You must enter and update the price manually.
- Supplier (High): Uses the highest supplier price entered under supplier prices.
- Costing: Appears on the dropdown list only if a costing is added. Fills in the Cost Price from the Costing. Applies to Costings and Assemblies.
- Estimating: Appears on the dropdown list only if Estimating Attributes are added. Fills in the Cost Price from the Estimating Attributes. Applies to Tasks and Outwork.
- Supplier: Filled in automatically from the Supplier Price if applicable. Otherwise blank.
- Reference = Enter a reference (optional).
- Currency: Does not apply to cost prices. Cost Prices must be in the local currency.
- VAT Type: Automatically set to No VAT. Cost prices are always VAT exclusive.
- Inc: Unavailable. Cost Prices cannot include VAT.
- Adj% = Enter the adjustment. The adjustment can be only positive (that is, it adds to the cost price). Use it to allow for handling, landed costs or spoilage, or to hedge the exchange rate.
- Unit Price = Enter the item’s unit price, or leave it blank to have it calculated when you click Save (if an option is selected under Price From).
- Unit = Select the unit that the price applies to from the dropdown list.
- Note: A red Warning appears if you enter a duplicate price. It disappears when you select a different unit and click Save.
- Click Save (button).
How to Create or Edit Sell Prices
- Sell Prices:
- Can be created in any currency, but the Rate of Exchange cannot be overridden.
- Can be created for any or all of the Units linked to an item.
- Can be VAT Inclusive or Exclusive.
- Can be automatically filled in from a Cost Price or manually set. If set from a cost price, the price appears in red if it is lower than the cost price (e.g. if the adjustment is negative).
- Cannot be duplicated (only one sell price can exist for the same currency and the same unit).
- To delete a sell price, right-click the entry and select Delete.
- From editing an item, click Prices (tab).
- Click Price (button) > Sell Price and fill in the details as follows:
- Status = Select a status from the dropdown list (usually Active or Inactive).
- Price From = Click the arrow and select an option from the dropdown list:
- Blank: The price is not updated automatically. You must enter and update the price manually.
- Cost Prices: Select a Cost Price from the dropdown list.
- Supplier: Automatically selects a supplier linked to the Cost Price if applicable.
- Reference = Enter a reference (optional).
- Currency = Select a currency from the dropdown list.
- VAT Type = Select a VAT Type from the dropdown list.
- Inc = Check the box for a VAT-inclusive Sell Price. Leave it unchecked for a VAT-exclusive price.
- Adj% = Enter the adjustment. The adjustment can be positive (markup) or negative (discount).
- Note: A negative adjustment can make the sell price lower than the cost price. In this case, the sell price appears in red.
- Unit Price = Enter the item’s unit price, or leave it blank to have it calculated when you click Save (if an option is selected under Price From).
- Note: The unit price appears in red if it is lower than the unit cost price.
- Unit = Select the unit that the price applies to from the dropdown list.
- Note: A red Warning appears if you enter a duplicate price. It disappears when you select a different unit or currency and click Save.
- Click Save (button).
How to Complete Inventory (tab)
The Inventory tab appears only if the item is a material (including standard materials, substrates, reels and assemblies).
- Click Inventory Location (button) next to Add.
- Note: A list of the active locations not yet linked to the item opens.
- Check the locations to add (one or more).
- Click Select (button).
- Complete the fields in blue (the other fields are filled in automatically):
- Stock Price = Enter an inventory unit price for the item.
- Min Qty = Enter the minimum quantity to keep in stock.
- To delete an entry, right-click it and select Delete.
How to Complete Costing (tab)
How to Complete Costing (tab): Materials Section
- Fields that are calculated automatically are not explained here.
- The totals at the bottom are calculated with more decimal places than appear on screen, so they do not add up exactly to the numbers you see.
- The unit used is the costing unit selected on the Detail tab.
- The Materials section is for the raw materials that are used in production (e.g. ink, plates).
- Click Materials (button) next to Add. A popup with a list of Materials appears.
- Click the materials you want to add (use Ctrl + left-click to select several).
- Click Select (button).
- Complete these fields for each of the added materials:
- Qty Type = Select the Quantity Type from the lookup list.
- Note: A material added from the items list starts as Job Qty (or Fixed Qty when the General Setting Item Qty Types hides Job Qty). Materials with their own Qty Type and substrates keep theirs.
- Waste% = Enter the percentage that is wasted during production.
- Fixed Qty = Enter the Fixed Quantity that applies to the base unit.
- Unit Qty = Enter the Unit Quantity that applies to the base unit.
- Min Qty = Enter the minimum quantity that you can produce at a time or that is viable to produce for a single order.
- Round = Check the box to round the prices up.
- Adj% = Enter an adjustment percentage: a markup (positive number) or a discount (negative number).
- Qty Type = Select the Quantity Type from the lookup list.
- Click Save (button).
How to Complete Costing (tab): Routing Section
- Fields marked in black are calculated automatically and are not explained here.
- The Totals at the bottom are calculated with more decimal places than appear on screen, so they do not add up exactly to the numbers you see.
- The unit used is the costing unit selected on the Detail tab.
- The Routing section is for Tasks (services) that are performed in-house or outsourced.
- To duplicate an added Task or Outwork, right-click it and select Copy.
- Click an option next to Add. The options are:
- Tasks (button itself): Opens a list of task items for you to select the task to add.
- Tasks (arrow on button):
- Add Custom Task – TSK (C): Adds a row at the bottom of the table for you to complete.
- Select this option if no item exists for the task.
- Add Custom Task that uses Constraints – TSK (CNSTR):
- Adds a row at the bottom of the table for you to complete.
- Only one Task that uses Constraints is allowed per Costing.
- If a task with a constraint is copied, a Custom Task – TSK (C) is created.
- Add Custom Task – TSK (C): Adds a row at the bottom of the table for you to complete.
- Outwork (button itself): Opens a list of outwork items for you to select the items to add.
- Outwork (arrow on button):
- Add Custom Outwork – OWK (C): Adds a row at the bottom of the table for you to fill in (e.g. for outwork that is not set up as an item).
- Complete these fields for each added task or outwork:
- Description = Enter a description of the task. This field is for internal use and does not appear to customers.
- Unit = Enter the unit of the Task or Outwork.
- Supplier = If you added Outwork, select a supplier from the lookup list. Does not apply to Tasks.
- Cost Centre = If you added a task, select a Cost Centre from the lookup list. Does not apply to Outwork.
- Qty Type = Select the Quantity Type from the lookup list.
- Qty = Enter the quantity if Fixed Qty was chosen in the Qty Type column.
- Setup (hrs) = Enter the number of hours it takes to set up the task. Does not apply to outwork.
- Speed (Qty/hr) = Enter the number of items that can be produced in an hour. Does not apply to outwork.
- Fixed Cost = Enter the fixed cost for the Task or Outwork.
- Unit Cost = Enter the unit cost for the Task or Outwork.
- Min Cost = Enter the minimum cost at which the task can be performed or the outwork bought.
- Adj% = Enter an adjustment percentage: a markup (positive number) or a discount (negative number).
How to Remove an Item From a Costing
- Right-click the entry to delete in the Materials or Routing section and select Delete.
- Confirm the deletion on the popup.
How to Reorder a Costing
- Right-click an entry in the Materials or Routing section and select Move Up or Move Down.
How to View a Linked Item
- Right-click an entry in the Materials or Routing section and select Open Linked Item.
- Note: If no item is linked (e.g. for a custom task or outwork in the Routing section), an error message appears.
How to Complete Notes & Attachments (tab)
How to Add Notes to an Item
- Navigate to Items > Menu (button) > Default View.
- Double-click the item you want to edit.
- Click Edit (button) on the top row of buttons if it is not blue.
- Click Notes & Attachments (tab).
- Click Note (button) next to Add and complete the Edit Note window as follows:
- Name = Replace the prefilled name or select one from the dropdown list.
- Reference = Enter a reference for the note.
- Blank space = Enter the note.
- Note: If the General Setting General > Enable Rich-Text in Note fields is checked, you enter and format the note directly in the window (the HTML editor with the Format toolbar). Clear Formatting (button), next to Save, makes it plain text again.
- Click Save (button).
- Click the X in the corner to close the window.
How to View or Edit a Note
- Navigate to Items > Menu (button) > Default View.
- Double-click the item you want to edit.
- Click Edit (button) on the top row of buttons if it is not blue.
- Click Notes & Attachments (tab).
- Double-click a note to open it or right-click the note and select View/Edit Note.
- Edit the note in the Edit Note window, including its name and reference.
- Note: Use Prev / Next to move to the previous or next note.
- Click Save (button).
- Click the X in the corner to close the window.
How to Delete a Single Note
- Navigate to Items > Menu (button) > Default View.
- Double-click the item you want to edit.
- Click Edit (button) on the top row of buttons if it is not blue.
- Click Notes & Attachments (tab).
- Click the three dots (…) in the last column and select Delete.
- Confirm the deletion on the popup.
How to Delete Multiple Notes
- Navigate to Items > Menu (button) > Default View.
- Double-click the item you want to edit.
- Click Edit (button) on the top row of buttons if it is not blue.
- Click Notes & Attachments (tab).
- Hold down the Ctrl key and click all the notes you want to delete.
- Click Delete (button) in the Notes section.
- Confirm the deletion of all the selected notes.
How to Add Attachments to an Item
- Navigate to Items > Menu (button) > Default View.
- Double-click the item you want to edit.
- Click Edit (button) on the top row of buttons if it is not blue.
- Click Notes & Attachments (tab).
- Click Attachment (button) next to Add.
- Click Save (button) if it is not greyed out.
- Description = Select a description from the dropdown list.
- Type = Select a type from the dropdown list (optional; the type is filled in when you add an attachment).
- Name = Select a name from the dropdown list.
- Click the tab that matches your upload option:
- Upload from Device:
- Check that the file size is less than the limit set in General Settings (e.g. 50 KB).
- Drag a file from your device onto the screen.
- Click Select Files from Your Device (button) to navigate to the file you want to upload.
- Enter URL: Paste or enter a URL in the box provided.
- Capture Image:
- Place the image you want to upload in front of your camera.
- Once the image is in place, click Pause (button) to pause the capture on QuickEasy BOS.
- Click Save (button) to capture the image.
- Paste Image:
- Copy an image to your clipboard.
- Click inside the Paste Image tab and press Ctrl + V or right-click and select Paste.
- Upload from Device:
- Click Save (button) if it is not greyed out.
- Click the X in the top corner to close the popup.
How to View or Edit an Attachment
- Navigate to Items > Menu (button) > Default View.
- Double-click the item you want to edit.
- Click Edit (button) on the top row of buttons if it is not blue.
- Click Notes & Attachments (tab).
- Right-click the attachment and select Edit.
- Edit the attachment.
- Click Save (button).
- Click the X in the corner to close the window.
How to Delete a Single Attachment
- Navigate to Items > Menu (button) > Default View.
- Double-click the item you want to edit.
- Click Edit (button) on the top row of buttons if it is not blue.
- Click Notes & Attachments (tab).
- Right-click an attachment and select Delete.
- Confirm the deletion on the popup.
How to Delete Multiple Attachments
- Navigate to Items > Menu (button) > Default View.
- Double-click the item you want to edit.
- Click Edit (button) on the top row of buttons if it is not blue.
- Click Notes & Attachments (tab).
- Hold down the Ctrl key and click all the attachments you want to delete.
- Click Delete (button) in the Notes section.
- Confirm the deletion of all the selected attachments.
How to Edit an Item
- Navigate to Items.
- Double-click the item to edit.
- Click Edit (button) on the top row.
- Make your changes.
- Click Save (button) on the top row.
How to Delete an Item
BOS refuses to delete an item in these cases, and shows the message given:
- The item is in the Materials section of another item’s Costing tab: Delete Failed. This selected Item is linked to an Costing Materials.
- The item is in the Routing section of another item’s Costing tab: Delete Failed. This selected Item is linked to an Costing Routing.
- The item has an inventory location on its Inventory tab: Delete Failed. This selected Item is linked to an Inventory Location.
Remove the item from those costings, or delete its inventory locations, and then delete the item. The Dependencies (tab) lists the costings and assemblies that use the item.
- Navigate to Items.
- Right-click the item to delete and select Delete.
- Confirm the deletion on the popup.
- Note: Items that are used in transactions cannot be deleted, but you can change their statuses to Cancelled or Pending.
How to Copy an Item
- Navigate to Items.
- Double-click the item to copy.
- Click Actions (button) > Copy.
- Note: You can also right-click the item in the List View and select Copy.
- Change the description of the copied item and edit the information.
- Click Save (button).
How to Set Transaction Defaults for Items
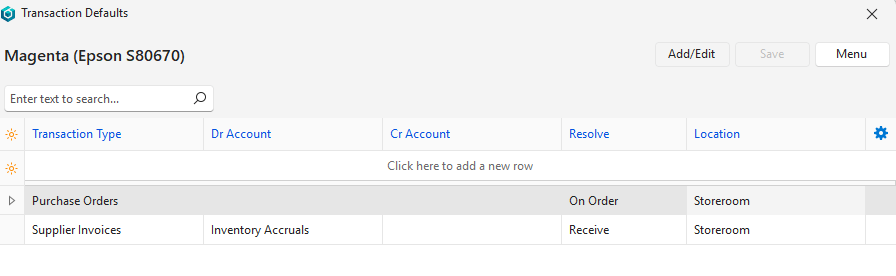
- Transaction defaults are set from Items Edit View > Menu (button) > Edit Transaction Defaults.
- Defaults can be set for all the Transaction Types, or only for those that post to the ledger, to ensure the correct ledger accounts are debited and credited.
- The defaults can be changed when you enter a transaction.
- Defaults can also be set from a transaction. When you enter a transaction, select a default account, resolve option and location, then right-click the entry, select Set Item defaults (Accounts, Resolve and Location) and confirm the change.
- Navigate to Items.
- Double-click the item you want to edit.
- Click Menu (button) > Edit Transaction Defaults.
- Click Add/Edit (button).
- Complete the Click here to add a new row row as follows:
- Transaction Type = Select a Transaction Type from the dropdown list.
- Dr Account = Select the ledger account to debit from the dropdown list. Leave it blank if the account to debit is a customer or supplier account, or if the transaction is not posted to the ledger.
- Cr Account = Select the ledger account to credit from the dropdown list. Leave it blank if the account to credit is a customer or supplier account, or if the transaction is not posted to the ledger.
- Resolve = Select a resolve option for the Transaction Type (e.g. Purchase, On Order, Produce).
- Note: If the resolve is unavailable for the Transaction Type, the resolve is still saved, but the warning line shows “Transaction Setup invalid Resolve” (with any invalid Dr Account or Cr Account in the same warning), and the resolve is ignored when the item is added to a transaction. To fix the warning, check which resolves the Transaction Type allows and select one of those.
- Location = Select the location where the item is usually stored.
- Note: If the item is not an inventory item, or if the item is stored at a different location from the one selected, the location is still saved, but the warning line shows “Item invalid Location”, and the location is ignored when the item is added to a transaction. To fix the warning, add the location to the item’s Inventory tab.
- Click Save (button).
How to Translate an Item
See Item Creation and Editing Interface for more information on translations.
- Navigate to Items.
- Double-click the item you want to edit.
- Click Translate (button) and select the language you want to translate to.
- Note: The dropdown list contains all the languages assigned to your organisation. Languages that the item is already translated into appear in bold. After the translation, the translated tabs and header information appear along with the base language. Tabs that can be edited only in the base language are hidden.
- Edit the translated text as needed.
- Click the arrow to close the item.
- In the List View, reopen the item to view it in the selected language.