
Menu Templates
Menu Templates hold the Menu Groups and Fixed Menu Items that users see on their menus. Once Menu Groups are created, they must be added to Menu Templates, and the Menu Templates assigned to users (see Menus Explained). This page explains how to create and manage Menu Templates.
- You can create as many Menu Templates as you need. For example, a staff member who only captures supplier invoices and debit notes could have a Menu Template with only those two Transaction Types and the Fixed Menu Items.
- Menu items can be on the Tile Menu or stay as dropdown items on the Main Menu. We recommend the Tile Menu for the items used most often.
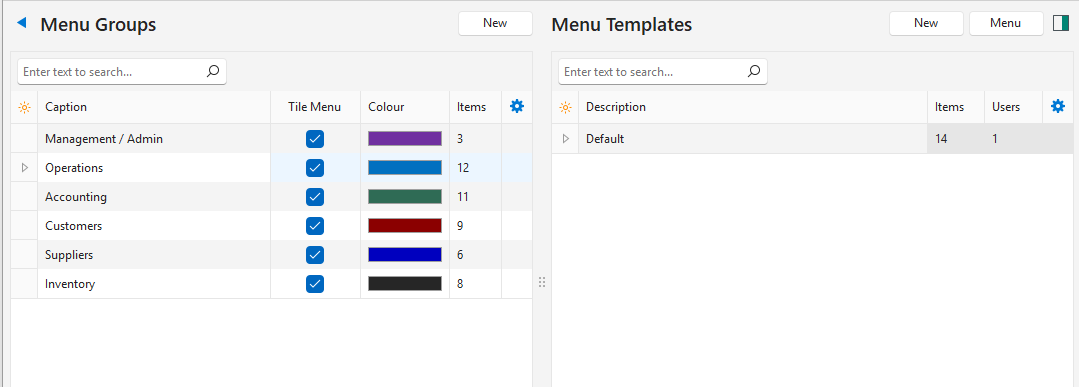
Menu Templates List
The right panel of the Menus screen lists the Menu Templates. The number of Menu Templates appears below the Description column.
| Column | Description |
|---|---|
| Field Chooser (*) | Add or remove columns. |
| Description | The name of the Menu Template. |
| Items | The number of items in the Menu Template. |
| Users | The number of users linked to the Menu Template. |
| Menu (…) | Right-click a Menu Template, or click its three dots (…), for these options:
|
Menu Template Items
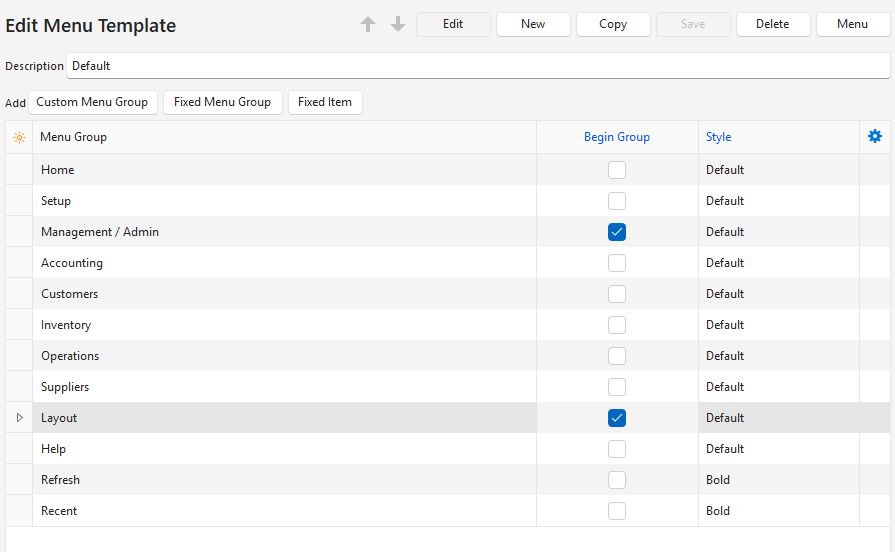
A Menu Template lists the items added with the buttons next to Add, each with its Begin Group and Style.
| Option or Column | Description |
|---|---|
| Custom Menu Group | Adds the Menu Groups that you created. |
| Fixed Menu Group | Adds built-in Menu Groups. These entries cannot be added to the Tile Menu. The following options are available:
|
| Fixed Item | Adds built-in functions. The following options are available:
|
| Begin Group | Checkbox. If checked, a separator line appears before the menu item. |
| Style | Bold or Default (not bold). |
How to Create Menu Templates
- Navigate to Main Menu > Setup > Menus.
- Click New (button) next to the Menu Templates caption (right panel).
- Description = Enter a name for the menu.
- Add items to the menu by clicking a button next to Add and selecting an option from the dropdown list (see Menu Template Items):
- Custom Menu Group
- Fixed Menu Group
- Fixed Item
- Continue to add all the items you want on the menu.
- Rearrange the items by right-clicking an item and selecting Move Up or Move Down. Items can also be dragged and dropped.
- For each item added:
- Check the box under Begin Group to include a separator line before the menu item (optional).
- Select Bold or Default (not bold) from the dropdown list under Style.
- Click Save (button) if it is not greyed out.
How to Edit a Menu Template
- Navigate to Main Menu > Setup > Menus.
- On the right panel, right-click the name of the menu you want to edit and select Edit.
- Click Edit (button) on the popup.
- Add items to the menu by clicking a button next to Add and selecting an option from the dropdown list:
- Custom Menu Group
- Fixed Menu Group
- Fixed Item
- Delete any items by right-clicking the item and selecting Delete.
- Rearrange the items by right-clicking an item and selecting Move Up or Move Down. Items can also be dragged and dropped.
- For each item on the list:
- Check the box under Begin Group to include a separator line before the menu item (optional).
- Select Bold or Default (not bold) from the dropdown list under Style.
- Click Save (button) if it is not greyed out.
How to Copy a Menu Template to a New Menu Template
- Navigate to Main Menu > Setup > Menus.
- On the right panel, right-click the name of the menu you want to copy and select Copy.
- Double-click the menu item that has – Copy after its name to open it.
- Edit the copied Menu Template as needed.
How to Delete a Menu Template
- Navigate to Main Menu > Setup > Menus.
- On the right panel, right-click the name of the menu you want to delete and select Edit.
- Click Edit (button) on the popup.
- Right-click every menu entry and select Delete.
- When there are no entries left, click Delete (button) on the top row of the popup.
- Confirm the deletion on the popup.
How to Change the Tile Colours
- Navigate to Main Menu > Setup > Menus.
- On the left panel, right-click an entry and select Edit.
- On the popup, click the block next to Colour.
- Select a new colour from the colour chart.
- Click Save (button).
How to Preview Menu Templates
- Navigate to Main Menu > Setup > Menus.
- Right-click the Menu Template you want to preview and select Preview.
- To reset the preview menu, preview one of the other menus or restart QuickEasy BOS.
How to Link a User to a Menu Template
- Navigate to Main Menu > Setup > Users.
- Click Edit (button).
- Navigate to the user you want to change and select a template from the dropdown list in the Menu Template column.
- Click Save (button).
- Restart BOS if you changed your own Menu Template.