
Project Templates List and Edit Views
A Project Template is a shell for a project that makes sure all the necessary steps are followed. Templates also let you assign tasks to specific employees.
To create Project Templates, right-click a Service Type in the list view and select Edit Project Templates, or use Menu (button) in the edit view.
List View: Project Templates
Buttons Explained
| Button | Description |
|---|---|
| Arrows | Navigates between Project Templates. |
| View | Displays a list of Project Templates. |
| New | Creates a template for the current Service Type. If there is no Service Type, the message “Please add a Class.” appears; create a Service Type first. |
| Menu | Layout |
Fields Explained
| Field | Description |
|---|---|
| Field Chooser (*) | Add or remove columns. |
| ID | The system-generated number for the entry. |
| Status | The status of the Project Template (Pending, Active or Cancelled), as selected on the status bar of the edit view. |
| Description | The description of the Project Template, as entered on the status bar of the edit view. |
| Enable Groups | A checkbox indicating whether the Project Template uses groups (milestones, groups and tasks) or only milestones and tasks. |
| Created | The date on which the entry was created. |
| Updated | The date on which the entry was last updated. |
| Updated By | The user who last updated the entry. |
| Days | The total number of days the project should take. |
| Hrs | The total number of hours the project should take. |
 | A submenu (also opened by right-clicking the entry) with these options:
|
Edit Project Template
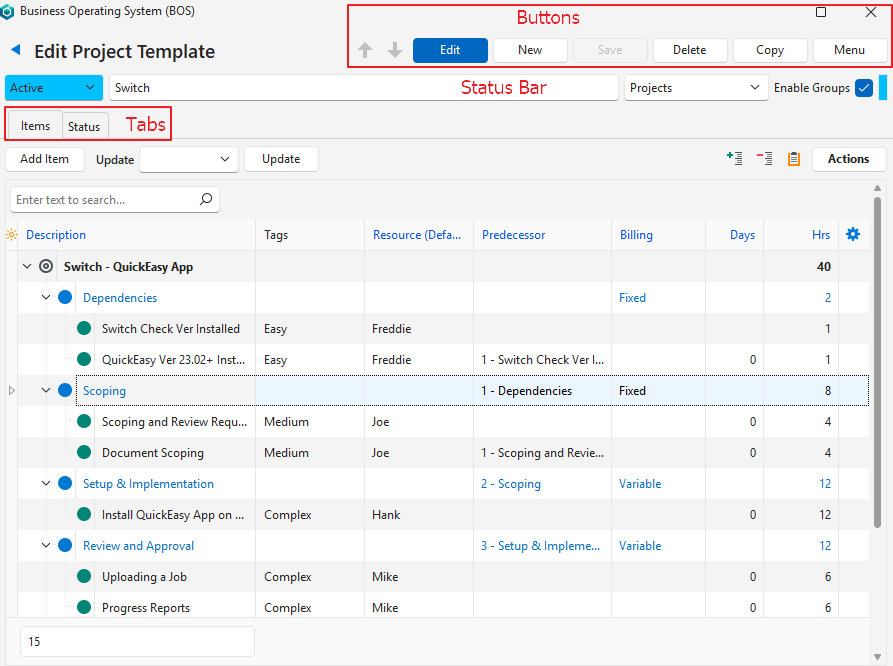
Buttons Explained
| Button | Description |
|---|---|
| Arrows | Navigates between Project Templates. |
| Edit | Lets you edit the fields. |
| New | Creates a template for the current Service Type. If there is no Service Type, the message “Please add a Class.” appears; create a Service Type first. |
| Save | Saves any changes and recalculates any totals. |
| Delete | Deletes the template if it has not yet been used. |
| Copy | Copies the template to create a new template. |
| Menu | Layout |
Status Bar
| Field | Description |
|---|---|
| Status | Select a status for the Project Template from the dropdown list:
Only Active templates can be added to a project. |
| Description | Enter a description for the Project Template. |
| Enable Groups | Checkbox. If checked (the default for a new template), the template has three levels: milestones, groups and tasks. If unchecked, the template has milestones and tasks only. Can be changed only while the template has no items. A template can be added only to a project with a matching Enable Group setting. |
| Service Types (filter) | Select a Service Type from the dropdown list of all the Service Types. |
Items (tab)
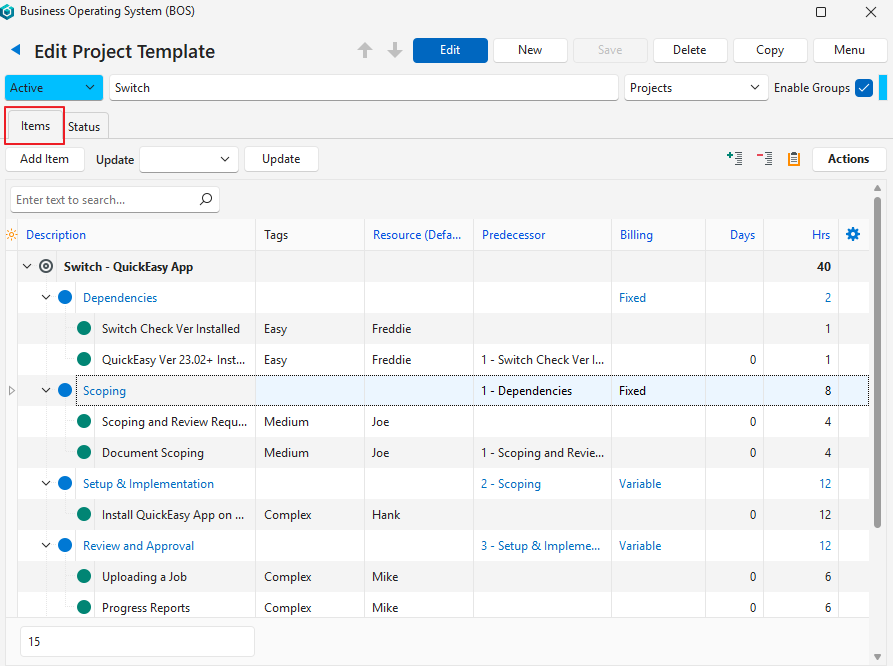
Fields Explained
| Buttons | Description |
|---|---|
| Add Item (button) | Adds a new milestone (top-level) item for you to fill in. Unavailable when not in Edit mode (click Edit (button) on the top row). |
| Update | Select the update to apply to all the selected records when you click the adjacent Update button. The update options are:
|
| + – | Expands or collapses the view. |
| Clipboard icon | Toggles showing or hiding notes that are added to items using the context menu. |
| Actions (button) | Options to:
|
Fields marked in blue (✎) can be edited.
| Field | Description |
|---|---|
| Field Chooser (*) | Add or remove columns. |
| ID | The system-generated number allocated to the project. |
| Parent ID | The system-generated number allocated to the parent entry (an entry with sub-items). |
| Order ID | A number that indicates the sequence of the entries in each level. |
| Level | A number that indicates which level the entry belongs to: 1 for a milestone, 2 for a group and 3 for a task. |
| Description | The description of the task or project. |
| Tags | The tags allocated to the entry. Tags can be added or removed only with Update or the context menu. |
| Resource (Default) | The default resource that performs the task. A different resource can be selected on the ticket. Can be edited only on milestones and tasks. |
| Predecessor | The task that must be completed first. Predecessors can be added or removed using Actions (button). They can also be added by selecting an option from the dropdown list of valid predecessors. Only milestone predecessors are used when a project is scheduled. |
| Note | Displays a truncated version of any note that is added to the item using the context menu. |
| Billing | The billing option, selected from this list:
Can be edited only on groups. |
| Days | The number of workdays the milestone is expected to take. Can be edited only on milestones. |
| Hrs | The number of hours the task is expected to take. Can be edited only on tasks. The hours of groups and milestones are totalled automatically from the items under them when you save. |
| A submenu with the following options (depending on which level item was clicked). If Enable Groups is unchecked, a sub-item added to a milestone is a task:
|
Status (tab)
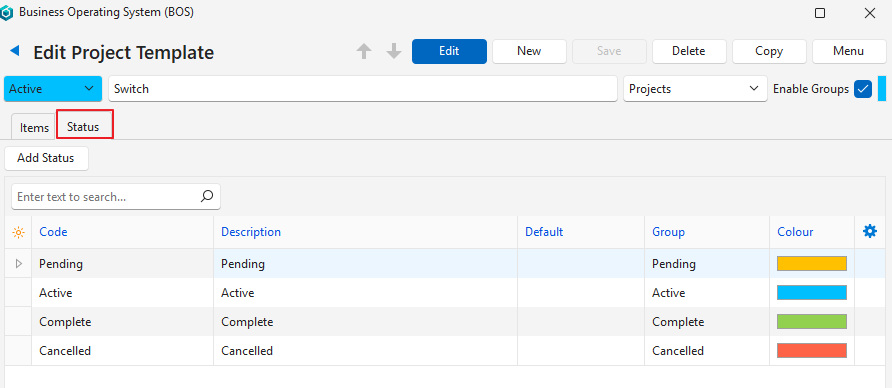
Fields marked in blue (✎) can be edited.
Fields Explained
| Field | Description |
|---|---|
| Add Status (button) | Adds statuses. Unavailable when not in Edit mode (click Edit (button) on the top row). |
| Field Chooser (*) | Add or remove columns. |
| ID | The system-generated number for the entry. |
| Order ID | A number indicating the order of the statuses. |
| Code | The short description for the status. |
| Description | The full description for the status. |
| Default | Whether the status is the default for one of these options, selected from a dropdown list:
|
| Group | The applicable Status Group. |
| Colour | The colour for the status. To change it, click the colour field and select a different colour. |
| A submenu (also opened by right-clicking the entry) with these options:
|