
Point of Sale Setup Tutorials
💡These tutorials explain how to set up QuickEasy BOS to use Point of Sale.
Setup Steps
- Create an entity for each PoS till.
- Set up the PoS Environment: Settings.
- Set up the PoS Environment: Users.
- Set up the PoS Environment: Statuses.
- Set User Access.
- Activate the Transaction Type settings.
- Add Point of Sale (PoS) to a Menu Group.
- Add Sign Out (PoS) to the applicable Menu Templates.
Step 1: Create an Entity
Note
- The costs and hours worked are for you to see what the PoS costs you. The information is not used elsewhere yet.
- If inventory is transferred between branches, a stock location should be created at the same level as the till and linked to the same direct parent. For example, if the till is linked to the Bangkok branch, the stock location must also be linked to the Bangkok branch.
- Ideally, you should have one stock location and one till for every branch that uses these features.
- Navigate to Entities (e.g. Main Menu > Setup > Entities).
- Click New (button) and select Till (PoS) from the dropdown list.
- Complete the header as follows:
- Name = Enter a name for the entity (e.g. Till Head Office).
- Code = Enter a code for the entity (abbreviated name).
- Parent = Select a parent from the dropdown list of entities.
- Note: A Till (PoS) can be linked to a branch or department that is linked to a registered entity, or directly to a registered entity.
- Hours/week = Enter how many hours per week the till typically operates.
- Monthly Cost = Enter the monthly cost (e.g. maintenance cost) of the till.
- Note: If staff are added and this field is blank, the staff costs are transferred to it automatically.
- Weeks/Annum = Enter how many weeks in a year the till typically operates, excluding holidays.
- Hourly Rate: Calculated if steps 3d to 3f are filled in. Alternatively, check the Override box and enter a rate.
- Override checkbox = Check the box to allow the Hourly Rate to be edited. Leave it unchecked to use the calculated rate.
- Optionally, add staff and assets (see Creating and Editing Entities Tutorials for detailed instructions).
- Note: Staff added to a till are not linked to the users who can use that till’s PoS. User access settings determine who can use it.
Step 2: Set Up the PoS Environment: Settings
- Navigate to Point of Sale (e.g. Main Menu > Setup > Point of Sale (PoS)).
- Click Edit (button) if it is not blue.
- Click Settings (tab) if it is not already open.
- Click Settings (button) next to Add.
- Select all the settings on the list.
- Click Add/Update (button).
- Enter the values for each of the settings as follows:
- Cash Accounts =
- Click Edit in the Value column.
- Move the cash accounts from the Available to the Selected section to add them. (Move the cash accounts from the Selected to the Available section to remove them.)
- Click Save (button).
- Default Customer – Assign to all Customer Docs by default = Click the arrow in the Value column and select the default customer (e.g. Cash Sales).
- Denominations = Enter all the notes your currency is available in (e.g. 200, 100, 50). Enter denominations below 1, such as coins, as decimals (e.g. 0.5, 0.2, 0.1).
- Sales Accounts =
- Click Edit in the Value column.
- Move the applicable sales accounts from the Available to the Selected section to add them. (Move the accounts from the Selected to the Available section to remove them.)
- Click Save (button).
- Select Transaction Types available for quick creation on the PoS Dashboard = Move the Transaction Types users will use to capture transactions from the Available to the Selected section.
- Select which Transaction Types show in the PoS Session history (Transactions Tab) = Move the Transaction Types you want PoS users to see from the Available to the Selected section.
- Note: Excluded Transaction Types can still be viewed from the general menu.
- Cash Accounts =
- Click Save (button) if it is not greyed out.
- Continue with Step 3 (see below).
Step 3: Set Up the PoS Environment: Users
Note
All the users created for the organisation appear. Users must be linked to a Contact for PoS purposes.
- Navigate to Point of Sale (e.g. Main Menu > Setup > Point of Sale (PoS)).
- Click Edit (button) if it is not blue.
- Click Users (tab).
- Contact = Select a contact if one is not already allocated.
- PIN No. = Enter a PIN consisting of numbers and capital letters.
- Note: If the user is going to log in by scanning a barcode, you can right-click the username and select Generate PIN No. to generate a 12-character PIN (digits and capital letters). If the user must enter the PIN each time, we recommend no more than five characters.
- Click Save (button) if it is not greyed out.
Step 4: Set Up the PoS Environment: Statuses
- Navigate to Point of Sale (e.g. Main Menu > Setup > Point of Sale (PoS)).
- Click Edit (button) if it is not blue.
- Click Statuses (PoS Sessions) (tab).
- Click Add Default Statuses (button).
- Edit the statuses if required.
- Click Save (button) if it is not greyed out.
- Continue with Step 5.
Step 5: Set User Access
Note
Assign the role PoS User (in the Users module) to users who must clock in to PoS before they start work.
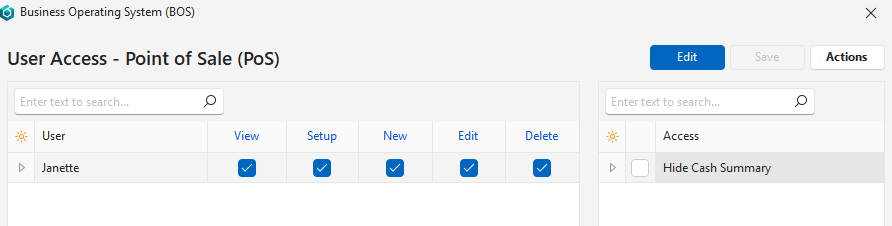
- After completing steps 2 to 4, click Menu (button) > Edit User Access.
- Click Actions (button) > Add/Remove Users.
- Move the users you want to grant access to from the Available to the Selected section.
- Click Save (button).
- Allocate access as follows, either individually or from Actions (button) > Batch Update:
- View = Check the box to allow the user to view the PoS records.
- Setup = Check the box to allow the user to change the setups (as explained on this page).
- New = Check the box to allow the user to create PoS records.
- Edit = Check the box to allow the user to edit or capture PoS records.
- Delete = Check the box to allow the user to delete PoS records.
- On the right, check the boxes to allow or block access to specific features (e.g. Hide Cash Summary).
- Click Save (button) if it is not greyed out.
Step 6: Activate the Transaction Type Settings
Info
- Any Transaction Type can be used in PoS.
- Only transactions that post to the Sales and Cash accounts defined in step 2 appear on the summary pages (if selected in step 2) or are included in the expected cash.
- Only transactions that allow items or custom items to be added appear on the PoS dashboard.
- If the same sales account is used for credit and cash sales, PoS isolates the cash sales (those recorded through PoS) and displays only the cash sales on the dashboard.
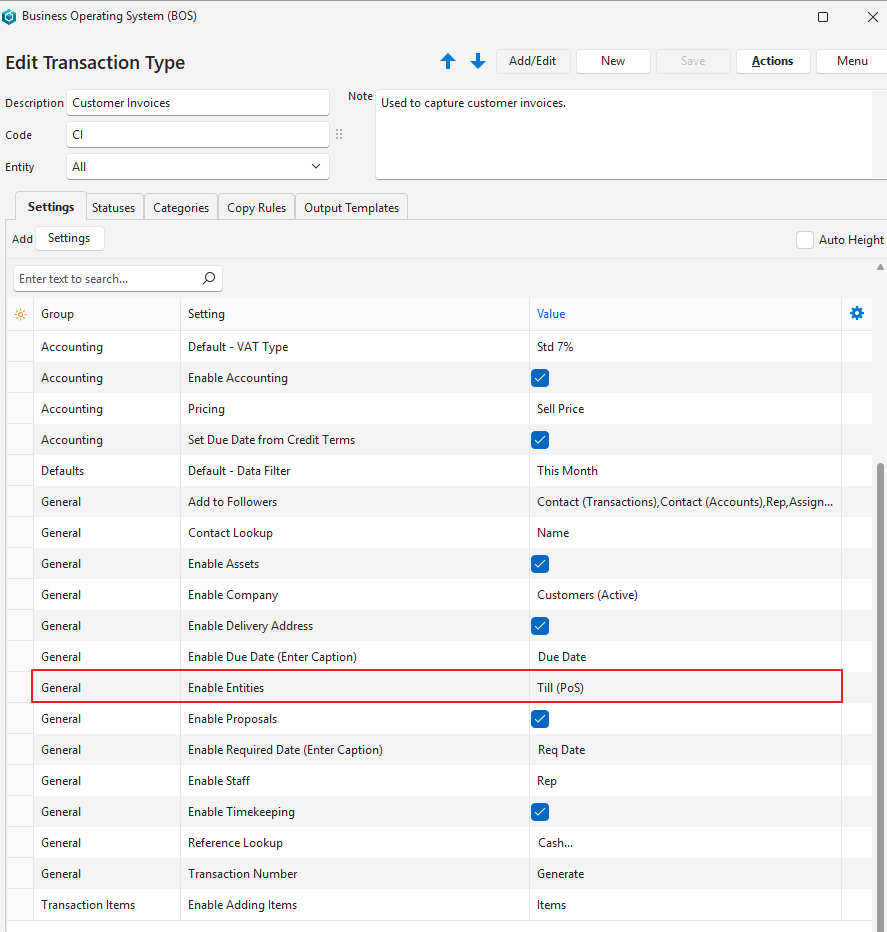
- Navigate to Transaction Types (e.g. Main Menu > Setup > Transaction Types).
- For each Transaction Type you want to link to PoS, add the setting General > Enable Entities on the Settings tab and select Till (PoS) in the Value column.
Step 7: Add Point of Sale (PoS) to a Menu Group
Info
This option displays a summary of the active tills.
- Navigate to Menus (e.g. Main Menu > Setup > Menus).
- Double-click an applicable Menu Group or create one.
- Click Edit (button) if it is not blue.
- Select Point of Sale (PoS) from the dropdown list next to Module.
- Check the box next to Tile Menu to display it on a tile menu (optional).
- Check the box next to Begin Group to draw a line before it on the menu (optional).
- Close the popup using the X in the corner.
Step 8: Add PoS to the Menu Templates
Info
Open PoS (button), named Sign Out (PoS) after the first click, opens the main interface from which the tills and cash are managed.
- Navigate to Menus (e.g. Main Menu > Setup > Menus).
- For each of the applicable Menu Templates:
- Double-click the Menu Template to edit it.
- Click Edit (button) on the top row if it is not blue.
- Click Fixed Item (above the items) > Sign Out (PoS).
- Check the box in Begin Group to draw a line before the entry (optional).
- Click Save (button) if it is not greyed out.
- Close the Edit Menu Template popup.
- Right-click the applicable Menu Template and select Preview if you changed your own Menu Template. Other users see the entry after they restart BOS.
Messages When You Open PoS
When you click Sign Out (PoS), BOS checks the setup. If a step is missing, one of these messages appears and PoS does not open.
| Message | How to Fix |
|---|---|
| Till (PoS) is blank. See Setup Entities (Till must be linked to a Registered Entity - Directly or indirectly). | Create a Till (PoS) entity and link it to a registered entity, directly or through a branch or department (see Step 1). |
| Invalid Setting Denominations. See Setup Point of Sale (PoS) > Settings > Denominations. | Add the Denominations setting and enter its value (see Step 2). |
| Invalid PoS Sessions Status. See Setup Point of Sale (PoS) > Statuses. | Add the PoS session statuses (see Step 4). |
| Invalid Timekeeping Status. See Timekeeping Module > Menu button > Settings > Edit Statuses. | Add the Timekeeping statuses (see Timekeeping Status Tutorials). |
| Active User has not been set PIN No. See Setup Point of Sale (PoS) > Users > PIN No. | Enter a PIN No. for the logged-in user (see Step 3). |
| Access Denied. | You do not have View access to PoS. Ask an administrator to grant it (see Step 5). |