
Contacts Edit View
Use this interface to create and edit contacts in Contacts, the address book of your staff, customers, suppliers and other contacts. A contact opened from another module, such as a transaction, opens in a modal form (a popup with fewer options than the full screen).
Buttons Explained
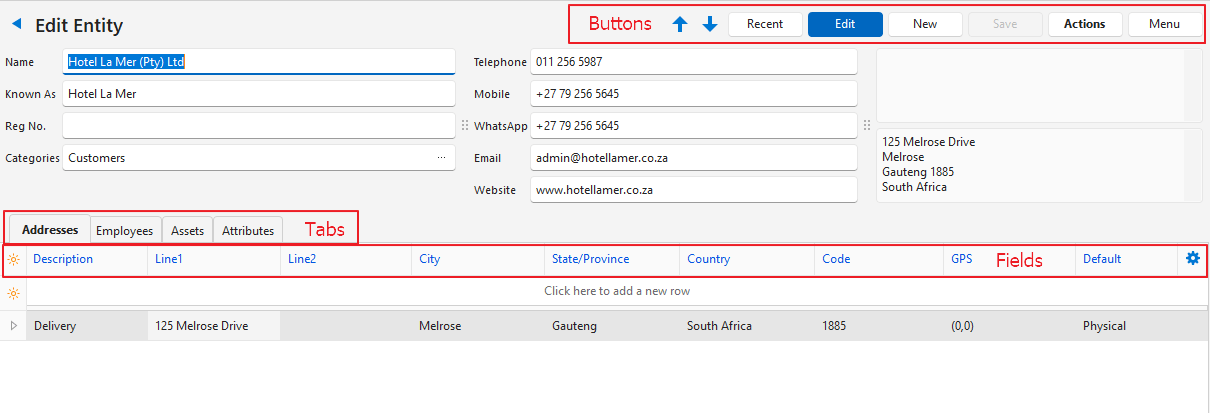
| Button | Description |
|---|---|
| Navigational Arrows | Navigates to the next or previous entry. |
| Recent | A dropdown list of recently viewed records for quick access to those records. The button does not appear if there are no recent items. |
| Edit | Edits the entry. |
| New | Creates a new Person or Entity. Select Person for an employee. Select Entity if the contact is a customer or supplier. |
| Save | Saves any changes. |
| Actions |
|
| Menu | View/Edit Notes & Attachments View/Edit Image Profile (Person contacts only) View Changelog: Opens the changes made to this contact and its attributes. Settings
|
Header Explained: Persons
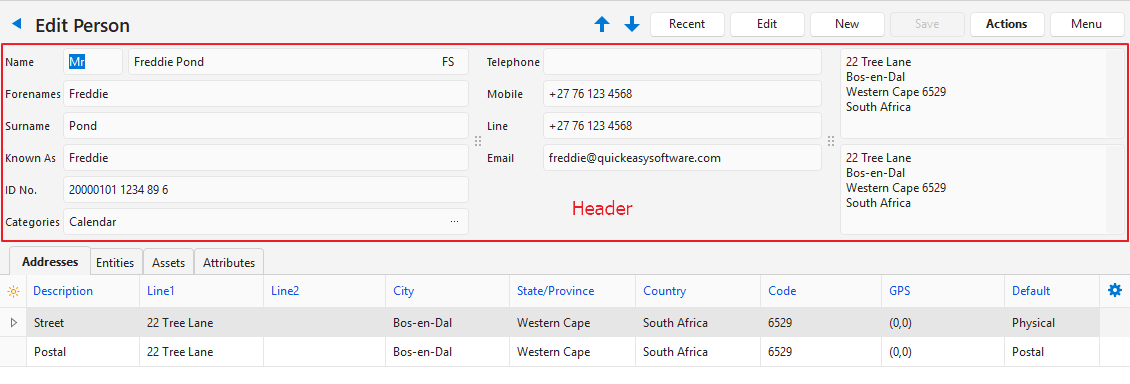
| Field | Description |
|---|---|
| Name | Enter the contact’s Title and Legal Name. If another person has the same Name or Known As, a warning appears at the top of the contact (for example, “Warning: Duplicate Name”). Only contacts of the same type are compared: a person is compared with other persons, not with entities. |
| Forenames | The person’s first name or names. |
| Surname | The person’s Surname. |
| Known As | Enter the contact’s trade name or nickname. |
| ID No. | Enter a government-issued number that identifies the person (e.g. identity or social security number). |
| Categories | The categories selected for the contact. When you change the categories in Edit mode, the contact’s row in the Contacts list is refreshed at once. |
| Telephone | Enter the contact’s Telephone Number. For the call or message features to work on the mobile app, the number must be in the international format (e.g. +00 82 123 1234). |
| Mobile | Enter the contact’s Mobile Number. For the call or message features to work on the mobile app, the number must be in the international format (e.g. +00 82 123 1234). |
| Messaging Number | Enter the contact’s Messaging Number (e.g. WhatsApp or Line). The name of the default app is a General Setting. For the call or message features to work on the mobile app, the number must be in the international format (e.g. +00 82 123 1234). |
| Enter the contact’s Email Address. | |
| Website | Enter the contact’s Website URL. |
| Postal Address | The contact’s Postal Address, filled in from the Addresses tab. |
| Physical Address | The contact’s Physical Address, filled in from the Addresses tab. |
Header Explained: Entities
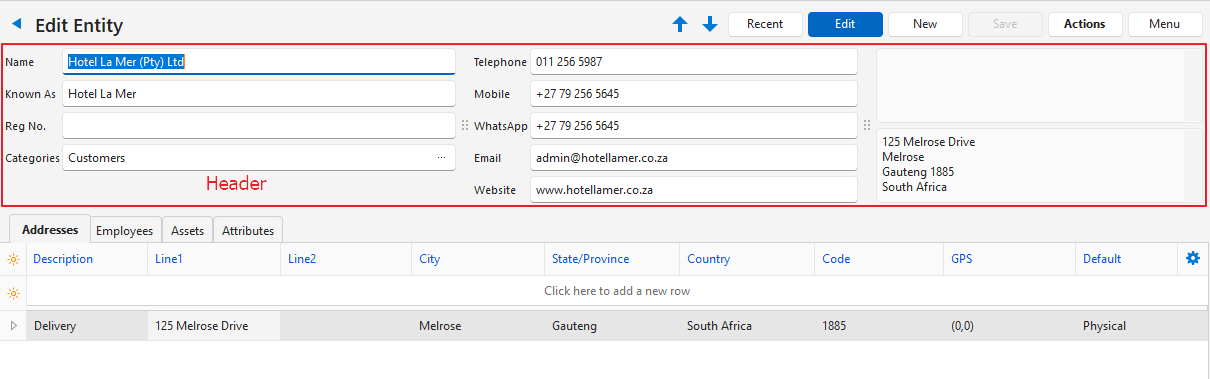
| Field | Description |
|---|---|
| Name | Enter the contact’s Title and Legal Name. If another entity has the same Name or Known As, a warning appears at the top of the contact (for example, “Warning: Duplicate Name”). Only contacts of the same type are compared: an entity is compared with other entities, not with persons. |
| Known As | Enter the contact’s trade name or nickname. |
| Reg No. | Enter the organisation’s Registration Number. |
| Categories | Add categories to the contact. When you change the categories in Edit mode, the contact’s row in the Contacts list is refreshed at once. |
| Telephone | Enter the contact’s Telephone Number. For the call or message features to work on the mobile app, the number must be in the international format (e.g. +00 82 123 1234). |
| Mobile | Enter the contact’s Mobile Number. For the call or message features to work on the mobile app, the number must be in the international format (e.g. +00 82 123 1234). |
| Messaging Number | Enter the contact’s Messaging Number (e.g. WhatsApp or Line). The name of the default app is a General Setting. For the call or message features to work on the mobile app, the number must be in the international format (e.g. +00 82 123 1234). |
| Enter the contact’s Email Address. | |
| Website | Enter the contact’s Website URL. |
| Postal Address | The contact’s Postal Address, filled in from the Addresses tab. |
| Physical Address | The contact’s Physical Address, filled in from the Addresses tab. |
Attributes (tab)
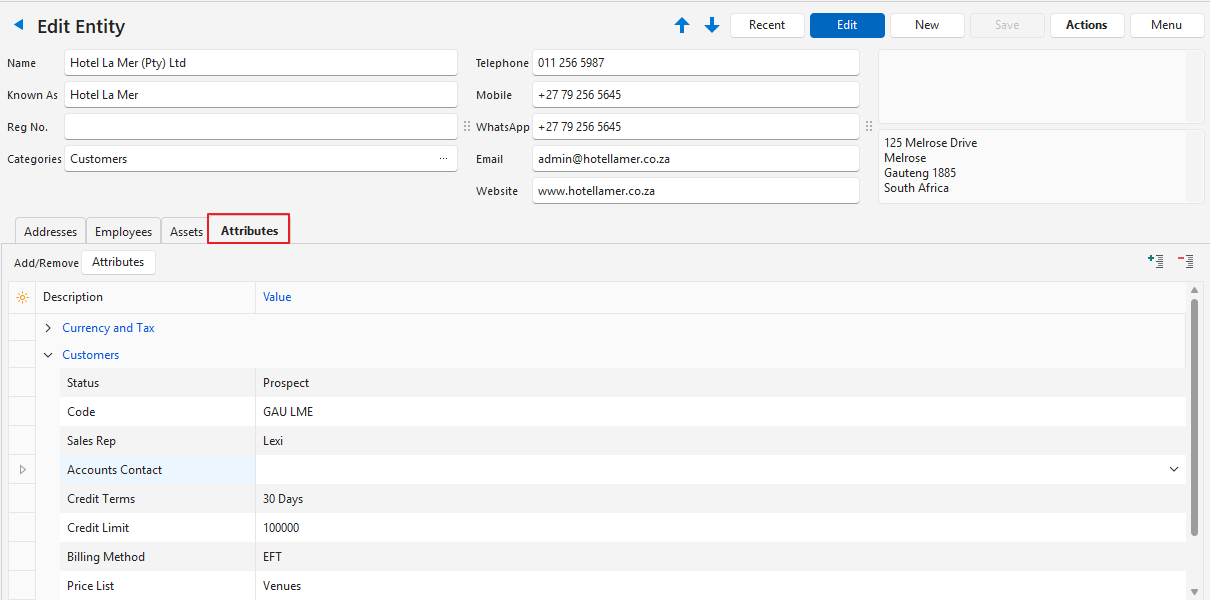
Fields marked in blue (✎) can be edited.
Fields Explained
| Field | Description |
|---|---|
| Attributes (button) | Add a Group/Attribute from a predefined list. Once added, the group is listed on the left. Click a group to show its fields on the right, where you fill in the details. Some groups can be added more than once (e.g. the Language group can be added for each language the person speaks).
|
| Field Chooser (*) | Add or remove columns. |
| ID | The system-generated number for the attribute. |
| Key | The name of the database entry. Use the key to add attributes to forms. |
| Description | The attribute’s description. |
| Value | The information for the entry. This field is editable. |
| Menu (…) | Right-click the Code attribute (key code, for example, the customer or supplier code) for this option:
|
Addresses (tab)
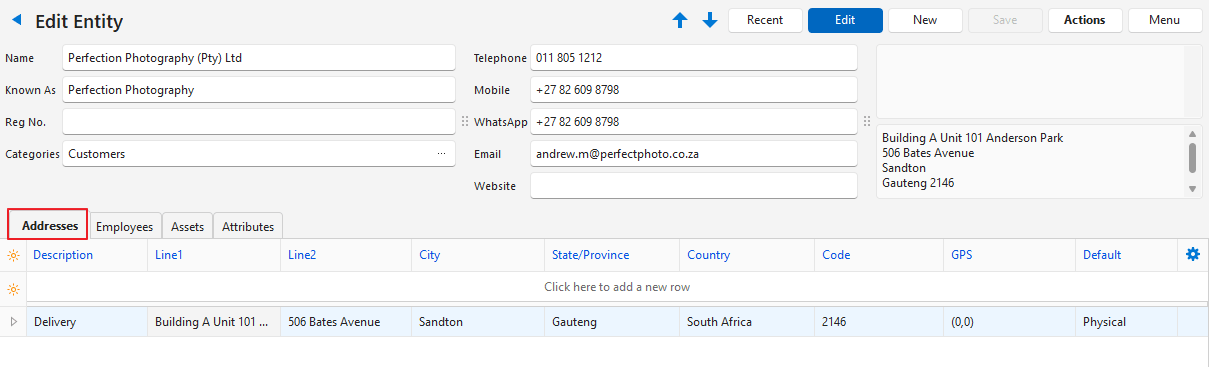
Fields marked in blue (✎) can be edited.
Fields Explained
| Field | Description |
|---|---|
| Click here to add a row | Opens a new row for you to enter another address. A contact can have several addresses. Appears only in Edit mode. |
| Field Chooser (*) | Add or remove columns. |
| ID | The system-generated number for the entry. |
| Contact ID | The system-generated number for the contact person. |
| Description | The description of the address (e.g. Office, Home). |
| Line1 | The first line of the address (e.g. unit number and building name). |
| Line2 | The second line of the address (e.g. street name and number). |
| City | Enter the city in which the contact is located. |
| State/Province | Enter the state or province in which the contact is located. |
| Country | Enter the country in which the contact is located. |
| Code | The postal or zip code of the address. |
| GPS | The contact’s GPS coordinates. |
| Created | The date on which the entry was created. |
| Updated | The date on which the entry was last updated. |
| Default | Select whether the address is the default Physical, Postal or Billing address from the dropdown list. A contact has only one default of each kind: selecting a default removes it from the contact’s other addresses. On customer transactions, the customer’s default Billing address fills in the Bill To field. The Bill To field appears only on customer transactions whose Transaction Type has the setting Enable Address set to Billing. |
 | A submenu (also opened by right-clicking the entry) with these options:
|
Entities (tab)
- This tab appears only if the contact is a person who was added as an employee of an entity.
- Fields marked in blue (✎) can be edited.
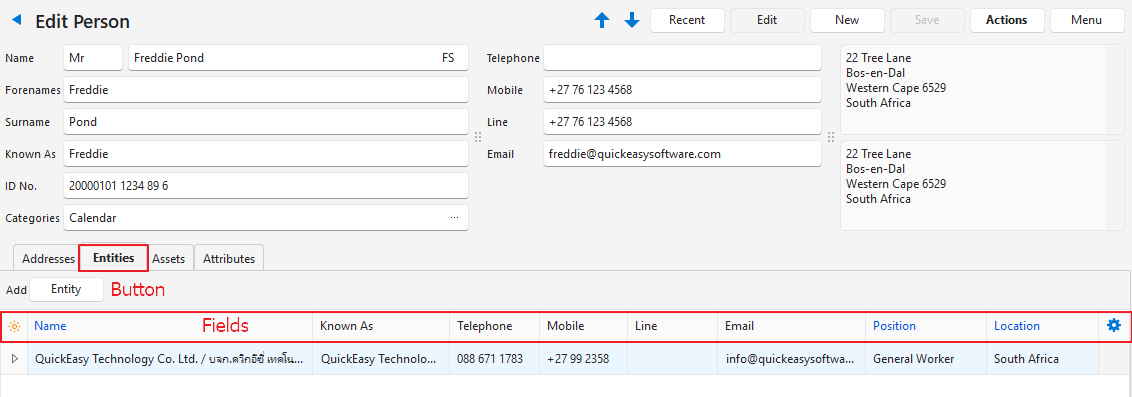
Fields Explained
| Field | Description |
|---|---|
| Entity (button) | Adds an entity. |
| Field Chooser (*) | Add or remove columns. |
| ID | The system-generated number for the entry. |
| Name | Enter the entity’s Name. |
| Known As | Enter the entity’s Trade Name. |
| Enter the entity’s Email Address. | |
| Position | Select a position from the dropdown list. |
| Location | Select a location from the dropdown list. The locations are the Description values on the selected entity’s Addresses (tab). |
| Created | The date on which the entry was created. |
| Updated | The date on which the entry was last updated. |
| A submenu to:
|
Employees (tab)
- This tab appears only if the contact is an entity.
- Fields marked in blue (✎) can be edited.
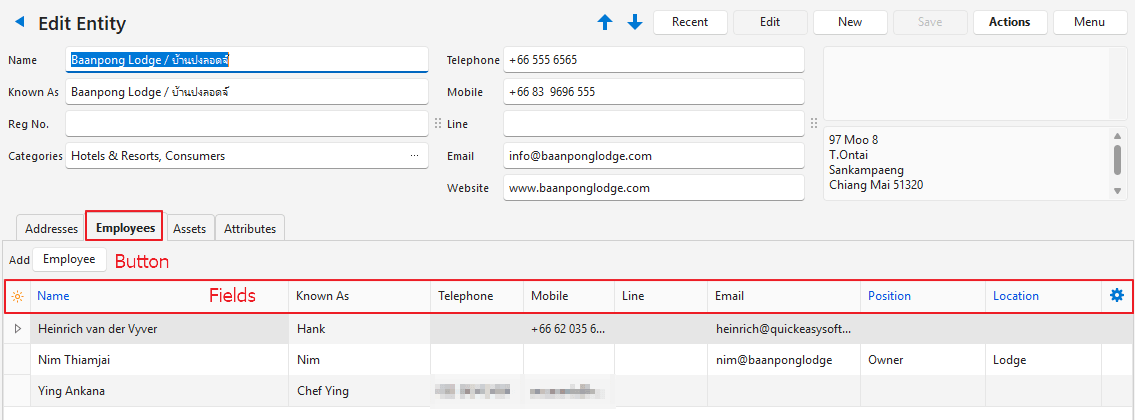
Fields Explained
| Button | Description |
|---|---|
| Employee (button) > Select Contact | Opens a new row. Select an existing contact from the dropdown list in the Name field. Once added, the fields marked in blue (✎) can be edited. |
| Employee (button) > Add Contact | Adds an employee through a form. |
| Field Chooser (*) | Add or remove columns. |
| ID | The system-generated number for the entry. |
| Title | The person’s title (e.g. Mr, Ms). |
| Name | The full name of the employee. |
| Known As | The nickname by which the employee is known. |
| Telephone | The employee’s telephone number. |
| Mobile | The employee’s mobile phone number. |
| Messaging number | Enter the employee’s Messaging Number (e.g. WhatsApp or Line). The name of the default app is a General Setting. |
| The employee’s email address. | |
| Position | The employee’s position. Select a position from the dropdown list. |
| Location | The employee’s location. Select a location from the dropdown list (the list holds the Description values on the entity’s Addresses tab). |
| Created | The date on which the entry was created. |
| Updated | The date on which the entry was last updated. |
| A submenu that lets you:
|
Assets (tab)
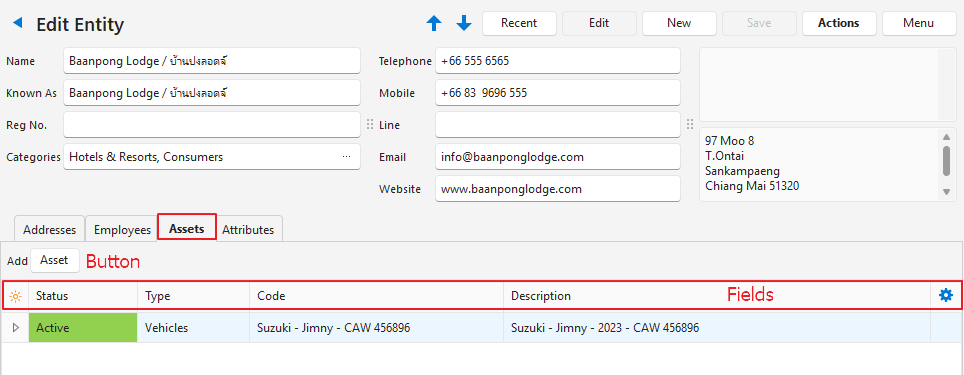
Fields Explained
| Button | Description |
|---|---|
| Asset (button) | Shows a dropdown list with these options:
If no asset statuses are set up, Add Asset shows the message “Invalid Setting Status. See Menu button > Settings > Edit Status (Asset).” and no asset is created. Add the statuses first with Menu (button) > Edit Statuses (Asset). |
| Field Chooser (*) | Add or remove columns. |
| ID | The system-generated number for the entry. |
| Status | The current status of the entry. |
| Type | The type of asset (e.g. Equipment, Vehicles). |
| Code | The asset’s code. |
| Description | The asset’s description. |
| Created | The date on which the entry was created. |
| Updated | The date on which the entry was last updated. |
| Updated By | The user who last updated the entry. |
| A submenu (also opened by right-clicking the entry) with these options:
|