
Contacts Default View
In QuickEasy BOS, you can create an address book of all your staff, customers, suppliers and other contacts. This address book is named Contacts.
There are two list views: the default view, which shows names and contact information such as phone numbers, and the addresses view.
You can also open contacts from other modules, such as transactions. In those cases, the contact opens in a modal form (a popup with fewer options than the full screen).
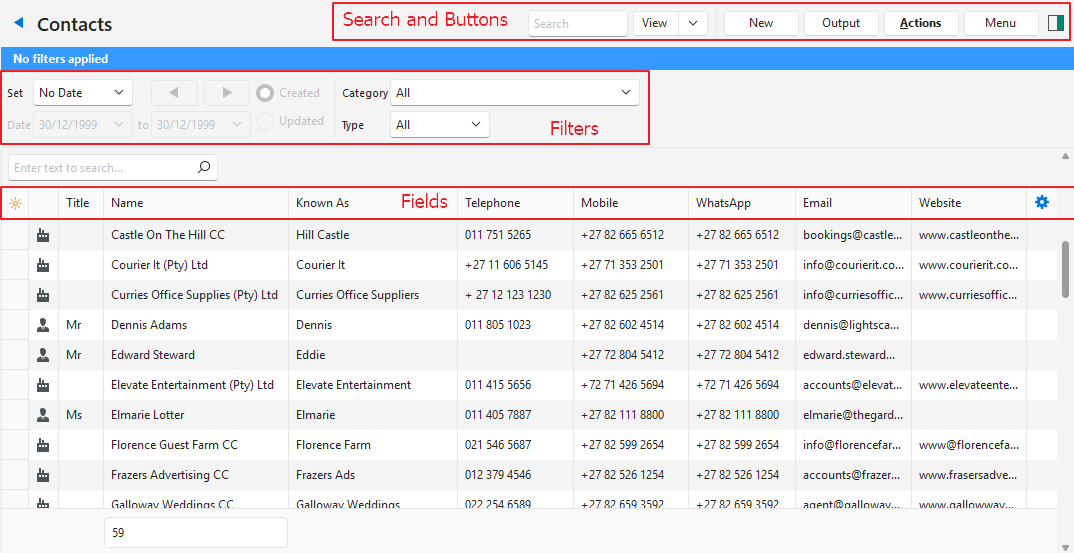
Buttons Explained
| Button | Description |
|---|---|
| View | Generates a list of entries as per the selected data filters. |
| Arrow on View Button | Reset Data Filter: Resets all the data filters. |
| Recent | A dropdown list of recently viewed records for quick access to those records. The button does not appear if no records were recently viewed. |
| New | Creates a new Person or Entity. Select Person for an employee. Select Entity if the contact is a customer or supplier. |
| Output | Prints, previews or emails the output if Output Templates are set up for the module. Export: Exports the list in .xlsx, .htm or .csv format. |
| Actions | Changes several records at once. Check the boxes of the records to update. The options are:
|
| Menu | Views
Settings
|
Filters Explained
| Filter | Description |
|---|---|
| Date | A dropdown list with date options (e.g. No Date, Today, This Year). |
| Navigational Arrows | Adjusts the date in the direction of the arrow. |
| Date … to … | Sets your own date range (based on the selection under Set). |
| Created (radio button) | When selected, only records created during the selected period appear. |
| Updated (radio button) | When selected, only records updated during the selected period appear. |
| Category | Select a specific category or All from the dropdown list. |
| Type | Select the type of contact from the dropdown list:
|
Fields Explained
| Field | Description |
|---|---|
| Field Chooser (*) | Add or remove columns. |
| ID | The system-generated number for the entry. |
| Type | An icon that shows whether the contact is a person or an organisation. |
| Forenames | The person’s first name or names. |
| Surname | The person’s surname. |
| Title | The person’s Job Title. |
| Name | The name of the contact, which can be a person’s full name or the name of a business. |
| Known As | The person’s Nickname or the organisation’s Trade Name. |
| ID No. | A government-issued number that identifies the person (e.g. identity or social security number). |
| Categories | The categories that were selected for the contact. |
| Telephone | The contact’s Telephone Number. For the call or message features to work on the mobile app, the number must be in the international format (e.g. +00 82 123 4567). |
| Mobile | The contact’s Mobile Number. For the call or message features to work on the mobile app, the number must be in the international format (e.g. +00 82 123 4567). |
| Messaging Number | The contact’s Messaging Number (e.g. WhatsApp or Line). The name of the default app is a General Setting. |
| The contact’s Email Address. | |
| Website | The contact’s Website URL. |
| Customers Checkbox | If checked, the contact is a customer. |
| Suppliers Checkbox | If checked, the contact is a supplier. |
| Created | The date on which the entry was created. |
| Updated | The date on which the entry was last updated. |
| Updated By | The user who last updated the entry. |
| Language | The contact’s language. |
 | Right-click a record to see the submenu. The options are:
|