Item Creation and Editing Interface
- Items include the following types and extensions to these types:
- Materials
- Tasks
- Outwork
- Assemblies
- Costings
- Items are used in Transactions (e.g. invoicing), Estimates and Inventory.
- The first step to creating an item is to select a Type. Once selected, the Type cannot be changed. The available types are set by the general setting Items > Enable Item Types.
- There are two types of costing items: Costings and Assemblies.
- Costing Items are used as Costings in Estimating.
- Assembly Items can be used to create nested Bills of Materials (BOMs).
- Costings and Assemblies are brief estimates containing Materials, Tasks and Outwork.
- A costing unit must be assigned, and only one unit can be the costing unit.
- Costings must be created for the unit selected as the Costing’s Unit.
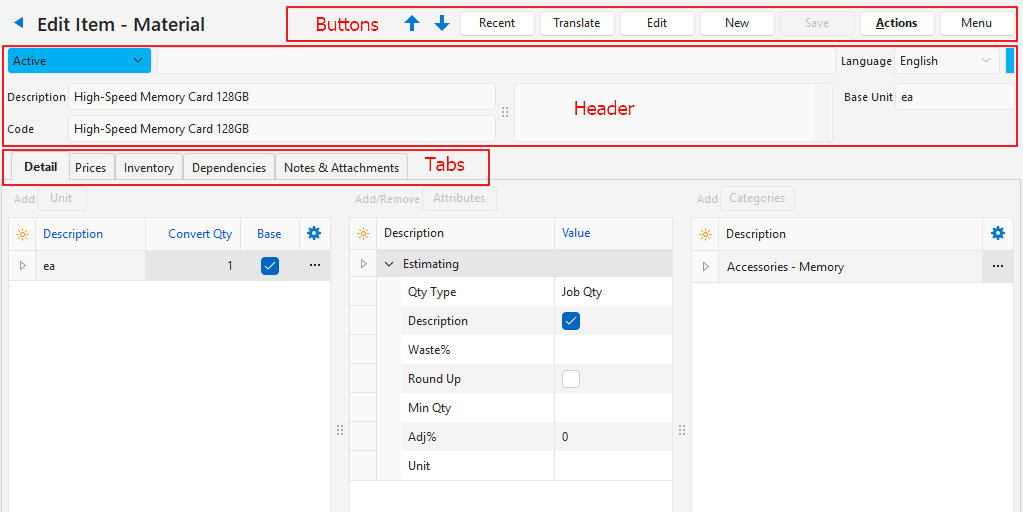
Buttons Explained
| Button | Description |
|---|---|
| Arrows | Navigates to the next or previous item. |
| Recent | A dropdown list of recently viewed items, for quick navigation. Hidden if no items were viewed in the same session. |
| Translate | Machine translates the item into one of the languages allocated to the organisation. Appears only if several languages are linked to the organisation. If a translation already exists, the item is opened in that language. If translated, the header shows the translation and English. |
| Edit | Lets you edit the item. |
| New | Creates an item of the Type selected from the dropdown list. The options are:
|
| Save | Saves the changes and recalculates the fields that depend on them. |
| Actions |
|
| Menu | View Item Summary: Opens an item summary on the right. Settings
|
Header Explained
All the header fields except the base unit can be edited.
| Field | Description |
|---|---|
| Status Bar | Status: Sets the item’s status. Defaults to the status selected for new items. Only items with an Active status can be used in transactions.
|
| Description | The description that appears on documents (e.g. Quotations, Invoices). |
| Code | The code is for internal use (e.g. to help with searches or to give more information about the item). If the code is blank, the description is copied to the code when you click Save. If another item has the same code, the item edit view shows the message “Warning: Duplicate Code”. The check ignores spaces before and after the code and the difference between uppercase and lowercase, and does not count items in the Recycle Bin. It is a warning only: the item is still saved. Items without a code are not checked. |
| Note | Enter a note. If the General Setting General > Enable Rich-Text in Note fields is checked, a View/Edit Note button next to the note opens the HTML editor, which saves the note as HTML (for example, a first line in bold red). The box then shows the formatted note (read-only):
When the item is added to a transaction, or a transaction item is copied, the note is copied as it was saved (formatted) when the setting is checked, and as plain text otherwise (no HTML tags in the note). Translate sends the note as plain text, so the translated note is plain text. Set its formatting again with the editor on the language. Plain text notes work as before. |
| Override | Overrides the description if the description is provided by an extension. Hidden if the description is freely editable. |
| Base Unit | The item’s Base Unit. For Substrate (Sheets), the base unit is used in Estimating. |
Detail (tab)
Fields marked in blue (✎) should be completed when an item is created and can be edited afterwards.
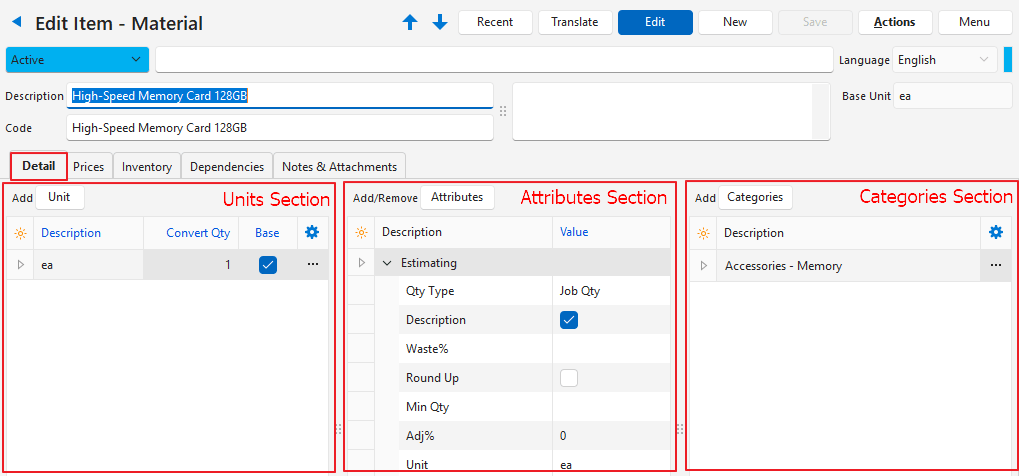
Units Section
If an item’s base or costing unit is changed, you must rebuild the Inventory Report (Items List View > Actions (button) > Rebuild Inventory Report).
Fields marked in blue (✎) can be edited.
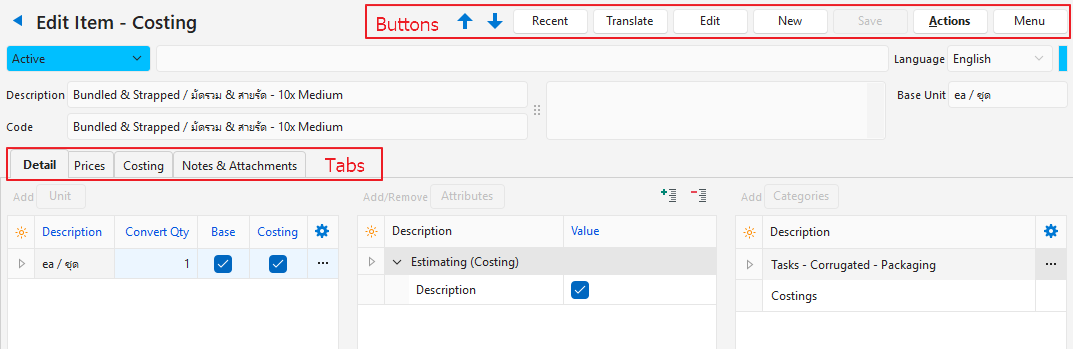
| Button / Field | Description |
|---|---|
| Unit (button next to Add) | Adds a unit. An item can have several units. It must have a base unit, and can have only one. |
| Field Chooser (*) | Add or remove columns. |
| ID | The system-generated number for the unit. |
| Description | Enter a description of the unit. |
| Convert Qty | Enter the number by which the unit is multiplied to give the base unit. Certain Attribute Sets include prefilled standard units. |
| Base | A checkbox. One of the units must be the base unit with a conversion quantity (Convert Qty) of 1. The base unit of prefilled units (added by the Extension Type) cannot be changed. |
| Costing | A checkbox. If checked, the unit is used for costing. Applies only to Costings and Assemblies. Only one unit can be the costing unit. |
| Created | The date on which the entry was created. |
| Updated | The date on which the entry was updated. |
| Updated By | The user who last updated the entry. |
 | A menu with the following option (also available when you right-click the entry):
|
Attributes Section
Fields marked in blue (✎) can be edited.
| Button / Field | Description |
|---|---|
Attributes (button) > Add Attributes (button) > Remove | Adds or removes a set of attributes. Custom Attributes are also added or removed as a set. |
| Field Chooser (*) | Add or remove columns. |
| ID | The system-generated number for the attribute. |
| Description | A tree view of the attributes, with the description of each attribute under its heading. Click the arrow next to a heading to collapse or expand it. |
| Value | Enter or select the attribute’s value. Depending on the attribute, the field is:
|
Categories Section
Lists the categories and subcategories set up under Menu (button) > Edit Categories.
| Button / Field | Description |
|---|---|
| Categories (button next to Add) | Adds a category selected from the dropdown list. |
| Field Chooser (*) | Add or remove columns. |
| ID | The system-generated number allocated to the category. |
| Description | The category’s description. |
| A menu with the following option (also available when you right-click the entry):
|
Prices (tab)
- Fields marked in blue (✎) should be completed when an item is created and can be edited afterwards.
- If a sell price is lower than the linked cost price, it appears in red.
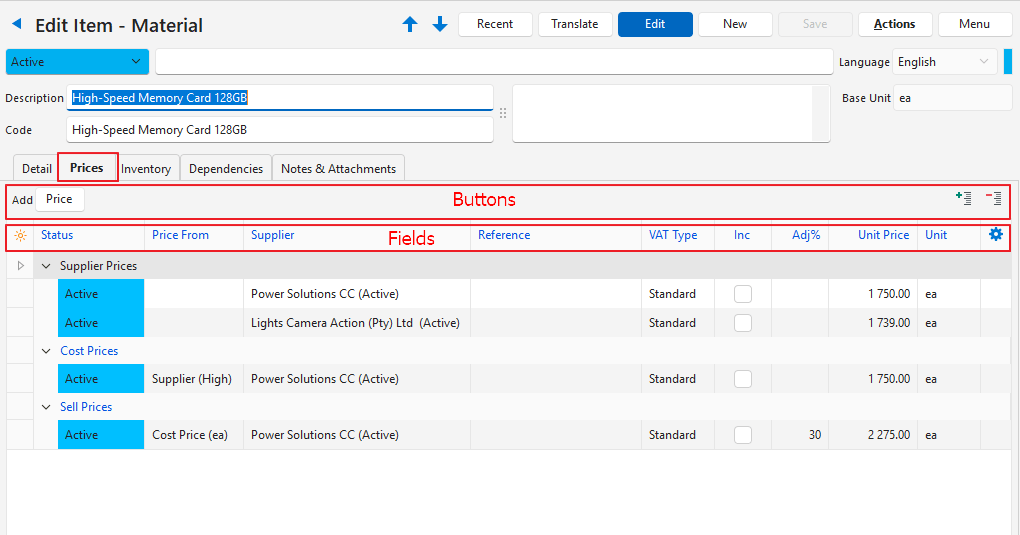
Fields Explained
| Button / Field | Description |
|---|---|
| Price (next to Add) | Adds the type of price selected from the dropdown list. The options are:
|
| + – | Expands (+) or collapses (–) the prices under their headings. |
| Field Chooser (*) | Add or remove columns. |
| ID | The system-generated number for the price. |
| Status | The status of the price. |
| Price From | Unavailable for supplier prices. Select the pricing option for Cost and Sell Prices from the dropdown list. If this field is blank, an adjustment cannot be entered. If prices are edited manually (e.g. with Batch Update), this field is cleared. |
| Supplier | The name of the supplier. |
| Barcode | The supplier’s barcode. |
| Reference | The supplier’s reference. |
| Currency | The supplier’s currency. If the supplier’s currency is changed, the price is updated. |
| VAT Type | The default VAT Type for the price. |
| Inc | A checkbox. If checked, the price includes VAT. Applies only to Sell Prices. |
| Adj% | Enter a markup (positive numbers) or discount (negative numbers) as follows:
|
| Fixed Price | The Fixed Price charged by the supplier. Applies only to Outwork and Assembly items. Any adjustment is applied to both the Fixed and Unit prices. |
| Unit Price | The unit price. |
| Total (Local / Base Unit) | The Total Price in local currency per base unit (Unit Price plus Adjustment %, converted to the local currency and the base unit). The column heading shows the name of the item’s base unit (e.g. Total (Local / ea)). |
| Round | A checkbox. If checked, the price is rounded up to the nearest integer. This rounding may result in a different Adjustment percentage, but the adjustment field is not updated. |
| Profit | The profit earned on the sell price (the difference between the cost and sell prices). |
| GM% | The Gross Margin percentage earned on the sell price (the profit as a percentage of the sell price). |
| Unit | Select the unit the price relates to from the dropdown list. If the unit is changed, the Fixed Price and Unit Price are converted to the new unit. |
| Created | The date on which the entry was created. |
| Updated | The date on which the entry was updated. |
| Updated By | The user who last updated the entry. |
| A menu with the following option (also available when you right-click the entry):
|
Inventory (tab)
- Fields marked in blue (✎) should be completed when an item is created and can be edited afterwards.
- Inventory locations are created under Entities.
- The Inventory tab is hidden unless the item is a Material.
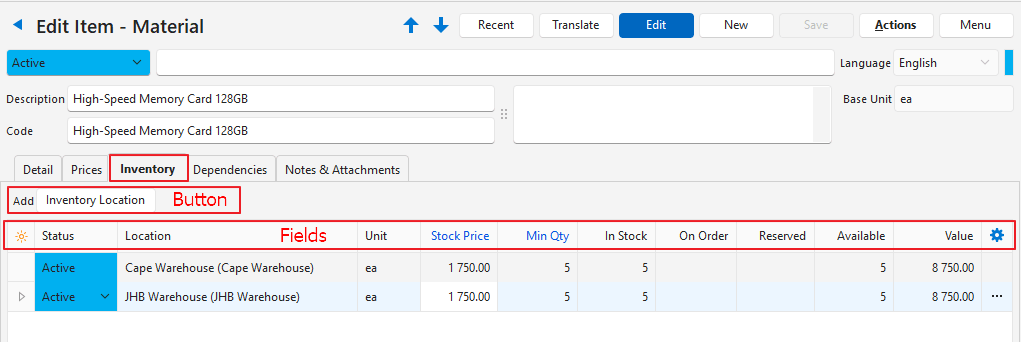
Fields Explained
| Button / Field | Description |
|---|---|
| Inventory Location (button, next to Add) | Opens a list of the active locations (that is, locations with an Active status) not yet linked to the item, as for Categories. Check one or more locations and click Select (button) to add them all at once. A location can be added only once. If you add it again, BOS shows the message “The selected Inventory Location has already been added.”. |
| Field Chooser (*) | Add or remove columns. |
| ID | The system-generated number for the entry. |
| Status | The status of the inventory location (that is, the entity). |
| Location | The location’s description. |
| Unit | The base unit for the inventory item. |
| Cost Price | The item’s Cost Price in local currency per base unit, from the Prices tab. Read-only. |
| Stock Price | The price used to value the inventory at this location. This price is separate from the prices entered on the Prices tab and must be entered manually, unless the General Setting Inventory > Auto Update Stock Price (Weighted Average) is checked: the stock price is then kept up to date as a weighted average (see Item Prices Explained). A stock price entered here counts as a revaluation from the start of that day. If no stock price is entered, the cost price is used to calculate the value. |
| Min Qty | Enter the minimum quantity to keep on hand. |
| In Stock | The quantity that is in stock. |
| On Order | The quantity ordered but not yet received (e.g. on a Purchase Order). |
| Reserved | The quantity reserved for future orders (e.g. on a Sales Order). |
| Available | The quantity that is available. |
| Value | The quantity in stock multiplied by the stock price (or by the cost price if no stock price is entered). It is the value of inventory for accounting. |
| Created | The date on which the entry was created. |
| Updated | The date on which the entry was updated. |
| Updated By | The user who last updated the entry. |
| A menu with the following option (also available when you right-click the entry):
|
Costing (tab)
- This tab applies only to Costing and Assembly items. It is hidden for all other items.
- Fields marked in blue (✎) should be completed when an item is created and can be edited afterwards.
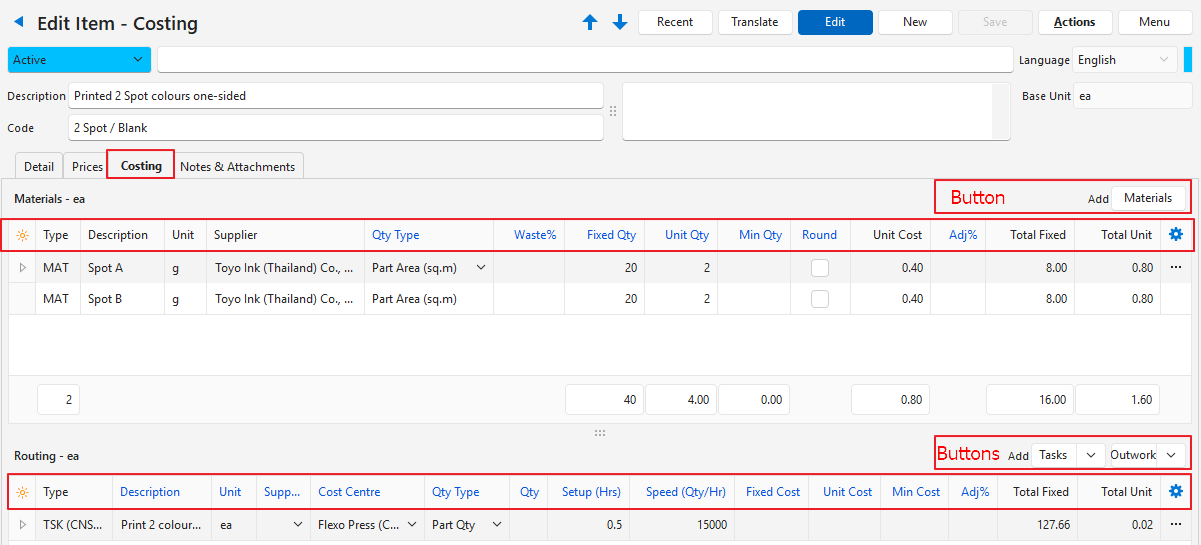
Buttons Explained
| Button | Description |
|---|---|
| Materials |
|
| Tasks |
|
| Arrow on Tasks |
|
| Outwork |
|
| Arrow on Outwork | Add Custom Outwork – OWK (C): Adds a row at the bottom of the table for you to fill in (e.g. for outwork that is not set up as an item). |
Fields Explained
- Fields marked in blue (✎) should be completed when an item is created and can be edited afterwards.
- If a Cost Price is based on a costing, these totals on the costing are added to form the Unit Price (Total Fixed Materials + Total Unit Materials + Total Fixed Routing + Total Unit Routing).
| Field | Description |
|---|---|
Materials (ea) (where ea is the Default Unit) | |
| Field Chooser (*) | Add or remove columns. |
| ID | The system-generated number for the entry. |
| Item From | The ID of the transaction the item was retrieved from. |
| Price ID | The linked Price ID. |
| Order ID | The system-generated number for the order of the entries. |
| Type | The item’s type (e.g. MAT for material). |
| Description | A description of the item. |
| Code | The item’s code, taken from the linked material. |
| Unit | The item’s unit, taken from the linked material’s cost price. |
| Supplier | The supplier linked to the item. |
| Qty Type | The Quantity Type determines how the Quantity field is used in calculating the unit cost. A material added from the items list starts as Job Qty (see the Materials button above). |
| Waste % | The percentage that is wasted during production. It is applied as a direct percentage to the Unit Quantity, not to the Fixed Quantity. |
| Fixed Qty | The Fixed Quantity that is used during production (e.g. the quantity used in setup, or the number of plates needed). |
| Unit Qty | The Unit Quantity that is used during production. |
| Min Qty | The minimum quantity that can be produced. |
| Round | A checkbox. If checked, prices are rounded up to two decimals. |
| Unit Cost | The item’s Unit Cost. |
| Adj% | An adjustment to the price that can be positive (markup) or negative (discount). |
| Total Fixed | The calculated Total Fixed Cost (the cost for the Fixed Quantity, including any adjustment). For information only. Rounded to two decimal places in this view. |
| Total Unit | The calculated Total Unit Cost (the cost for the Unit Quantity, including any adjustment). For information only. Rounded to two decimal places in this view. |
| Created | The date on which the entry was created. |
| Updated | The date on which the entry was updated. |
| Updated By | The user who last updated the entry. |
| A menu with the following options (also available when you right-click the entry):
|
Routing (ea) (where ea is the Default Unit) | |
| Field Chooser (*) | Add or remove columns. |
| ID | The system-generated number for the entry. |
| Item From | The ID of the transaction the item was retrieved from. |
| Price ID | The linked Price ID. |
| Order ID | A sequential number for the entries in the Routing section. |
| Type | The Type of item that was added:
|
| Description | The description of the task or outwork. You can edit it, for example, to add an instruction for production. |
| Code | The item’s Code if an item was added. |
| Unit | A description of the unit. |
| Supplier | The name of the supplier. Applies to Outwork. |
| Cost Centre | The name of the Cost Centre. Applies to Tasks. |
| Qty Type | The Quantity Type determines how the Quantity field is used in calculating the unit cost. Routing lines (services, outwork and custom lines) start as Fixed Qty. A service or outwork line linked to an item shows the item’s Qty Type, or Fixed Qty when the item has none (or Fixed). |
| Qty | The quantity of the item. Editable when Fixed Qty is chosen as the quantity type. A line linked to a task or outwork item (not custom) shows the quantity of the item’s Estimating attributes, or 1 when it is not set. |
| Setup (hrs) | The number of hours it takes to set up production for that item. Used for tasks. |
| Speed (Qty/hr) | The quantity that can be produced in an hour. Used for tasks. This field is the default. When you click Save, it updates Speed (Hrs) and Speed (Min). |
| Speed (Hrs) | The number of hours it takes to complete one unit. If you enter this field, the Speed (Qty/hr) and Speed (Min) fields are updated when you click Save. |
| Speed (Min) | The number of minutes it takes to complete one unit. If you enter this field, the Speed (Qty/hr) and Speed (Hrs) fields are updated when you click Save. |
| Fixed Cost | The item’s fixed cost. |
| Unit Cost | The item’s unit cost. |
| Min Cost | The item’s minimum cost. |
| Adj% | A price adjustment that can be positive (markup) or negative (discount). |
| Total Fixed | The calculated Total Fixed Cost. |
| Total Unit | The calculated Total Unit Cost. |
| Created | The date on which the entry was created. |
| Updated | The date on which the entry was updated. |
| Updated By | The user who last updated the entry. |
| A menu with the following options (also available when you right-click the entry):
|
Dependencies (tab)
Lists the Costing (CST) and Assembly (ASM) items that use the item.
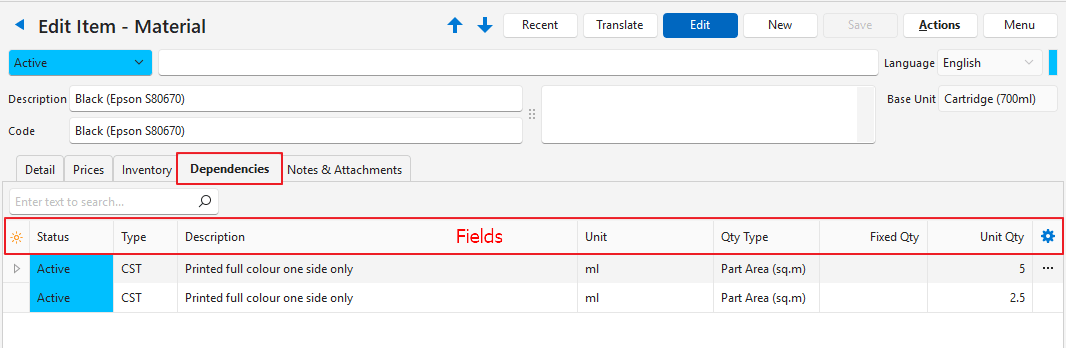
Fields Explained
| Field | Description |
|---|---|
| ID | The system-generated number allocated to the entry. |
| Status | The status of the linked item. |
| Type | The type of item (e.g. CST for costing). |
| Description | The linked item’s description. |
| Code | The linked item’s code. |
| Unit | The unit used on the costing or assembly. |
| Qty Type | The Quantity Type used on the costing or assembly. |
| Fixed Qty | The fixed quantity included in the costing or assembly. |
| Unit Qty | The unit quantity included in the costing or assembly. |
| Min Qty | The minimum quantity included in the costing or assembly. |
| Created | The date on which the linked costing or assembly was created. |
| Updated | The date on which the linked costing or assembly was last updated. |
| Updated By | The user who last updated the linked costing or assembly. |
| A menu with the following option (also available when you right-click the entry):
|
Notes & Attachments (tab)
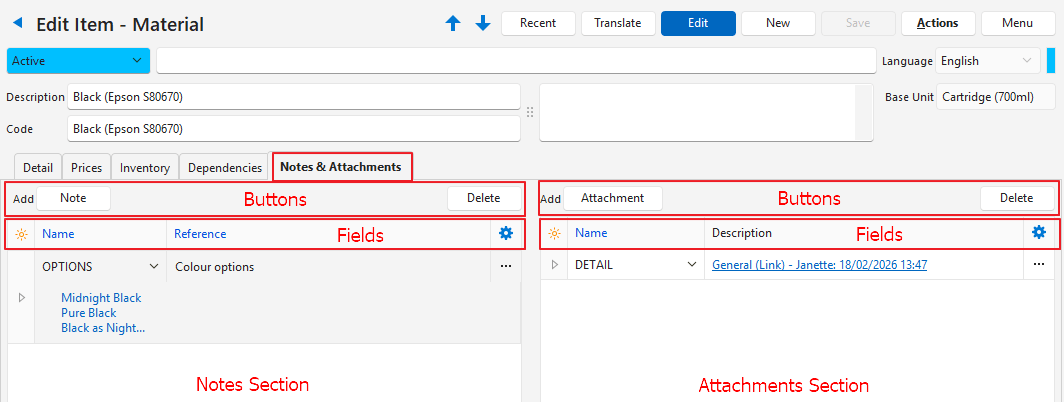
Buttons Explained: Notes Section
| Button | Description |
|---|---|
| Note (button) | Adds a note in the Edit Note window. |
| Expand | A checkbox. If checked, each note appears in full. If unchecked, only the first part appears: the first 255 characters on one line or, for formatted notes (General Setting Enable Rich-Text in Note fields), the first three lines. |
| Delete (button) | Deletes all the selected notes after you confirm. |
Fields Explained: Notes Section
- Each note has one line with the reference, user and date in bold, then the note text, newest first.
- The list is read-only. Edit a note, including its name and reference, in the Edit Note window (double-click the note, or select View/Edit Note).
- If the General Setting General > Enable Rich-Text in Note fields is checked, the list shows the note formatted (bold, colours and lists kept). When it is unchecked, the note is plain text (an HTML note shows no tags).
- Edit Note window:
- If the setting is checked, the note is entered and formatted directly in the window (the HTML editor with the Format toolbar). A plain note becomes HTML only when it is edited.
- If the setting is unchecked, the window shows the plain note box.
- Clear Formatting (button, next to Save) always appears. It makes a formatted note plain text again; on a plain text or read-only note, it changes nothing.
- On a language item, the English note is shown formatted too, and Translate sends it as plain text.
| Field | Description |
|---|---|
| Field Chooser (*) | Add or remove columns. |
| ID | The system-generated number for the note. |
| Description | The note line: the note’s reference, the user and the date, in bold. The note’s name works as an ID in Proposals and Templates. Select it from a lookup of common names or enter it in the Edit Note window. |
| Note | The note text (see Expand above). |
| Menu (…) | A context menu with the following options:
|
Buttons Explained: Attachments Section
| Button | Description |
|---|---|
| Attachment (button) | Adds an attachment. |
| Delete (button) | Deletes all the selected attachments after you confirm. |
Fields Explained: Attachments Section
| Field | Description |
|---|---|
| Field Chooser (*) | Add or remove columns. |
| ID | The system-generated number for the attachment. |
| Status | The attachment’s status. |
| Name | The attachment’s name. The name works as an ID in Proposals and Templates. Select it from a lookup of common names or enter it. |
| Description | The attachment’s description. |
| Issued | The date on which the attachment was issued (e.g. if the attachment is a certificate). |
| Expires | The date on which the attachment expires (e.g. if the attachment is a licence). |
| Reminder | The reminder date for the attachment. |
| Created | The user who created the attachment. |
| Updated | The date on which the attachment was last updated. |
| Updated By | The user who last updated the attachment. |
| Menu (…) | A context menu with the following options:
|
Transaction Defaults
- Transaction defaults are set from Items Edit View > Menu (button) > Edit Transaction Defaults.
- The defaults can be changed when you enter a transaction.
- Defaults can also be set from a transaction. After you select a default account, resolve option and location, right-click the entry, select Set Item defaults (Accounts, Resolve and Location) and confirm the change.
- Every field is saved as set, even a value the Transaction Type cannot use. The warning line shows why a value is not used, for the selected row:
- A Dr Account, Cr Account or Resolve that the Transaction Setup does not allow is listed in one warning, for example, “Transaction Setup invalid Dr Account, Cr Account, Resolve”.
- A location that is not one of the item’s locations shows “Item invalid Location”.
- The values are checked when the item is added to a transaction: a value the Transaction Type cannot use is ignored there.
Buttons Explained
| Button | Description |
|---|---|
| Add/Edit | Lets you add or edit defaults. |
| Save | Saves any changes. |
| Menu | Layout |
Fields Explained
Fields marked in blue (✎) can be edited.
| Field | Description |
|---|---|
| Field Chooser (*) | Add or remove columns. |
| ID | The system-generated number allocated to the entry. |
| Transaction Type | Select a Transaction Type from the dropdown list. Add each Transaction Type only once. If the selected row’s Transaction Type is also on another row, the warning bar shows the message “Duplicate Transaction Type”. |
| Dr Account | The default ledger account to debit. Leave blank if the default debit account is a customer or supplier account. |
| Cr Account | The default ledger account to credit. Leave blank if the default credit account is a customer or supplier account. |
| Resolve | The item’s default resolve for that Transaction Type (e.g. purchase or produce). |
| Location | The default location where the item is stored. |
| Date Created | The date on which the entry was created. |
| Date Updated | The date on which the entry was last updated. |
| Updated By | The user who last updated the entry. |
Item Translations Explained
- The translation features are hidden if the organisation has only one language assigned to it.
- The base language is the main language of the organisation (e.g. English).
- When a new item is created, it is set to the organisation’s base language.
- The Translate button machine translates the item information from the base language to any other language assigned to the organisation. Translated languages appear in bold on the dropdown list.
- When a translated version is open, the dropdown list also has a Translate option. It translates the description, code, note and other text again from the English version and replaces the current translation. Translation is unavailable for the English version.
- A new translation cannot be created from the Items Modal Form. BOS shows the message “Insert new language not allowed on popup form. See Menu button > Open in Items Module.” Open the item in the Items module to translate it. A language that already has a translation opens in the modal form as usual.
- When an item is translated, the original base language entry appears alongside the translations in Edit view. This feature applies only to translations. Items viewed in the base language show only the base language.
- The Units, Prices and Inventory can be maintained only on the Base (English) version of the item. When an item is translated, these tabs are hidden.
- When an item is copied, only the original English version is copied.
- When the English (Base) item is deleted, all the translations are deleted with it (moved to the Recycle Bin). The Recycle Bin shows only the base item.
- These Item List Views show only items in the base language:
- Default
- Pricing
- Inventory Summary
Items Modal Form
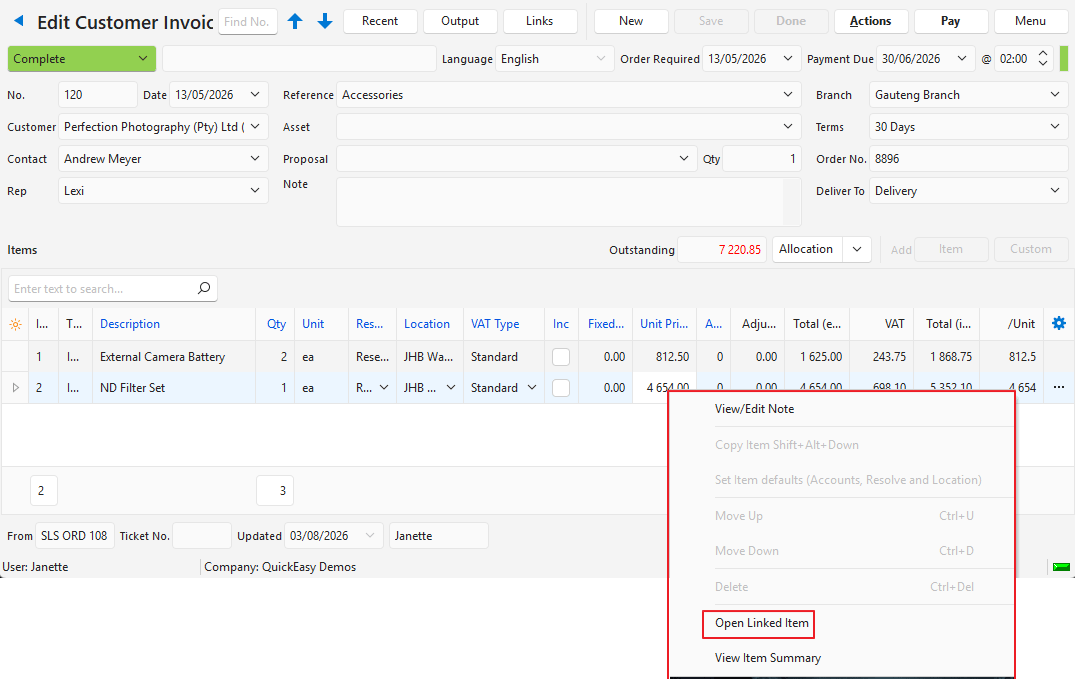
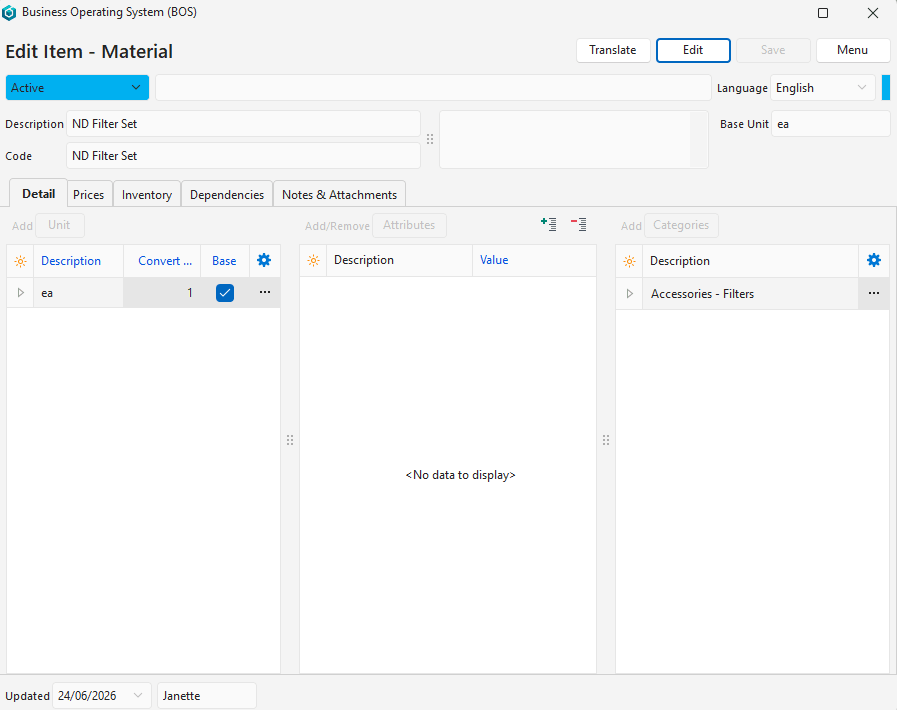
The window that opens when you select Open Linked Item on a transaction’s context menu is a modal form. The modal form is similar to the item edit view explained on this page, but does not have all the features. For all the features, open the item from the Items module.