
Using Point of Sale Interface
Point of Sale (PoS) is a digital system that enables businesses to complete sales transactions efficiently and accurately. It typically combines hardware (such as a register, barcode scanner or card reader) with software that records sales, processes payments and manages inventory. Modern PoS systems such as QuickEasy BOS go beyond simple transactions with features such as real-time reporting, customer management and integration with accounting tools.
The PoS module in QuickEasy BOS supports multiple tills and users. The system can also be used to manage stock transfers from one till or branch to another.
Interface Explained
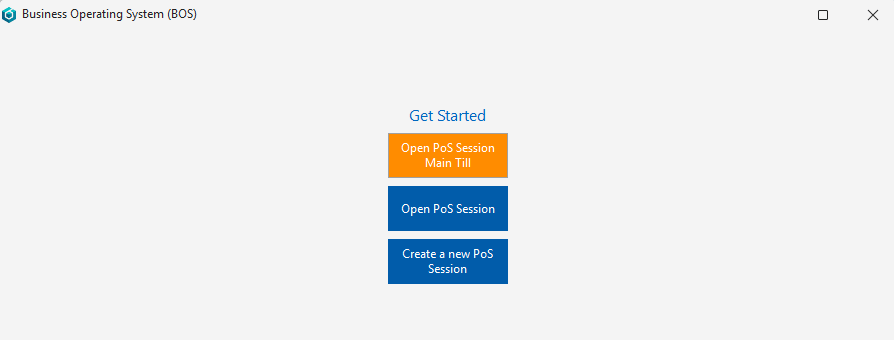
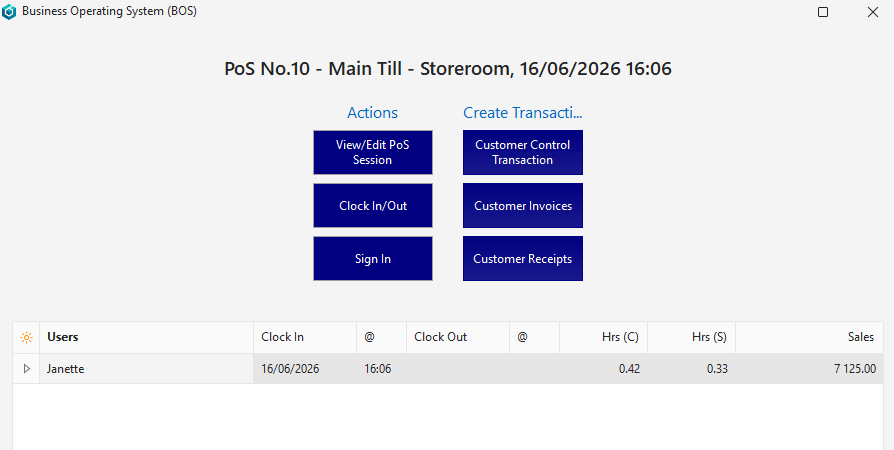
Tile Menu Buttons Explained
- You are prompted to log in after clicking a tile.
- If a PoS session is open and has transactions, the till cannot be changed. Close the session first.
| Button | Description |
|---|---|
| First Screen: | Shown when BOS starts. |
| Open PoS Session [till name] | The tile shows Open PoS Session followed by the name of the till. The till is remembered from the last session. This option lets you continue using the same till. The button is unavailable if the till was cleared, or no till was saved (that is, the person had not yet used PoS). |
| Open PoS Session | Lists all the active PoS sessions, including the default session, for you to select one. Each session appears as the entity, the date the session was opened and the till. |
| Create a new PoS Session | Creates a PoS session. |
| Second Screen: | Shown after an option is selected on the first screen. |
| View/Edit PoS Session | Opens the till session that was selected on the first screen. |
| Clock In/Out | Clocks you in or out. You are automatically clocked in when you open a till session, and clocked out when you close a till session from the till interface. Note: When a user clocks in, all the other active clock-in records for that user are clocked out with a note (e.g. if someone switches tills and forgets to clock out of the old till). |
| Transactions | Opens the QuickEasy BOS main menu for the selected till session after you enter your PIN, without closing the session. You are automatically clocked in if you are not already clocked in. |
| Create Transactions | Creates a tile button for all the transactions that have PoS enabled. Normal user access rights apply to these transactions. |
Dashboard Explained
- Once a till session is selected, a dashboard appears next to the tiles with a Users grid and a Transfers grid.
- A grid appears only if it has entries.
Users (grid)
Any clock-in notes appear below the user’s row.
| Field | Description |
|---|---|
| Users | The users who clocked in to the till session. |
| Clock In | The date on which the user first clocked in to the session. |
| @ | The time at which the user first clocked in. |
| Clock Out | The date on which the user last clocked out of the session. Blank while the user is still clocked in. |
| @ | The time at which the user last clocked out. |
| Hrs | The hours from the user’s first clock-in to their last clock-out (or to now, if they are still clocked in). |
| Sales | The user’s sales in the session. |
Transfers (grid)
Lists the transfers linked to the till’s inventory location: active transfers issued from the till’s location, and transfers issued to the till’s location that have not yet been received.
| Field | Description |
|---|---|
| Transfers | The Transaction Type’s code and the transaction number. |
| Date | The date of the transfer. |
| Due | The date on which the transfer is due. |
| @ | The time at which the transfer is due. |
| Reference | The transfer’s description. |
| From | The code of the inventory location the stock is transferred from. |
| To | The code of the inventory location the stock is transferred to. |
| Items | The number of items on the transfer. |
 | A submenu, also opened by right-clicking the entry, with these options:
|
Till Session
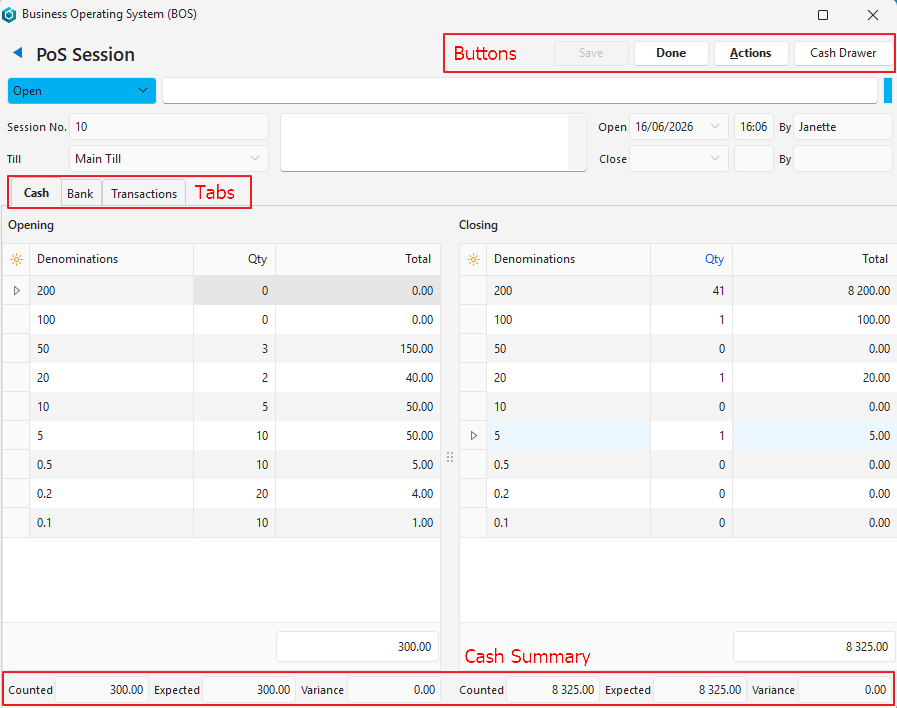
Buttons Explained
| Button | Description |
|---|---|
| Save | Saves any changes. |
| Menu | |
| Done | Click it after the cash is counted.
When you click Done (button), BOS checks the following:
|
| Actions |
|
| Output | Offers Print, Preview and Email options for the till session, using its output templates. If there is more than one template, each option lists the templates for selection. |
| Cash Drawer | Opens the cash drawer if one is connected by a cable. The cash drawer must be set up as a printer, so that it opens when a receipt is printed. The feature was tested with an RJ11 cable. If a cash drawer is not linked, clicking the button does nothing. |
Warning Bar Explained
A warning bar appears on the till session when something needs attention. It lists one or more of these warnings, separated by semicolons:
- Till is blank: No till is selected for the session.
- The selected Till is opened: Another session that is open uses the same till.
- Cash count does not match the expected Opening balance (or Closing, or Opening and Closing): The counted cash differs from the expected cash. The opening count is checked while the session is new, and both counts while it is open.
When you click Done (button), the warning appears again, followed by “Continue?”. If you leave the session while the till is blank or already open, BOS also asks you to confirm.
Header Explained
| Field | Description |
|---|---|
| Status | A dropdown list of statuses.
|
| Status Note | Enter a note regarding the status. |
| PoS No. | The system-generated number allocated to the session. |
| Till | The name of the till if a session is active. A dropdown list from which a till can be selected if a session is started. Click Save (button) after selecting a till to populate the values. |
| Note | Enter a note. |
| Open | The date and time that the till was opened. |
| By | The user who opened the till. |
| Close | The date and time that the till was closed. |
| By | The user who closed the till. |
Cash (tab)
The tab has two sections: the opening balances are on the left and the closing balances are on the right.
Fields marked in blue (✎) can be edited.
Fields Explained
| Fields | Description |
|---|---|
| Field Chooser (*) | Add or remove columns (fields). |
| ID | The system-generated number allocated to the entry. |
| Denominations | The denominations that should be counted. The opening quantities are on the left and the closing quantities are on the right. The quantities that can be edited are determined by the status. |
| Qty | Enter the counted quantity of each denomination. |
| Total | The value of the counted quantity. |
| Counted (tally) | Adds the counted amount. |
| Expected (tally) | The expected cash on hand (that is, the balance from the previous session). |
| Variance (tally) | The difference between the Counted and Expected amounts. |
Bank (tab)
This tab lists all the bank transactions that were created from PoS.
Fields Explained
| Field | Description |
|---|---|
| Field Chooser (*) | Add or remove columns (fields). |
| ID | The name of the Cash Account. The system-generated number allocated to the entry. |
| Trans No. | The PoS transaction number. The number of the transaction outside of the PoS system. |
| Total | The total amount on the transaction. |
| User | The user who created the transaction. |
| @ | The time of the transaction. |
| A submenu with these options:
|
Transactions (tab)
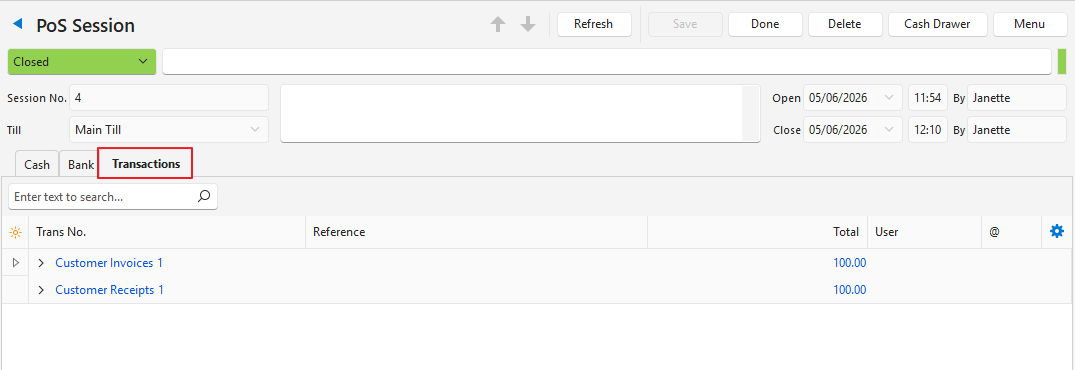
Fields Explained
| Field | Description |
|---|---|
| Field Chooser (*) | Add or remove columns (fields). |
| ID | The name of the Transaction Type. The system-generated number allocated to the entry. |
| Trans No. | The PoS transaction number. The number of the transaction outside of the PoS system. |
| Reference | The transaction’s reference. |
| Total | The total amount of the transaction. |
| User | The user who recorded the transaction. |
| Time | The time of the transaction. |
| A submenu with these options:
|