
Non-Conformance Reports (NCRs)
An NCR (non-conformance report) is a formal document used to record, investigate and correct a situation where something does not meet the required standards.
Those standards could be:
- Company procedures
- Contract requirements
- Industry standards such as ISO
- Regulatory or legal requirements
- Design specifications
An NCR is raised when:
- A product is defective.
- A process is not followed correctly.
- The output does not meet the drawings or specifications.
- Safety or compliance requirements are violated.
- Audit findings reveal non-compliance with internal procedures.
An NCR usually includes:
- Description of the non-conformance
- Reference to the violated standard or requirement
- Root cause analysis (why it happened)
- Corrective action (how it will be fixed)
- Preventive action (how it will be avoided in the future)
- Responsible person and deadlines
- Verification and closure approval
NCRs are issued to:
- Ensure quality and compliance
- Prevent repeat issues
- Improve processes
- Provide traceability and accountability
Examples
- A construction project uses the wrong grade of concrete → NCR issued.
- A factory produces parts outside tolerance → NCR issued.
- An ISO audit finds missing documentation → NCR issued.
How QuickEasy BOS Manages NCRs
QuickEasy BOS manages NCRs with transactions and the Service Manager.
Transactions
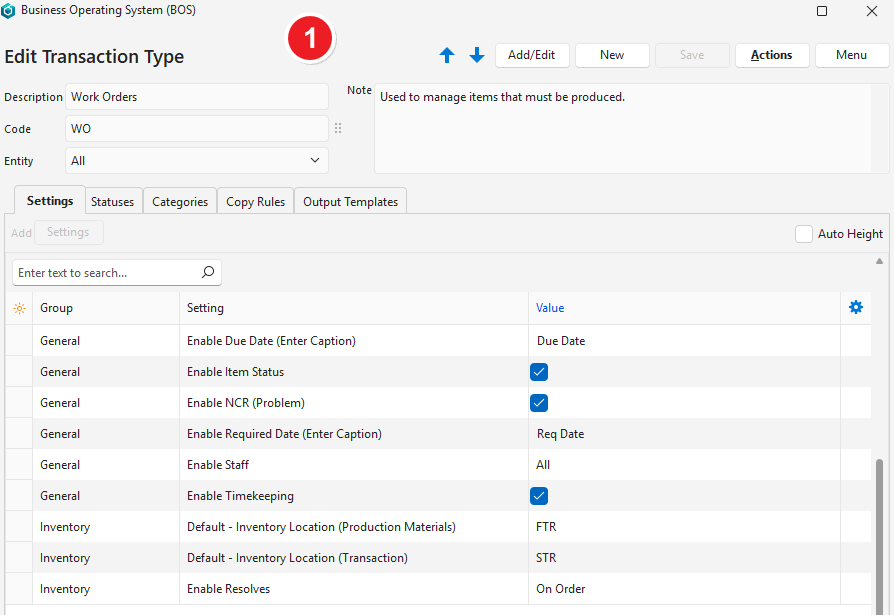
- To use NCRs on transactions, check the box next to the Transaction Type setting General > Enable NCR (Problem).
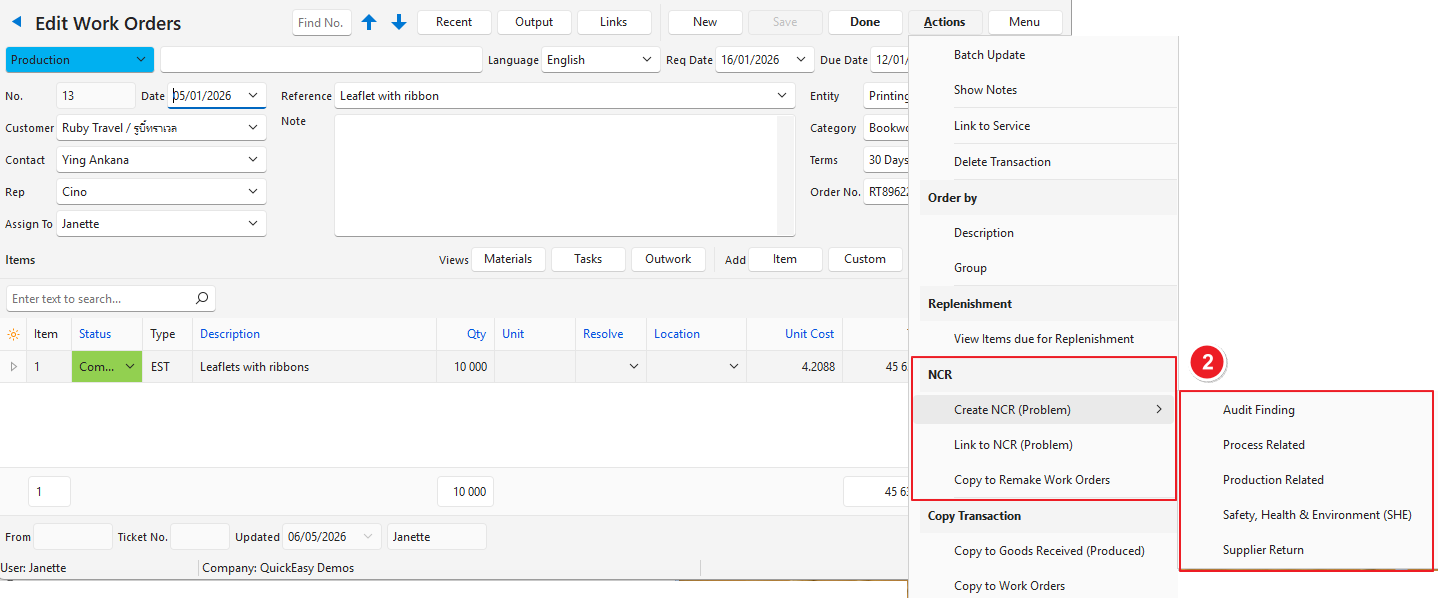
- This setting adds options to Actions (button) on the transactions of that Transaction Type.
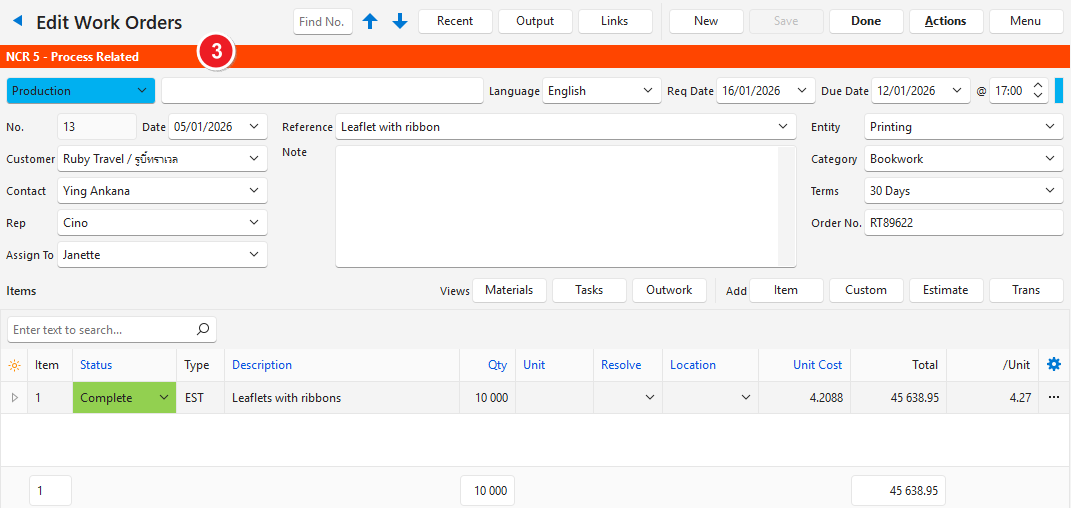
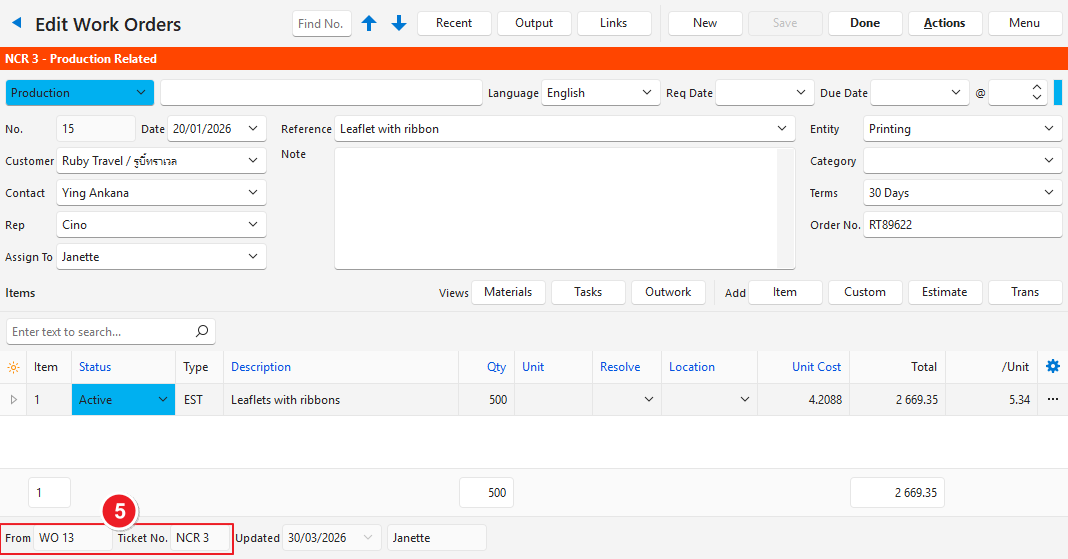
- Once a transaction is marked as non-conforming, an orange banner on the transaction shows the number of the NCR service ticket.
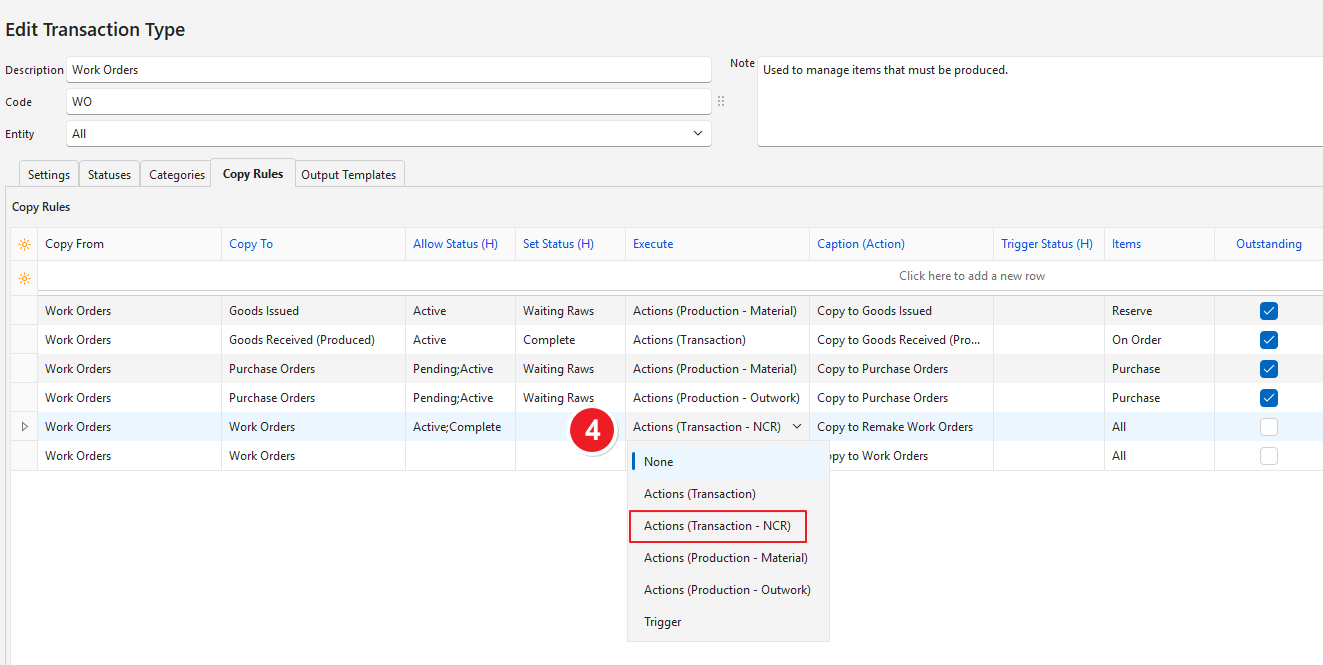
- Copy Rules can be created to copy the transaction to a specific NCR transaction. An option under Execute identifies the transaction as an NCR transaction.
- When a transaction is copied to a remake transaction, information appears in the transaction’s footer. Links (button) includes links to the ticket and other transactions in the same transaction flow, and to the linked asset (at the bottom), if there is one.
Service Types
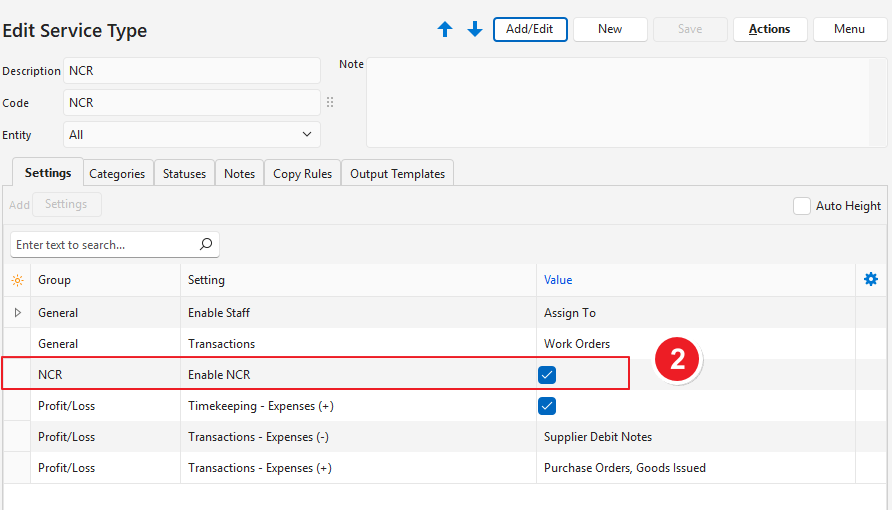
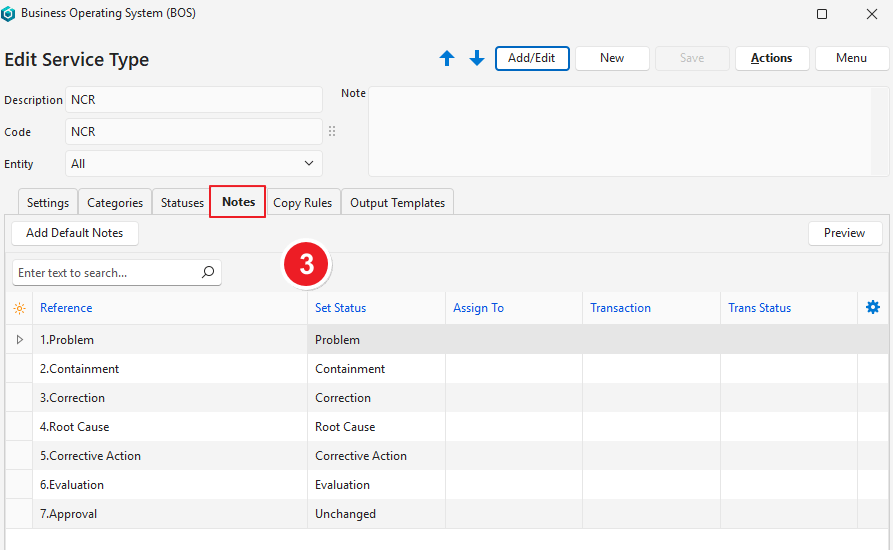
- A dedicated Service Type must be created for NCRs and added to an appropriate menu.
- To mark a Service Type as one used for NCRs, add the setting NCR > Enable NCR and check the box. You can add this setting to more than one Service Type.
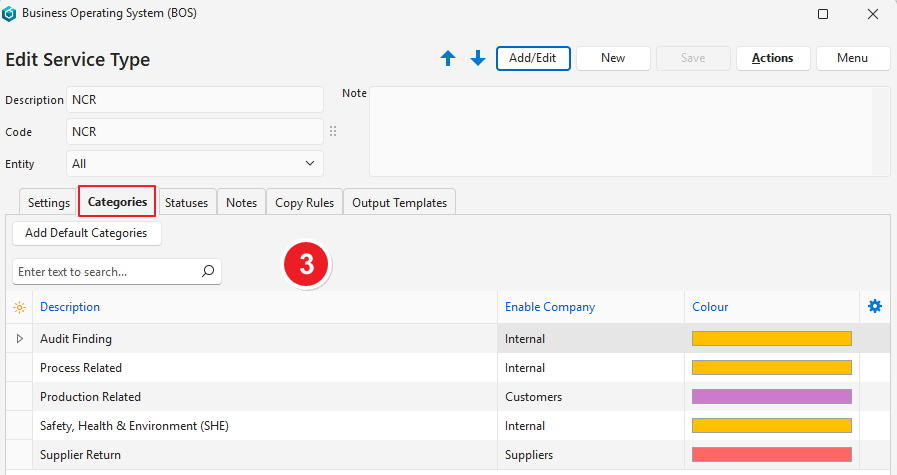
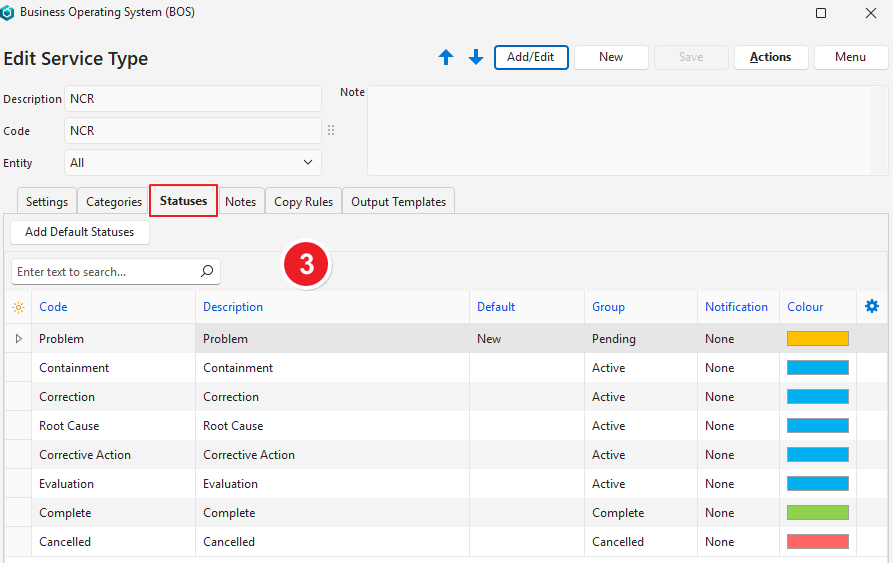
- You can select default categories, statuses and notes for NCRs when you create the Service Type.
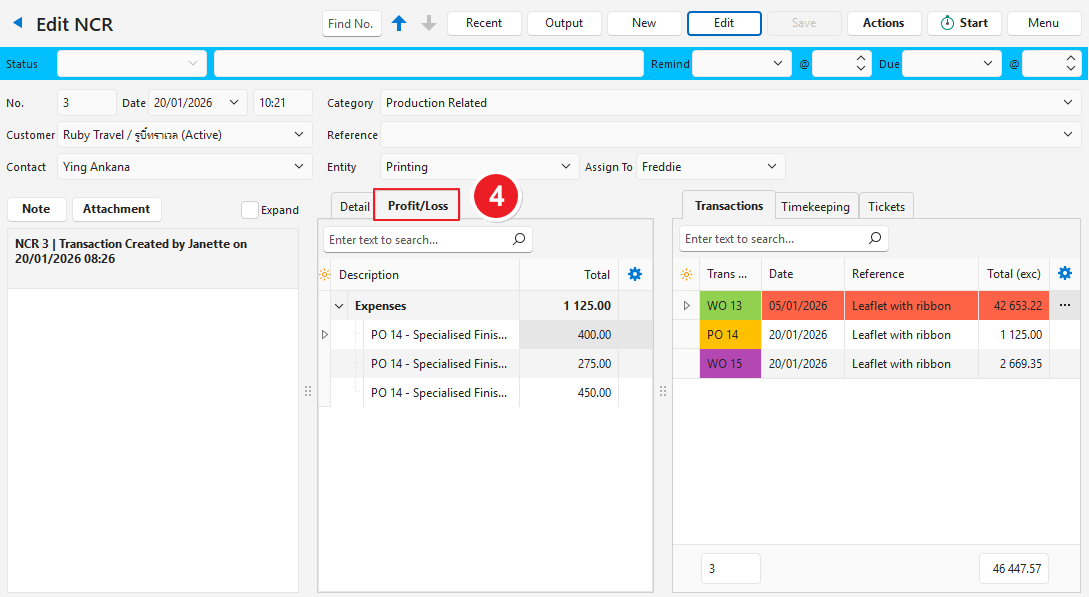
- The related transactions and timekeeping records can be identified to track the costs of the NCR (see the Service Tickets Profit/Loss screenshot below). If set up, a profit and loss statement appears on the ticket.
Tutorials
These tutorials explain how to create, resolve and unlink NCR tickets.
How to Create and Resolve an NCR Ticket
Note
- This example is based on a product that is produced from a work order.
- The notes on the service ticket should be added in sequence.
- Although these instructions list the steps one after the other, the steps might be completed by different people on different days.
- Production should be complete before the ticket is closed so that all the costs are included.
- Step 7 (creating the additional work order) can be done at any stage.
- Open the transaction that has the error (e.g. a Work Order).
- Click Actions (button) > Create NCR (Problem) and select one of these options:
- Audit Finding
- Process Related
- Production Related
- Safety, Health & Environment (SHE)
- Supplier Return
- Confirm on the popup. A service ticket is created and opens.
- Note: On the service ticket, the linked transaction appears on the Transactions tab, highlighted in orange.
- Click Note (button) and click 1. Problem.
- In the note section, describe the problem.
- Assign To = Select the user who must work on the issue next.
- Click Save (button).
- Click Note (button) and click 2. Containment.
- In the note section, describe what was or will be done to contain the problem.
- Assign To = Select the user who must work on the issue next.
- Click Save (button).
- Click Note (button) and click 3. Correction.
- In the note section, describe what was or will be done to correct the problem.
- Assign To = Select the user who must work on the issue next.
- Click Save (button).
- On the service ticket, on the Transactions tab, right-click the transaction that is marked in orange and select Open Transaction. On the transaction:
- Click Actions (button) > Copy to Remake Work Orders.
- On the popup, uncheck any items that must not be copied.
- Make sure that the Open New Transaction box (bottom left) is checked.
- Click Copy (button).
- On the newly created work order, edit the Qty column to indicate how many replacement products must be produced.
- Place the work order into production (if linked) so that the tasks, materials and outwork can be processed.
- Return to the service ticket: click Links (button) on the transaction and click the service ticket’s number (e.g. NCR 3).
- Click Actions (button) > Copy to Remake Work Orders.
- Click Note (button) and click 4. Root Cause.
- In the note section, describe the root cause of the problem.
- Assign To = Select the user who must work on the issue next.
- Click Save (button).
- Click Note (button) and click 5. Corrective Action.
- In the note section, describe the corrective action that was or will be taken.
- Assign To = Select the user who must work on the issue next.
- Click Save (button).
- Click Note (button) and click 6. Evaluation.
- In the note section, enter an evaluation of the issue.
- Assign To = Select the user who must approve the ticket.
- Click Save (button).
- Click Note (button) and click 7. Approval.
- Enter a note in the box provided (optional).
- Click Complete under Set Status.
- Click Save (button).
How to Unlink a Ticket From an NCR Transaction
- Open the service ticket.
- On the Transactions tab, right-click the transaction that the ticket is linked to (the transaction is highlighted in orange) and select Unlink Transaction NCR.
- Confirm the unlinking on the popup.