
Entities Edit View
Use this interface to create and edit an entity, with its staff, assets and accounting details. For the types of entity and how they nest, see Entity Types.
Before creating the first entity, you must create statuses (Menu (button) > Edit Statuses (Entities)).
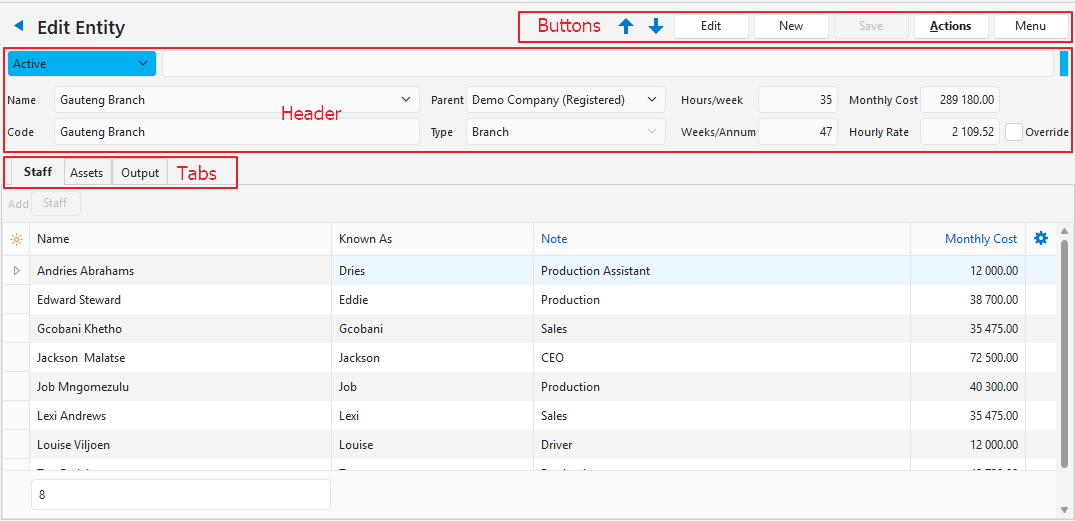
Buttons Explained
| Button | Description |
|---|---|
| Arrows | Navigates between entities. |
| Edit | Edits the fields. |
| New | Creates an entity of the type selected from the dropdown list. |
| Save | Saves any changes. |
| Actions | Refresh Lookups: Refreshes the lookups. Delete Entity: Deletes the entity (see below). Entities can only be deleted if: All Entities:
Cost Centres:
Stock Locations:
Registered Entities, Branches and Tills:
|
| Menu | View/Edit Notes & Attachments: Create, edit or view any notes and attachments. Settings
|
Fields Explained: Header
| Field | Description |
|---|---|
| Status Bar | Select a status from the dropdown list. Enter a Status Note. |
| Name | Enter the name of the entity. Arrow on Name Field: Click the arrow to select an existing contact from a list of contacts. |
| Code | The entity’s code (abbreviation of the name). |
| Parent | Select the parent entity from the dropdown list. |
| Type | The type of entity selected when the entity was created. |
| Hours/week | The number of operating hours in a week. Entered manually. |
| Weeks/Annum | The number of weeks the entity operates in a year. Entered manually. |
| Monthly Cost | The monthly cost. Calculated automatically from assets and staff, but can also be entered manually. |
| Hourly Rate | The entity’s hourly charge-out rate, calculated from the monthly cost and production hours. |
| Override | A checkbox. If checked, the hourly rate can be edited. |
| Staff (tab) | See Staff (tab) below. |
| Assets (tab) | See Assets (tab) below. |
| Output (tab) | This tab only appears if the Entity Type is Registered, Branch or Till (PoS).
|
| Accounting (tab) | This tab only appears if the Entity Type is Stock Location. See Accounting (tab) below. |
Staff (tab)
Fields marked in blue (✎) can be edited.
Fields Explained
| Field | Description |
|---|---|
| Staff (button) |
|
| Field Chooser (*) | Add or remove columns. |
| ID | The system-generated number for the entry. |
| Entity ID | The system-generated number for the entity. |
| Name | The name of the staff member. |
| Known As | The staff member’s nickname. |
| Forenames | The staff member’s first names. |
| Surname | The staff member’s surname. |
| Telephone | The staff member’s telephone number. |
| Mobile | The staff member’s mobile phone number. |
| The staff member’s email address. | |
| Note | Any note created for the staff member. |
| Monthly Cost | The staff member’s monthly cost. |
| Created | The date on which the record was created. |
| Updated | The date on which the record was updated. |
| Updated By | The user who updated the record. |
 | A submenu (also opened by right-clicking an entry) with these options:
|
Assets (tab)
To use all the features on the Assets tab (e.g. Edit), you must have access to Assets.
Fields Explained
| Field | Description |
|---|---|
| Asset (button) | A dropdown list with these options:
|
| Field Chooser (*) | Add or remove columns. |
| ID | The system-generated number for the entry. |
| Entity ID | The system-generated number for the entity. |
| Status | The status of the asset. |
| Type | The type of asset (e.g. Equipment or Vehicles). |
| Entity | The entity’s code (short description). |
| Code | The asset’s code. |
| Description | A description of the asset. |
| Monthly Cost | Enter the estimated monthly cost of the asset. |
| Created | The date on which the record was created. |
| Updated | The date on which the record was updated. |
| Updated By | The user who updated the record. |
| A submenu (also opened by right-clicking the entry) with these options:
|
Accounting (tab)
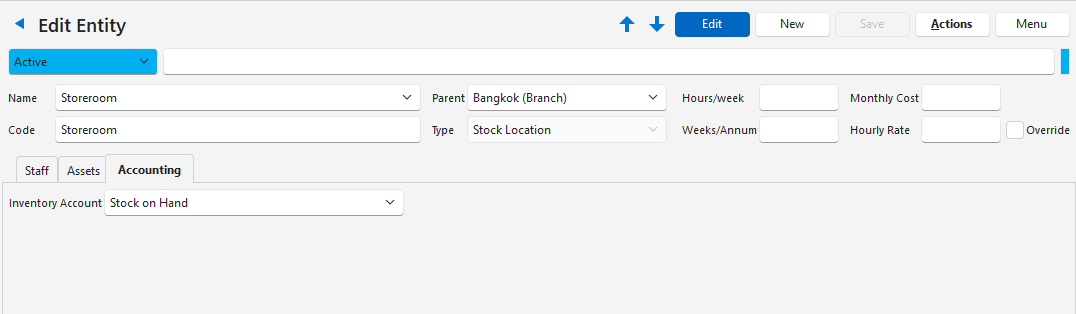
- The Accounting tab only appears on stock locations.
- The Inventory Account of several locations can be set or cleared at once from the Entities List View (Actions (button) > Batch Update).
Fields Explained
| Field | Description |
|---|---|
| Inventory Account | Select the ledger account for the inventory held at this location. Press Delete to clear it. On Transaction Types with the Dr Type or Cr Type setting Inventory (see Transaction Type Settings), when an item entry gets this location, or its location is changed, the entry’s Dr account (Dr Type Inventory) or Cr account (Cr Type Inventory) is set to this account. For example, a Transfer Issue with Cr Type Inventory uses the Location From’s account, and a Transfer Receive with Dr Type Inventory uses the Location To’s account. Copied items get the location’s Inventory Account instead of the source account. An account changed manually on the entry stays until the location is changed again. If a location has no Inventory Account, the entry’s account is kept as it is. |