
Service Tickets Edit View Interface
Before you create service tickets, Service Types must be created and added to a menu, and user access must be set.
The fields and tabs that are available depend on the settings chosen for the Service Type.
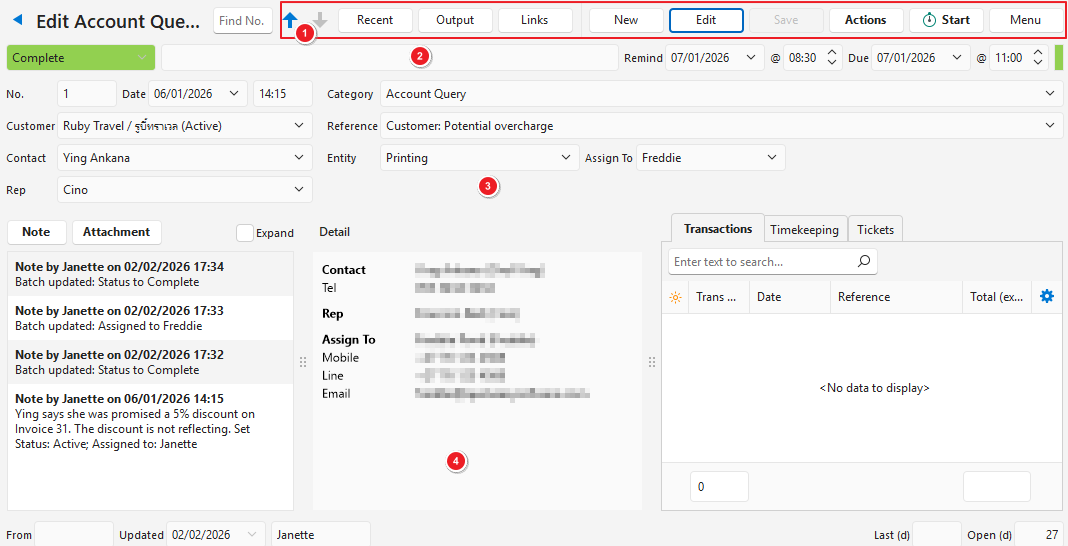
Buttons Explained
| Button | Description |
|---|---|
| Arrows | Navigates through the service tickets. |
| Recent | Lists recently viewed tickets for quick navigation. |
| Output | Prints, previews or emails the output if Output Templates are set up for the module. |
| Links | Lists the service tickets linked to this ticket (by the Filter selected under Actions). Click a ticket to open it. If the ticket has a linked asset, the asset is listed at the bottom. Click it to open the asset. |
| New | Creates a new service ticket. |
| Edit | Edits the entry. |
| Save | Saves any changes. |
| Actions | The options for the open ticket are:
|
| Start / Stop | Starts or stops timekeeping for the ticket, after you confirm. To start timekeeping, your user login must be linked to a contact (the Contact column in the Users module). |
| Menu | Settings
|
Top Status Bar Explained
| Field | Description |
|---|---|
| Status | The entry’s status. Statuses can be changed by adding a note. |
| Status Note | Enter a note or instruction for that status. |
| Remind | Set the reminder date. |
| @ | Set the reminder time. |
| Due | Set the due date. |
| @ | Set the due time. |
Header Section Explained
| Field | Description |
|---|---|
| No. | The system-generated number for the ticket. |
| / | The ticket’s version number, next to the ticket number. Only appears if the Service Type’s General > Enable Version Numbers setting is checked. |
| Date | The date on which the ticket was created. |
| Time | The time at which the ticket was created. |
| Customer | Select a customer from the dropdown list. |
| Contact | The customer’s contact person, or a dropdown list if the customer has more than one contact. |
| Rep | Select a rep from the dropdown list. |
| Asset | Select an asset from the dropdown list. If the selected customer has a linked asset, this field is filled in automatically. |
| Category | Select one of the Service Type’s categories from the dropdown list. |
| Reference | Enter a reference or select one if a lookup list was created. |
| Entity | Select the entity that the ticket belongs to from the dropdown list. |
| Assign To | The person the ticket is currently assigned to. Can be changed by adding a note. |
| Lead Source | Enter the source of the lead (can also be a lookup list). |
| Referred By | The user who referred the lead. |
| Once-off | The once-off price quoted to the customer, or the expected once-off earnings. |
| Annual | The annual price quoted to the customer, or the expected annual earnings. |
| Probability % | Enter the probability of a successful outcome as a percentage. |
Detail (tab)
- The tabs that appear depend on the settings under the project’s setup.
- If Projects are disabled, the tab feature is removed and the information on the Detail tab appears.
- The Detail tab uses the default font of the General Settings General > Default - Font name for HTML and Default - Font size for HTML.
- With the General Setting General > Enable Rich-Text in Note fields checked, a note is entered and formatted in the HTML editor in the note window. A plain note becomes HTML only when it is edited. Set Status and Assigned to are added to an HTML note as a new line.
- A note or attachment added on a job or task is linked to the job’s person when the Service Type uses Enable Company = Internal, and to the company otherwise.
Buttons and Filters Explained: Notes Section
| Button / Filter | Description |
|---|---|
| Note (button) | Adds a response or note to the ticket (e.g. Call, Meeting, Message). The note popup has a Start Timekeeping checkbox, or Stop Timekeeping if your timekeeping on the ticket is running. If checked, your timekeeping starts or stops when you save the note. If your timekeeping is running and the checkbox is unchecked, “Stop Timekeeping?” appears when you save the note. Click Yes (button) to stop it or Cancel (button) to keep it running. |
| Attachment (button) | Adds an attachment to the ticket. Attachments can be images, files, or URLs. |
| Expand (checkbox) | If checked, expands the responses (notes). |
| Fields | Description |
|---|---|
| Response section | A list of all the responses linked to the ticket or company. |
| Detail (tab) | Shows contact details for the contact, the rep and the user the ticket is assigned to. Shows Asset Attributes for assets linked to the ticket. Customising the Detail tab is a service that QuickEasy offers. |
| Profit / Loss (tab) | Shows the detailed income, expenses and profit or loss, based on the linked transactions and timekeeping records, according to the Service Type’s setup. Transactions can be linked to a service ticket at item level. Timekeeping that is linked to the ticket or a linked transaction can be included. |
Transactions (tab)
| Field | Description |
|---|---|
| Filter | |
| Linked to Filter on Actions (button) |
|
| Columns | |
| Field Chooser (*) | Add or remove columns. |
| ID | The system-generated number for the entry. |
| Trans No. | A code indicating the Transaction Type followed by the document number of the transaction. |
| Date | The transaction’s date. |
| Reference | The reference entered or selected for the transaction. |
| Total (exc) | The VAT-exclusive transaction total. |
 | A submenu that lets you:
|
Timekeeping (tab)
This tab lists the timekeeping linked to the service ticket, from the ticket itself or from the Timekeeping module.
| Field | Description |
|---|---|
| Expand | Checkbox. Toggles truncating or expanding the reference. Works only if the reference field is longer than the column width when displayed full screen. |
| Field Chooser (*) | Add or remove columns. |
| ID | The system-generated number for the entry. |
| Trans No. | The timekeeping transaction number which includes the source (e.g. Projects). |
| Start Date | The date on which timekeeping was started. |
| @ | The time at which timekeeping was started. |
| Resource | The user (person selected as the resource) who started the timekeeping. |
| Reference | The reference on the timekeeping record. |
| Hrs | The duration of the timekeeping record in hours. |
Tickets (tab)
| Field | Description |
|---|---|
| Filter | |
| Linked to Filter on Actions (button) |
|
| Columns | |
| Field Chooser (*) | Add or remove columns. |
| No. | The service ticket number. |
| Date | The ticket’s date. |
| Reference | The ticket’s reference. |
| A submenu that lets you:
|
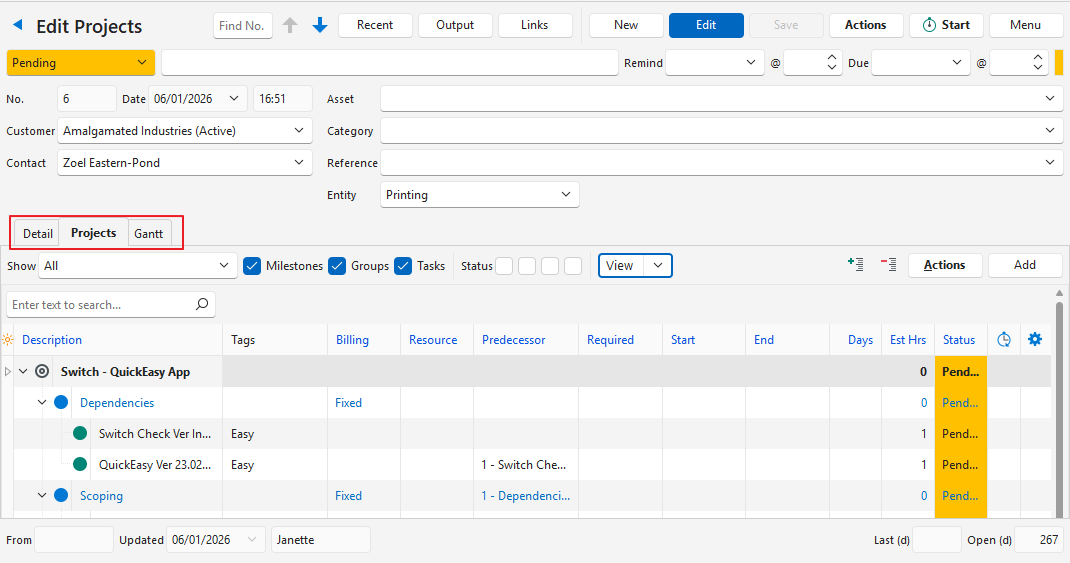
Projects (tab)
Deleting a milestone or group also deletes every group and task under it. The confirmation only counts the items you selected (“Delete Item?” or “2 Items will be deleted. Continue?”), not the items under them. Deleted project items are not sent to the Recycle Bin and cannot be restored.
Buttons Explained
These are the buttons in the middle of the screen, not the top row of buttons.
| Button | Description |
|---|---|
| View | Generates a list of entries as per the selected data filters. |
| Arrow on View Button | Reset Data Filter: Resets all the data filters. |
| Add | Opens the Select Project Templates (Active) screen for you to add Project Templates to the project. Only Active templates with an Enable Groups setting that matches the project’s Enable Group setting are listed. |
| Actions | Lets you change multiple records that you can select using Ctrl + left-click. The options are:
|
Filters Explained
| Filter | Description |
|---|---|
| Filter | The first filter depends on the type of ticket. For projects, the Show dropdown list lets you show All or a specific project. For NCR tickets, the options are:
|
| Show | Checkboxes to select which levels appear:
|
| Status | Checkboxes that show only the records with the checked statuses: one for each of the Pending, Active, Complete and Cancelled Status Groups. Hold the mouse pointer over a checkbox to see the names of its statuses. |
| + – | Expands or collapses the display of project items. |
Schedule
This section appears when you click Actions (button) > Schedule. Scheduling sets the start and end dates of the milestones only; the days and predecessors of groups and tasks are cleared. Cancelled milestones, and milestones with the default status for Fix Dates, are not rescheduled.
| Field | Description |
|---|---|
| Start | The start date of the project. |
| End | The end date of the project. |
| Schedule | A dropdown button with these options:
You can run each option with one of these settings:
|
Fields Explained
Fields marked in blue (✎) can be edited.
| Field | Description |
|---|---|
| Field Chooser (*) | Add or remove columns. |
| ID | The system-generated number for the entry. |
| Component | A colour-coded circle indicating the level of the entry. |
| Parent ID | The system-generated number for the parent item. |
| Order ID | The system-generated number for the order of entries under a parent. |
| Template | The number of the Project Template selected for the project. |
| Description | The descriptions of the project items. |
| Tags | The tags as defined on the Service Type. Tags can be added using Batch Update. |
| Group | The group assigned to the project item. Groups can be added using Batch Update. |
| Billing | Select the type of billing from the dropdown list:
Can be edited only on groups. Does not appear if Enable Group is unchecked for the project. |
| Resource | The resource allocated to the task. Can be edited only on milestones and tasks. |
| Note | Any note that was created from the context menu for the item. |
| Predecessor | The name of the predecessor. Can be edited only on milestones. |
| Required | The date on which the task is required. |
| Start | The start date of the task. |
| End | The end date of the task. |
| Audit | Records the original start date. Applies only if the start date is changed. |
| Days | The number of days the milestone is expected to take. Can be edited only on milestones. |
| Note | Enter a note. |
| Est Hrs | The number of hours the task is expected to take. Can be edited only on tasks. |
| Moved (d) | The number of days the task’s start date was moved. |
| Act Hrs | The actual hours the task has taken. |
| Var Hrs | The difference between the actual and estimated hours. |
| Status | The status of the specific milestone, group or task. |
| Created | The date on which the entry was created. |
| Updated | The date on which the entry was last updated. |
| Updated By | The user who last updated the entry. |
| Clock | Indicates whether a timekeeping record is active. |
| Enable Group | A read-only checkbox below the list indicating whether the project uses groups. It can be changed with Actions (button) > Enable Group while the task list is empty. |
| A submenu that changes depending on the hierarchy of the item that is right-clicked. The options are:
|
Gantt (tab)
Button Explained
| Button | Description |
|---|---|
| Refresh | Refreshes the display. |
Fields Explained
| Field | Description |
|---|---|
| Field Chooser (*) | Add or remove columns. |
| Description | The description of the project items. |
| Duration | The number of days the task is expected to take. |
| Start | The expected start date. |
| Finish | The expected finish date. |
| Calendar | A visual representation of the project that displays the start date and duration of each task in the project. |
| Menu (…) | Right-click an entry for this option:
|