
Custom Actions Tutorials
Actions can be used to:
- Automate processes
- Add a layer of control
- Provide additional information
Actions can be created for:
- Transactions: The action is written for a specific transaction.
- Services: The action is written for a specific Service Type.
- Custom Reports: The action is written for a specific custom report.
- Global: These actions are not linked to specific modules but add specific functions to QuickEasy BOS, such as generating commission invoices or printing Point of Sale (PoS) receipts. These actions must be added to a menu and are executed by selecting the menu item.
💡These tutorials explain how to create custom actions for transactions, Service Types, custom reports and global use, and add them to menus.
How Actions Work
- Actions consist of an ordered list of items that are executed in sequence.
- Each item contains SQL that is run on the database and optionally returns a note.
- If a note is returned, it appears as a message to users.
- The input variables that can be used in the SQL are determined by the module the action is linked to.
- Multiple items, including duplicate items (e.g. multiple error messages), can be linked to an action.
- User Access must be assigned to each action.
- Only actions with an Active status are executed.
- The Execute option decides where the action is run from (see Custom Actions List and Edit Views).
Creating Custom Actions
How to Create a Custom Action for a Transaction
Note
- To use this feature, you must have a basic understanding of SQL and be able to create or modify SQL queries.
- The tables, including field names, functions and procedures, are provided, but you must still know how to modify a SQL template using this data.
- If you are unfamiliar with SQL, contact QuickEasy Support for assistance.
- Navigate to Actions (e.g. Main Menu > Setup > Actions).
- Click New (button) > Transactions.
- Status = Select Active from the dropdown list.
- In the blank field next to Type > Transaction, enter a description for the action.
- Note: This description appears on Actions (button), so make it meaningful.
- Transaction = Select the Transaction Type that the action is for from the dropdown list.
- Execute =
- Select Actions (Single) if the action is used when creating a transaction (e.g. a warning or stock check).
- Select Actions (Multi-selected) if the action checks or updates multiple transactions (List View) or transaction items (Edit View).
- Click Item (button) next to Add.
- Complete the new row as follows:
- Type = Select one of these options:
- Error: Used to return an error message and stop the transaction from being processed further.
- Warning: Used to warn the person capturing the transaction but allows them to continue.
- Confirm: Used to confirm something (e.g. that there is enough stock on hand).
- Execute SQL: Performs a query and does not return a note.
- Type = Select one of these options:
- Description = Describe what the entry does (this description only appears here).
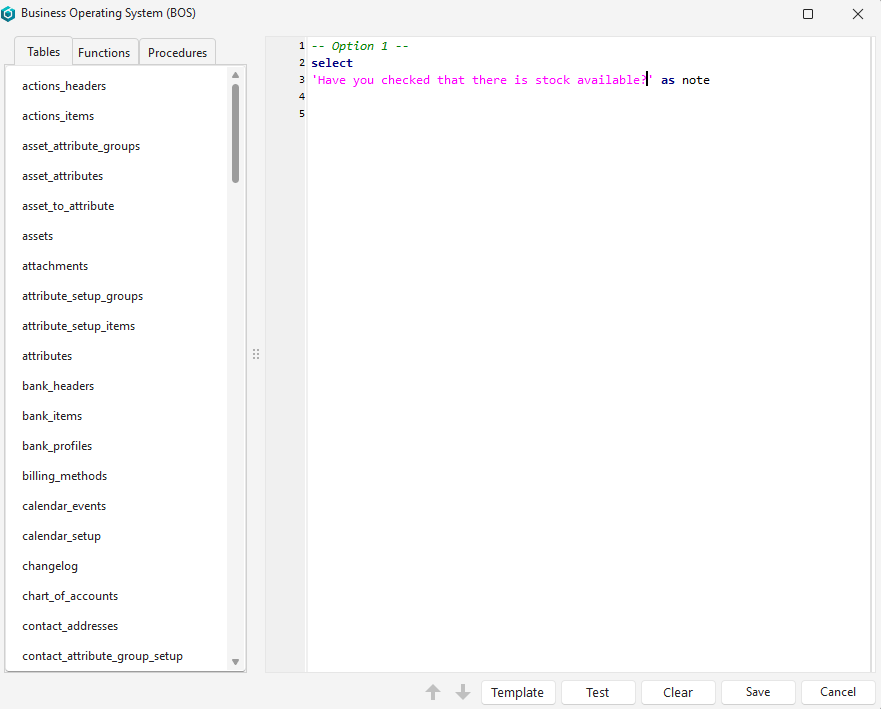
- Right-click the entry and select View/Edit SQL.
- Create the SQL query on the popup as follows:
- Click Template (button), then do one of the following:
- Edit Option 1 to display a message or question (see the screenshot below) and delete Option 2.
- Edit Option 2 to execute a procedure that returns a message and delete Option 1.
- Click Clear (button) and insert your own SQL.
- Click Test (button).
- Note: The test only checks that the SQL is valid, not that it returns a valid result.
- Close the SQL popup by clicking the X in the corner.
- Click Template (button), then do one of the following:
- Repeat Steps 7 to 11 to add more items if needed.
- Click Save (button) if it is not greyed out.
How to Create a Custom Action for a Service Type
Note
- To use this feature, you must have a basic understanding of SQL and be able to create or modify SQL queries.
- The tables, including field names, functions and procedures, are provided, but you must still know how to modify a SQL template using this data.
- If you are unfamiliar with SQL, contact QuickEasy Support for assistance.
- Navigate to Actions (e.g. Main Menu > Setup > Actions).
- Click New (button) > Services.
- Status = Select Active from the dropdown list.
- In the blank field next to Type > Service, enter a description for the action.
- Note: This description appears on Actions (button), so make it meaningful.
- Service = Select the Service Type that the action is for from the dropdown list.
- Execute =
- Select Actions (Single) if the action is used when creating a ticket.
- Select Actions (Multi-selected) if the action checks or updates multiple tickets (List View) or multiple ticket items (e.g. on projects).
- Click Item (button) next to Add.
- Complete the new row as follows:
- Type = Select one of these options:
- Error: Used to return an error message and stop the ticket from being processed further.
- Warning: Used to warn the person capturing the ticket but allows them to continue.
- Confirm: Used to confirm something (e.g. that there is enough stock on hand).
- Execute SQL: Performs a query and does not return a note.
- Type = Select one of these options:
- Description = Describe what the entry does (this description only appears here).
- Right-click the entry and select View/Edit SQL.
- Create the SQL query on the popup as follows:
- Click Template (button), then do one of the following:
- Edit Option 1 to update a field and delete Option 2.
- Edit Option 2 to execute a procedure that returns a message and delete Option 1.
- Click Clear (button) and insert your own SQL.
- Click Test (button).
- Note: The test only checks that the SQL is valid, not that it returns a valid result.
- Close the SQL popup by clicking the X in the corner.
- Click Template (button), then do one of the following:
- Repeat Steps 7 to 11 to add more items if needed.
- Click Save (button).
How to Create a Custom Action for a Custom Report
Note
- To use this feature, you must have a basic understanding of SQL and be able to create or modify SQL queries.
- The tables, including field names, functions and procedures, are provided, but you must still know how to modify a SQL template using this data.
- If you are unfamiliar with SQL, contact QuickEasy Support for assistance.
- Navigate to Actions (e.g. Main Menu > Setup > Actions).
- Click New (button) > Custom Reports.
- Status = Select Active from the dropdown list.
- In the blank field next to Type > Custom Report, enter a description for the action.
- Note: This description appears on Actions (button), so make it meaningful.
- Report = Select the custom report that the action is for from the dropdown list.
- Execute =
- Select Actions (Single) if the action is used on the context menu of a custom report.
- Select Actions (Multi-selected) if the action checks or updates multiple report items (List View).
- Click Item (button) next to Add.
- Complete the new row as follows:
- Type = Select one of these options:
- Error: Used to return an error message and stop the report from being processed further.
- Warning: Used to warn the person viewing or editing the report but allows them to continue.
- Confirm: Used to confirm something (e.g. that there is enough stock on hand).
- Execute SQL: Performs a query and does not return a note.
- Type = Select one of these options:
- Description = Describe what the entry does (this description only appears here).
- Right-click the entry and select View/Edit SQL.
- Create the SQL query on the popup as follows:
- Click Template (button), then do one of the following:
- Edit Option 1 to update a field and delete Option 2.
- Edit Option 2 to execute a procedure that returns a message and delete Option 1.
- Click Clear (button) and insert your own SQL.
- Click Test (button).
- Note: The test only checks that the SQL is valid, not that it returns a valid result.
- Close the SQL popup by clicking the X in the corner.
- Click Template (button), then do one of the following:
- Repeat Steps 7 to 11 to add more items if needed.
- Click Save (button).
How to Create a Global Custom Action
Note
- To use this feature, you must have a basic understanding of SQL and be able to create or modify SQL queries.
- The tables, including field names, functions and procedures, are provided, but you must still know how to modify a SQL template using this data.
- If you are unfamiliar with SQL, contact QuickEasy Support for assistance.
- Navigate to Actions (e.g. Main Menu > Setup > Actions).
- Click New (button) > Global.
- Status = Select Active from the dropdown list.
- In the blank field next to Type > Global, enter a description for the action.
- Note: This description appears on Actions (button), so make it meaningful.
- Click Item (button) next to Add.
- Complete the new row as follows:
- Type = Select one of these options:
- Error: Used to return an error message and stop the transaction from being processed further.
- Warning: Used to warn the person capturing the transaction but allows them to continue.
- Confirm: Used to confirm something (e.g. that there is enough stock on hand).
- Execute SQL: Performs a query and does not return a note.
- Type = Select one of these options:
- Description = Describe what the entry does (this description only appears here).
- Right-click the entry and select View/Edit SQL.
- Create the SQL query on the popup as follows:
- Click Template (button), then do one of the following:
- Edit Option 1 to update a field and delete Option 2.
- Edit Option 2 to execute a procedure that returns a message and delete Option 1.
- Click Clear (button) and insert your own SQL.
- Click Test (button).
- Note: The test only checks that the SQL is valid, not that it returns a valid result.
- Close the SQL popup by clicking the X in the corner.
- Click Template (button), then do one of the following:
- Repeat Steps 5 to 9 to add more items if needed.
- Click Save (button).
Applying Custom Actions
How to Add Global Actions to a Menu
- Navigate to Menus (e.g. Main Menu > Setup > Menus).
- Double-click any Menu Group to edit it or click New (button) to create a group.
- Click Edit (button) on the top row if it is not blue.
- Next to Add Module, look for the entry Actions – XXX where XXX is the name of your Global Action.
- Click Add (button).
- Move the newly added module if applicable.
- Check the Tile Menu box to display the action on the Tile Menu (optional).
- Check the Begin Group box to draw a line before the entry (optional).
- Click Save (button) if it is not greyed out.
- Close the Menu Group interface by clicking the X in the corner.
- If you created a Menu Group, add it to a Menu Template (see Menu Templates).
- Note: If you edited an existing Menu Group, the template is updated and available to users after they restart BOS.
- If it affects your own Menu Template, right-click your Menu Template and select Preview to view the new entry on the menu.
How to Find and Apply Custom Actions
- Transactions: In either List View or Edit View, click Actions (button) and click the action under the heading Actions.
- Custom Reports: Generate the custom report. Right-click an entry on the report and select the action.
- Service Types: Navigate to the applicable Service Type. Double-click a ticket to open it. Click Actions (button) and click the action under the heading Actions.
- Global Actions: Click the action on the menu where it was added (see How to Add Global Actions to a Menu). The person creating the action chooses a name, and the person editing the menus chooses the placement. It could be named anything and placed anywhere.