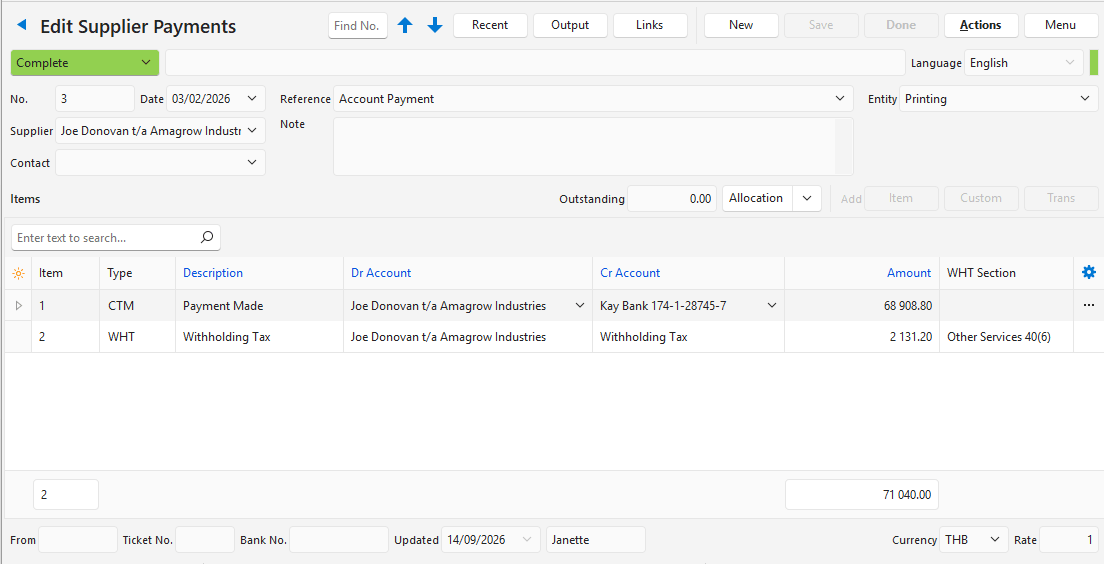
Transactions Edit View Interface
The edit view is where a transaction is captured. It has top row buttons, a status bar, a header, the items and a footer (numbered on the example below). Transactions are listed in the List View.
The fields included depend on the Transaction Type’s settings.
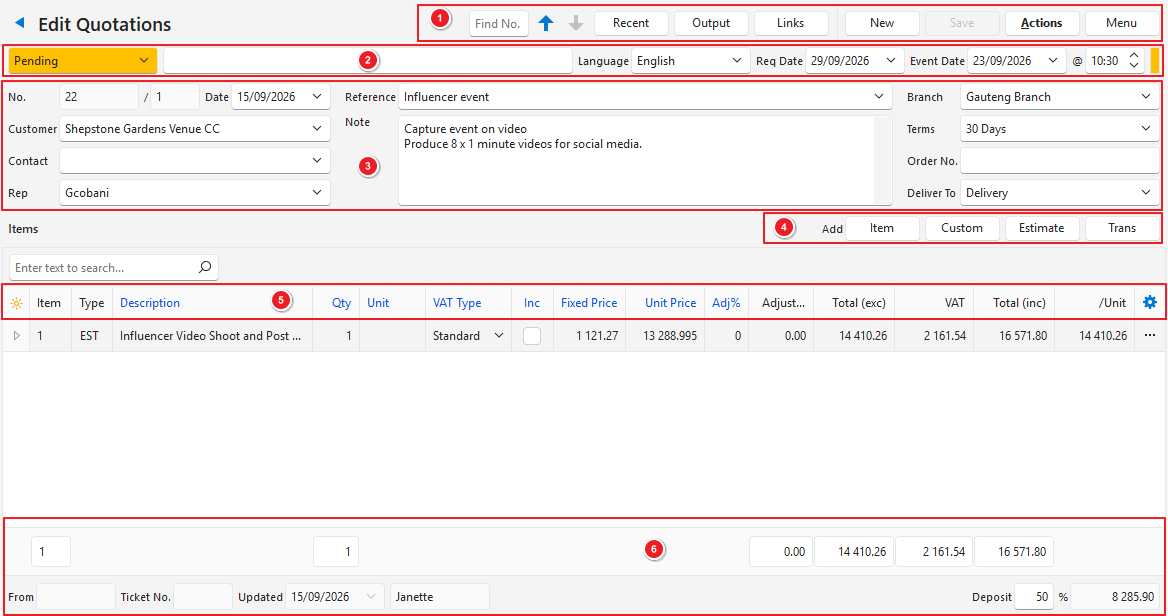
1 Top Row Buttons – 2 Status Bar – 3 Header – 4 Item Buttons – 5 Item Fields – 6 Transaction Footer
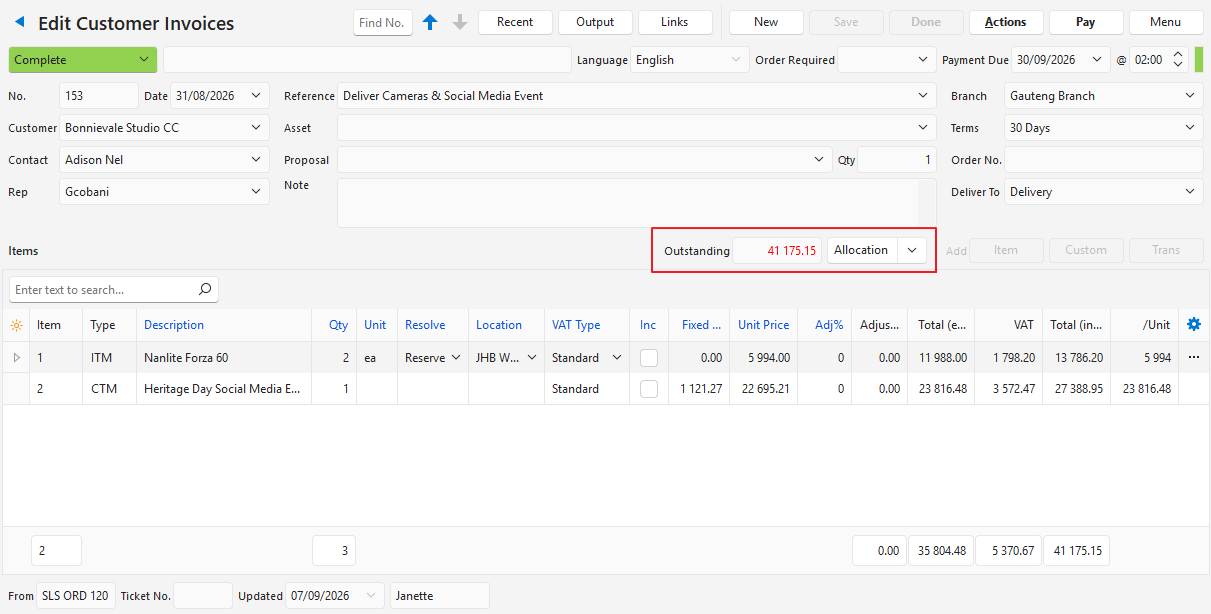
Top Row Buttons Explained
| Button | Description |
|---|---|
| Arrows | Navigates to the next or previous entry. |
| Find No. | Enter a transaction number and press Enter to open that transaction of the same Transaction Type. Any changes to the current transaction are saved first. If no transaction has that number, “Transaction not found.” appears. |
| Recent | A dropdown list of recently viewed records for quick access to those records. The button does not appear if there are no recent records. |
| Output | Prints, previews or emails the output if Output Templates are set up for the module. |
| Links | A dropdown list with the Abbreviation and Number of documents in the same transaction flow for quick access to those documents. It lists the first 20 linked transactions; More… (always the last entry) opens View Linked Transactions with the full list. If an Asset is selected on the transaction, the asset is listed at the bottom (Asset: followed by its name). Click it to open the asset. |
| New | Creates a transaction. If General > Transaction Number is Generate (Entity) and the Transaction Type is not limited to one entity, New is a dropdown list of entities. Select the entity to create the transaction for. The Entity field is then read-only. |
| Save | Saves any changes. |
| Done | Available if a default Complete Status was selected. Sets the transaction to the specified status. If the warning bar shows an error, Done shows the error in a message and does not change the status. A warning that is not an error does not block it. If the transaction was copied from a transaction of another Transaction Type that posts to the ledger, and nothing is allocated yet, Done asks “Allocate the outstanding amount to” followed by the source transaction. Click Yes (button) to allocate the transaction to it, or No (button) to continue without allocating. The question only appears if allocations are enabled and the transaction amount is not zero. See Transaction Allocations. |
| Actions | See Actions Button Explained below. |
| Pay | Applies to customer invoices. Copies the transaction to a customer receipt. See Copy Rules for more information. |
| Menu | See Menu Button Explained below. |
Actions Button Explained
- Actions (button) has options to process, delete or copy the transaction.
- The available options differ per transaction and depend on the Copy Rules.
- Actions let you edit static records (e.g. the customer, supplier or contact). These modules have limited functionality when opened from a transaction.
- Transactions can be linked to service tickets using the Actions button.
- A transaction can be linked to an earlier transaction in its workflow, or unlinked from it, using the Actions button (see Update Transaction below).
- Replenishment functions can also be accessed from the Actions button (see Replenishment below).
Update Transaction
- Below Link to Service, the Update Transaction group of the Actions button includes these functions:
- Link to From Transaction: Links the open transaction to an earlier transaction (the From transaction) in the workflow, for example, a Sales Order that was created on its own but belongs to a Quotation. In the Link to From Transaction window, select the Transaction Type next to Link to, enter the No. and click Load (button). Then select a From entry for each entry in the Link to From Item column. Entries are suggested by item. Click Link (button) and confirm. The transaction and every transaction created from it (e.g. a Delivery Note or an Invoice) join the workflow of the From transaction, together with their notes, attachments, attributes and project. Linked entries reduce the outstanding quantity of the From entries.
- Unlink From Transaction: Makes the transaction, and the transactions created from it, a separate workflow again. The confirmation lists the transactions created from it that are unlinked too.
- Only Transaction Types that have a Copy Rule to the open transaction’s type can be selected. A cancelled or deleted transaction cannot be the From transaction (see How to Link a Transaction to a From Transaction).
Proposals
- When proposals are enabled, the Actions button includes these functions:
- View/Edit Proposal: Opens the proposal for fields to be selected.
- Update Transaction from linked Proposal: Updates the transaction from the original proposal. If the transaction uses Sell prices, each item is given the customer’s Price List price, or its Sell price if the customer has no Price List price for it.
- Select a different Proposal Template: Allows a new proposal template to be selected.
Non-Conformance Reports
- When a transaction is linked to a non-conformance report (NCR) as the Problem transaction, the following functions are added:
- Create NCR (Problem): Creates an NCR and links the current transaction as the problem transaction. NCR in this example is the name of a Service Type that has the NCR feature enabled.
- Link to NCR (Problem): Links the current transaction as the problem transaction to an existing NCR.
- Terminology used:
- Problem: Refers to the original transaction that was queried.
- Remake: Refers to a work or purchase order that is created to remake or reorder part or all the items.
- Rework: Refers to products that are faulty but can be fixed (that is, they are reworked).
Depreciation
Add Depreciable Assets replaces all the existing items on the transaction each time it is run.
- When Depreciation > Enable Depreciation is checked on the Transaction Type, the Actions button includes this function:
- Add Depreciable Assets: Adds a custom entry for each active depreciable asset with a Book Value greater than its Residual Value, linked to the asset. The amount for the first month is calculated pro rata, and in later months the amount is capped so that the book value does not go below the residual value. The Status in each asset’s Depreciation attribute set is set to Active for assets being depreciated and to Complete for fully depreciated assets. The asset’s own status is not changed.
Replenishment
- When Inventory > Enable Inventory Replenishment is set on the Transaction Type, the Actions button includes this function:
- View Items due for Replenishment: Opens the Inventory Replenishment interface to add the items that are due for replenishment to the transaction.
Stock Adjustment
- When Inventory > Enable Stock Adjustment is checked on the Transaction Type, the Actions button includes these functions:
- Update the In Stock Qty: Recalculates the In Stock quantity on all the items.
- Set Count Qty = In Stock Qty: Sets the Count Qty on all the items to the In Stock quantity.
- Set Count Qty = 0: Sets the Count Qty on all the items to zero.
Batch Updates
Where applicable, the following changes can be made to all the selected items (Adj%, MU% and VAT only if your user access has Edit Prices set to Yes):
- Adj%: Changes the adjustment percentage to the one entered in the adjacent box.
- Calendar Start: (Calendar Start is a custom description). Changes the calendar’s start date and time.
- Calendar End: (Calendar End is a custom description). Changes the calendar’s end date and time.
- Cr Account: Updates the ledger account that is credited (e.g. for Customer Invoices). If a custom name is used, the option under batch updates is changed accordingly (e.g. Sales Account).
- Dr Account: Updates the ledger account that is debited (e.g. for Supplier Invoices). If a custom name is used, the option under batch updates is changed accordingly.
- Fix: Checkbox.
- If checked, both the fixed and unit prices can be edited, and they override the markup percentage (MU%), which is calculated from the entered prices.
- If unchecked, the MU% is applied to the cost price to determine both the fixed and unit prices. The MU% overrides any entered prices, which are adjusted to match it.
- Changes on the transaction set this box automatically: entering a price checks it, and entering an MU% unchecks it.
- Group: Enter a group name. Group names are specific to the transaction.
- Location: Changes the location for the selected items. Only inventory items have a location: a Purchase or Produce resolve only directs the item to the next transaction (a Purchase Order or Work Order). On Transaction Types with General > Enable Entities set to Branch, only the locations linked to the transaction’s branch are listed.
- MU%: Changes the markup percentage to the one entered in the adjacent box. Automatically unchecks the Fix box.
- Resolve: Changes the resolve to the one selected on the dropdown list.
- Service No.: Select a service ticket from the dropdown list to allocate the items to.
- Status: Changes the item’s status to the one selected from the dropdown list. Only available if the Transaction Type setting General > Enable Item Status is checked.
- Transaction Calendar: (Transaction Calendar is the custom name of the Calendar Type). Allows the calendar resource to be changed.
- VAT: Changes the VAT Type and whether the price is entered inclusive or exclusive of VAT.
- VAT Category: Changes the VAT category. Only available if the Transaction Type setting Accounting > Enable Accounting is checked.
- WHT%: Changes the withholding tax percentage to the one entered in the adjacent box, or clears it if 0 is entered. Only available if Accounting > Enable Withholding Tax (WHT) is set to Invoice.
- WHT Section: Sets the WHT section to the one selected from the dropdown list, or clears it if the blank entry is selected. Only available if Accounting > Enable Withholding Tax (WHT) is set to Invoice.
Example:
- Batch Update
- Show Notes
- Link to Service
- Update Transaction
- Link to From Transaction
- Unlink From Transaction
- Delete Transaction
- Order by
- Description
- Group
- Proposal
- View/Edit Proposal
- Update Transaction from linked Proposal
- Select a different Proposal Template
- NCR
- Create Accounts Procedure (Problem) (where Accounts Procedure is the name of a Service Type)
- Create Non-Conformance Reports (NCR) (Problem) (where Non-Conformance Reports is the name of the Service Type created for NCRs)
- Link to NCR (Problem)
- Unlink NCR (Problem)
- Copy to Remake Work Orders
- Copy Transaction
- Copy to Version
- Copy to Customer Invoice
- Copy to Goods Issued
- Contact
- Add Customer
- Edit Customer
- Edit Contact
Contact options:
- Add Customer / Add Supplier: Asks “Add a new Customer?” (or Add a new Supplier?), creates the customer or supplier, opens it for you to complete, and then selects it on the transaction.
- On a read-only transaction, “Customers may not be added from read-only Transactions.” (or Suppliers may not be added from read-only Transactions.) appears.
- On Transaction Types with General > Enable Company = Customers (Active) or Suppliers (Active), Customers may not be added from Transactions that use Active Customers (or Suppliers may not be added from Transactions that use Active Suppliers) appears.
- Edit Customer / Edit Supplier: Opens the customer or supplier selected on the transaction. If none is selected, “Please select a Customer.” or “Please select a Supplier.” appears.
- Edit Contact: Opens the contact selected on the transaction. If none is selected, “Please select a Contact.” appears.
Menu Button Explained
The options depend on which features are enabled, and vary from the example below.
- Open Timekeeping
- Open Linked Asset
- Open Calendar
- View/Edit Notes & Attachments
- View/Edit Followers
- View Accounting: Displays how the transaction is posted to the ledger. Each row is one ledger entry, with these columns:
- Item: The number of the entry on the transaction.
- Description: The entry’s description.
- Account: The ledger account that is debited or credited.
- Debit and Credit: The amounts in the local currency, with totals at the bottom.
- Account Type: Asset, Liability, Equity, Revenue or Expense (with Field Chooser (*)).
- Currency: The transaction’s currency (with Field Chooser (*)).
- Debit (CUR) and Credit (CUR): The amounts in the transaction’s currency (with Field Chooser (*)).
- Created, Updated and Updated By (with Field Chooser (*)).
- View Inventory: Displays how inventory is affected by the transaction. Each row is one inventory movement, with these columns:
- Date, Description and Location.
- Unit: The item’s base unit. The quantities are converted to it.
- Resolve: The entry’s resolve.
- Moved: The quantity issued from stock (negative, in red) or received into stock (positive).
- On Order: The quantity on order, for entries with the On Order resolve.
- Reserved: The quantity reserved, for entries with the Reserve resolve.
- Adjusted: The quantity adjusted, for entries with the Adjust resolve (negative to issue, positive to receive).
- From, Item Code, Item Description, Created, Updated and Updated By (with Field Chooser (*)).
- View Changelog
- View Transaction Info: Displays the transaction ID and, if the transaction is read-only for you, the reasons:
- Edit Access = No: Your user access to the Transaction Type does not allow editing.
- The Transaction Status is a Read-only Status (Status Setting): The transaction’s status does not allow editing.
- Views – Production
- Jobs: Opens the production jobs view filtered to the specific transaction.
- Materials: Opens the production materials view filtered to the specific transaction.
- Tasks: Opens the production tasks view filtered to the specific transaction.
- Outwork: Opens the production outwork view filtered to the specific transaction.
- Settings
- Layout
Warning Bar
- Displays warnings about the transaction (e.g. the transaction is not in an accounting status) and lists the NCR number if the transaction is linked to an NCR.
- On a transaction dated on or before its Transaction Type’s Close-off Date, shows Closed off up to dd/mm/yyyy (before any other warning). The transaction is read-only and cannot be set to Done or deleted, and its date cannot be changed to a date on or before the Close-off Date.
- On transactions that track batches or serial numbers, also shows the tracking warnings (e.g. a batch issued at a location where it was not received, or an item’s Qty that does not match the number of its serial numbers). See Item Tracking.
Header Information
| Field | Description |
|---|---|
| Status Bar | |
| Status | Set the status for the entry. |
| Status Note | Enter a note or instruction to the next person opening the transaction. |
| Language | Select the transaction’s language from the dropdown list. Read-only once the transaction has items, because the item descriptions are in that language. Selecting a customer or supplier sets the language from the contact, but only while the transaction has no items. |
| Req Date | A calendar to select an applicable date. The field’s caption and use depend on the related setting. If no caption is set, the field does not appear. |
| Due Date | A calendar to select an applicable date. The field’s caption and use depend on the related setting. If no caption is set, the field does not appear. |
| @ | A time chooser for you to select the time for the due date. Appears only with the due date. |
| Header | |
| No. | The number of the document. The version number of the document where applicable. |
| Date | A calendar to select a date. |
| Customer / Supplier | Select a customer or supplier (depending on the transaction) from the dropdown list. |
| Contact | Select from a dropdown list of contacts. |
| Rep | Select from a dropdown list of representatives. |
| Assign To | Select the staff member to assign the transaction to from the dropdown list. |
| Reference | Enter or select a reference. Lookup lists for the reference field are created on the Transaction Type’s Settings. |
| Asset | Select from a dropdown list of assets linked to the customer or supplier. A copied transaction keeps the asset of its source transaction, even when the asset is not linked to the selected customer or supplier. |
| Proposal | Select from a dropdown list of proposals. |
| Note | Enter a note. With the General Setting General > Enable Rich-Text in Note fields checked, click Edit next to the box to format the note in the HTML editor. A formatted note is shown read-only in the box: double-click it or click Edit to change it, or right-click it and select Clear Formatting to make it plain text again. |
| Entity | Select from a dropdown list of entities. Does not appear if there is only one entity. The caption and the list follow the Transaction Type setting General > Enable Entities:
A new transaction always gets an entity of that kind. |
| Category | Select from a dropdown list of categories. |
| Order No. | Enter an order number. |
| Terms | Select from a dropdown list of terms. |
| Deliver To | A dropdown list of the address descriptions. The addresses can be edited directly on the popup. If a contact is selected on a transaction, and a location is entered for that contact on the customer’s record, the location is automatically filled in as the delivery address. If there is no contact or location, the default delivery address is used. Only appears if General > Enable Address includes Delivery. |
| Bill To | A dropdown list of the address descriptions. The addresses can be edited directly on the popup. When a customer is selected, the customer’s address with Default = Billing is filled in automatically. For supplier transactions, the entity’s billing address is used. If there is no billing address, the field is left blank. Only appears if General > Enable Address includes Billing. |
| From | A dropdown list of inventory locations to select the location the items are transferred from. When it appears, the items’ Location column is read-only. Only appears if Inventory > Enable Transfer Issue or Inventory > Enable Transfer Receive is checked. |
| To | Select the location the items are transferred to from the dropdown list. Only appears if Inventory > Enable Transfer Issue or Inventory > Enable Transfer Receive is checked. |
| Bank No. | Read-only. The number of the bank import and the imported bank statement line that the transaction is matched to. Only appears if Accounting > Update Bank is not None. |
| Attributes | The transaction attributes selected in the Transaction Type setting Attributes to show in Edit View, in the fourth column of the header (after Entity, Category and Terms), in the order selected. Each attribute has its own caption. Enter or select a value. Changes are saved when you save the transaction. If the attribute’s set is not on the transaction yet, entering a value adds the set with its defaults. Transaction attributes are shared across the workflow, so the Quotation, Sales Order, Invoice and the other transactions in it show and edit the same values. Only appears if attributes are selected in that setting. |
Item Information
Buttons Explained
- A transaction can contain multiple items. It can also contain a mixture of the different options available (e.g. a single quotation can include one or more items, custom entries, and estimates).
- The items that can be added are determined by this setting: Transaction Items > Enable Adding Items. Disabled buttons still appear but return an error when clicked.
| Button | Description |
|---|---|
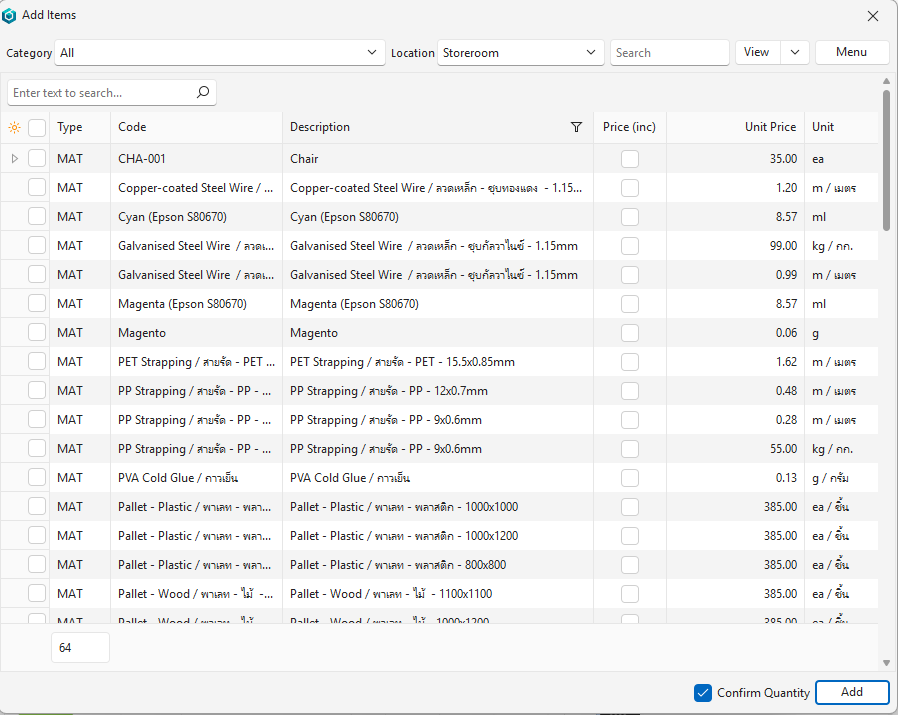
| Item | Opens the Add Items window, to add items to the transaction. It has these filters and options:
Items cannot be added to a Transfer Receive transaction (Inventory > Enable Transfer Receive is checked). The message “Items may not be added to a Transfer Receive Transaction.” appears. |
| Custom | Adds a custom entry (not an item from the item master):
|
| Estimate | Creates an Estimate from an Estimate Type. The estimate summary appears as an entry on the transaction. A setting determines whether estimates can be added. |
| Trans | Opens a window to copy items from other transactions onto this transaction. No new transaction is created. It has these options:
|
Allocations Explained
- The allocations feature is optional.
- Allocations link payments to invoices. This linking lets you see which invoices remain unpaid.
- The Allocation button opens an interface to allocate transactions.
- See Transaction Allocations for detailed information.
The arrow on the Allocation button includes these functions:
- Update Transaction to the Allocated Amount: Changes the transaction’s amount to the total of its allocations. If the transaction has no items, a custom entry is added for the amount.
- Calculate Withholding Tax (WHT): Calculates the withholding tax on the allocated invoices and adds it to the transaction as WHT entries. It is not done for partially allocated invoices. Only available if Accounting > Enable Withholding Tax (WHT) is set to Payment.
Fields Explained
- Only fields marked in blue (✎) can be edited. The rest are prefilled or calculated.
- The available fields depend on the price used (e.g. cost or sell price) and the Transaction Type’s setup.
- If your user access to the Transaction Type has Edit Prices set to No, you cannot change the Fixed Price, Unit Price, Adj%, MU%, VAT Type, Inc or Unit (Select) of the items, and their captions are not blue.
- If your user access has Hide Costs set to Yes and the Transaction Type uses sell prices, the cost, markup and profit columns are hidden: Fixed Cost, Unit Cost, Total Cost, MU%, Markup, Profit and GM%.
| Field | Description |
|---|---|
| /Unit | The price per unit, based on the Fixed Price and the Unit Price, in the local currency. |
| /Unit (cur) | The price per unit, based on the Fixed Price and the Unit Price, in the transaction currency. |
| Adj% | The percentage adjustment (a markup or discount) applied to the entry. Enter a negative adjustment to capture a discount (e.g. -10). |
| Adjustment | The amount of the Adj% adjustment. |
| Batch No. | The entry’s batch number (one batch per entry). On a receive entry, enter the batch number. On an issue or reserve entry, select the batch from the dropdown list of the item’s batches with a balance at the entry’s location; on an order entry, enter it (see Inventory Tracking). This field appears only if Inventory > Enable Tracking is set to Batches for the Transaction Type, and the type enables Receive, On Order, Reserve or Issue. |
| Calendar End Date – Date | The end date for the calendar. Calendar fields start with the word Calendar. In this example, the custom caption is End Date. |
| Calendar End Date – Time | The end time for the calendar. Calendar fields start with the word Calendar. In this example, the custom caption is End Date. Shown as @. |
| Calendar Start Date – Date | The start date for the calendar. Calendar fields start with the word Calendar. In this example, the custom caption is Start Date. |
| Calendar Start Date – Time | The start time for the calendar. Calendar fields start with the word Calendar. In this example, the custom caption is Start Date. Shown as @. |
| Calendar Transaction Calendar | Select the resource (a contact or an asset) the task is assigned to on the calendar. The field is named after the linked calendar, with the word Calendar in front. In this example, the linked calendar is named Transaction Calendar. |
| Category | Select the entry’s category from the dropdown list. |
| Category (Item) | Auto-filled with the item’s category if an item is inserted. |
| Code | The item’s code. |
| Cr Account | The account that should be credited. If a Credit Account Filter is used, the caption is changed to the name of the filter (e.g. Bank Account instead of Cr Account). These filters are case-insensitive and apply only to ledger accounts. |
| Created | The date on which the entry was created. |
| Description | The description of the item or estimate. |
| Dr Account | The account that should be debited. If a Debit Account Filter is used, the caption is changed to the name of the filter (e.g. Bank Account instead of Dr Account). These filters are case-insensitive and apply only to ledger accounts. |
| Expiry Date | Enter the date on which the batch or the serial numbers on the entry expire (optional). It is shown in the batch list and the Available serial numbers when the stock is issued. On receive and order entries, enter it. On reserve and issue entries it is read-only: with Batches, it is filled from the selected batch (the expiry date of its last Goods Received); with Serial Numbers, it is the earliest expiry date of the selected serial numbers. This field appears only on Transaction Types that enable Receive, On Order, Reserve or Issue and have Inventory > Enable Tracking set to Batches, Serial Numbers or Serial Number (Unchecked). |
| Field Chooser (*) | Add or remove columns. |
| Fix | Sets how the price is calculated:
|
| Fixed Cost | The entry’s fixed cost, which applies regardless of the quantity. |
| Fixed Price | The entry’s fixed sell price, which applies regardless of the quantity. |
| Flow | The system-generated number for the transaction flow (e.g. if a Quotation is copied to a Sales Order, they are part of the same transaction flow). |
| From | The code and number of the source document (e.g. if a Quotation is copied to a Sales Order, the From field shows the quotation code and number). |
| GM% | The gross margin percentage. |
| Group | Enter a group to sort the items. Groups are optional and entered per transaction (e.g. Labour, Materials). Groups can be used to select items that are copied to the next transaction. |
| ID | The system-generated number for the entry. |
| Inc | A checkbox. If checked, the entered prices are treated as VAT-inclusive. |
| In Stock | Read-only. The item’s current quantity in stock at the entry’s Location, or the total of all the item’s locations when the entry has no location. |
| Item | The sequential number allocated to the item on the transaction. |
| Item Type | The type of item, which can be:
If a transaction that uses estimating (e.g. Quotations) is copied to a transaction that does not use estimating (e.g. Customer Invoice), the item type is changed (e.g. the item type is EST on the quotation and CTM on the invoice). |
| Location | The location of the stock item.
|
| Markup | The amount of the MU% markup. |
| MU% | The markup percentage added to the cost price to calculate the price (see Fix). |
| Profit | The profit earned on the entry. |
| Qty | The item’s quantity, which defaults to one. On stock adjustments (Inventory > Enable Stock Adjustment), Qty is read-only: it is the Count Qty less the In Stock quantity, and can be negative. Zero quantities are allowed. |
| Qty (From) | The quantity on the source transaction that was copied to create the current transaction. |
| Qty (Var) | The quantity difference between the source (copy from) and target (copy to) transactions. |
| Resolve | The item’s resolve (e.g. Issue, Receive, Order). If only one resolve option is selected for the Transaction Type, that option is entered by default. Copy Rules may also change the resolve (e.g. if a sales order is copied to a work order, the resolve is set to Produce). |
| Serial No. | The entry’s serial numbers.
This field appears only if Inventory > Enable Tracking is set to Serial Numbers or Serial Number (Unchecked), on Transaction Types that enable Receive, On Order, Reserve or Issue (see Inventory Tracking). |
| Service No. | An abbreviation indicating the Service Type and the linked ticket number. |
| Status | The item’s status if item statuses are enabled. |
| Subtotal | The entry’s subtotal before the Adj% adjustment, in the local currency. |
| Supplier Reference | The reference entered for the supplier price on the item’s record. |
| Total (exc (cur)) | The VAT-exclusive total in the transaction currency. |
| Total (exc) | The VAT-exclusive total in the local currency. |
| Total (inc (cur)) | The VAT-inclusive total in the transaction currency. |
| Total (inc) | The VAT-inclusive total in the local currency. |
| Total Cost | The entry’s total cost in the local currency. |
| Type | An abbreviation that indicates the type of item that was added (e.g. ITM, EST). |
| Type ID | The system-generated number for the item type (e.g. 1 for ITM, 2 for EST). |
| Unit | The item’s unit name (e.g. ea, kg, hrs). Editable only for custom entries. To change the unit of an item from the item master, use Unit (Select). |
| Unit (Select) | Select another unit of the item from the dropdown list. The list shows the item’s prices of the same price type (supplier, cost, sell or Price List price) and currency as the transaction, with these columns:
When the unit changes:
Only for items from the item master (ITM); custom items keep the free-text Unit column. Editable only if your user access to the Transaction Type has Edit Prices set to Yes and the transaction is not read-only. |
| Unit Cost | The entry’s unit cost, which is multiplied by the quantity. |
| Unit Price | The entry’s unit price, which is multiplied by the quantity. |
| Updated | The date on which the entry was updated. |
| Updated By | The user who last updated the entry. |
| VAT | The VAT amount in the local currency. |
| VAT % | The percentage of VAT applied to the entry. |
| VAT (cur) | The VAT amount in the transaction currency. |
| VAT Category | The entry’s VAT category. |
| VAT Type | Select the entry’s VAT Type from the dropdown list. |
 | A submenu, also opened by right-clicking the entry. The options depend on the type of transaction and the type of entry:
|
Item Tracking
If Inventory > Enable Tracking is set to Batches or Serial Numbers for the Transaction Type, you record the batch number or serial numbers of each entry. See Inventory Tracking.
Footer Explained
| Field | Description |
|---|---|
| From | The transaction code and number that the current transaction was copied from. |
| Ticket No. | The linked service ticket number. |
| Updated | The date on which the transaction was last updated. |
| Name | The name of the user who last updated the transaction. |
| Deposit % | The percentage deposit that is payable (if applicable). |
| Deposit amount | The deposit amount that is payable. |
| Currency | The transaction’s currency. |
| Rate | The currency’s exchange rate. The rate is 1 if the transaction is in the local currency, and is then read-only. Changing the rate on a foreign currency transaction also updates the other rate (Local > Cur and Cur > Local) and recalculates the local totals of the items, also on Transaction Types without a customer or supplier. See How to Change the Exchange Rate on a Transaction. |
Examples
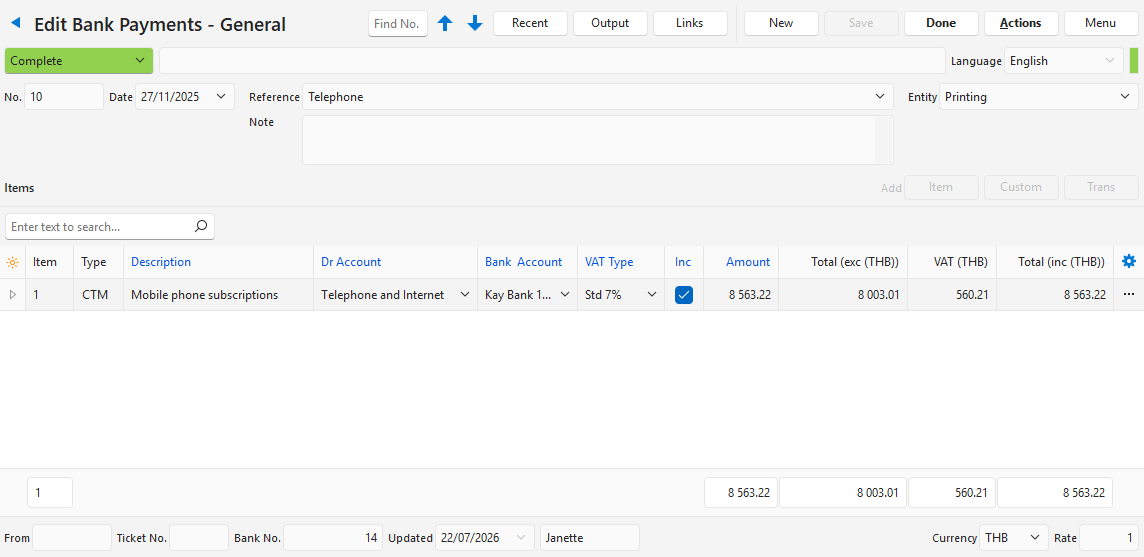
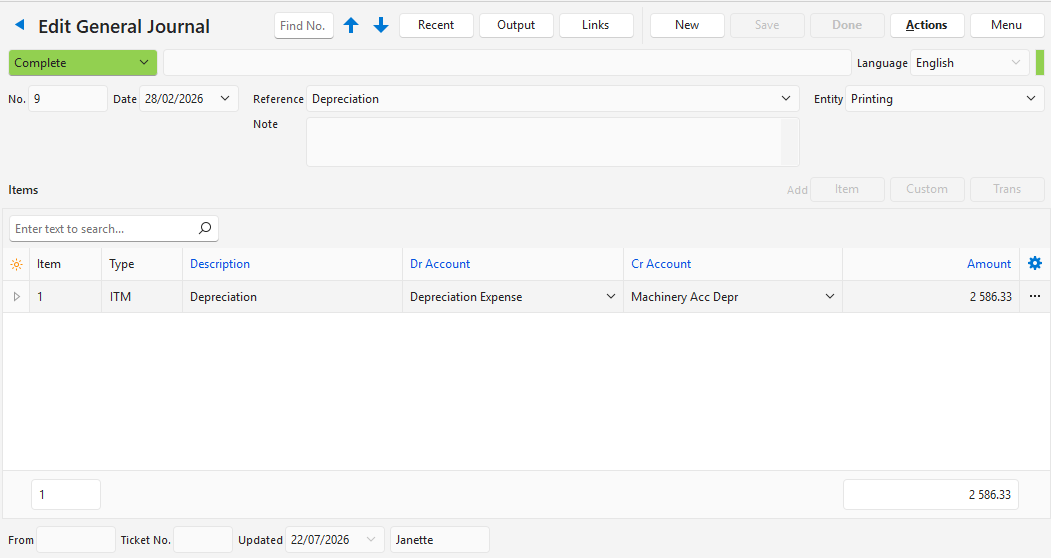
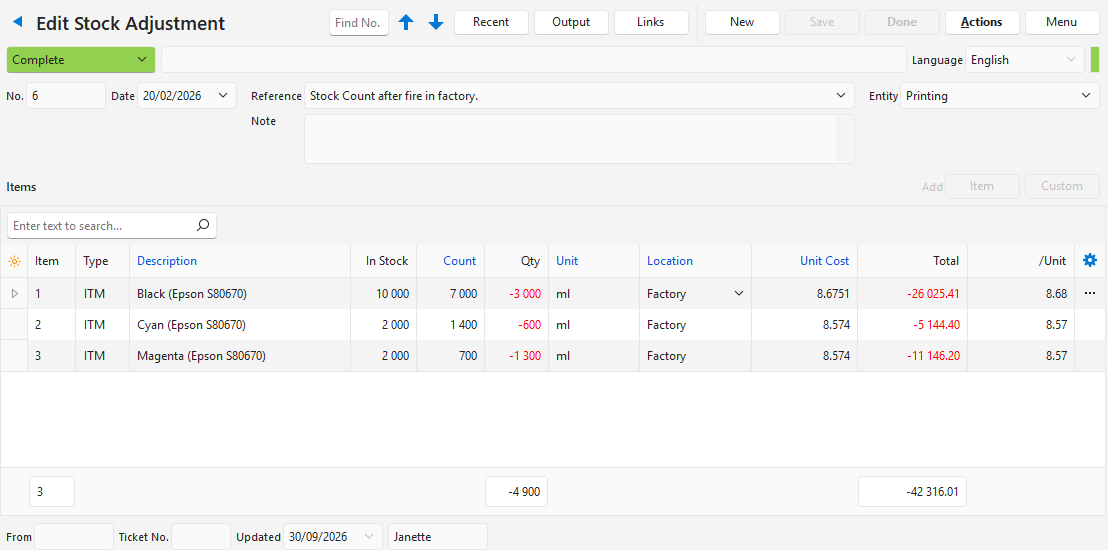
Transactions and Withholding Taxes
- Withholding taxes can be captured on an invoice. When a payment is allocated to that invoice, a transaction can be created to capture the withholding taxes. The setting must be applied to both the invoice and payment transactions.
- The WHT section is filled in automatically on payments if:
- Allocations are used.
- The payment is allocated to an invoice on which the WHT fields were captured.
- WHT is updated on the allocation interface: Actions (button) > Update Withholding Tax (WHT).
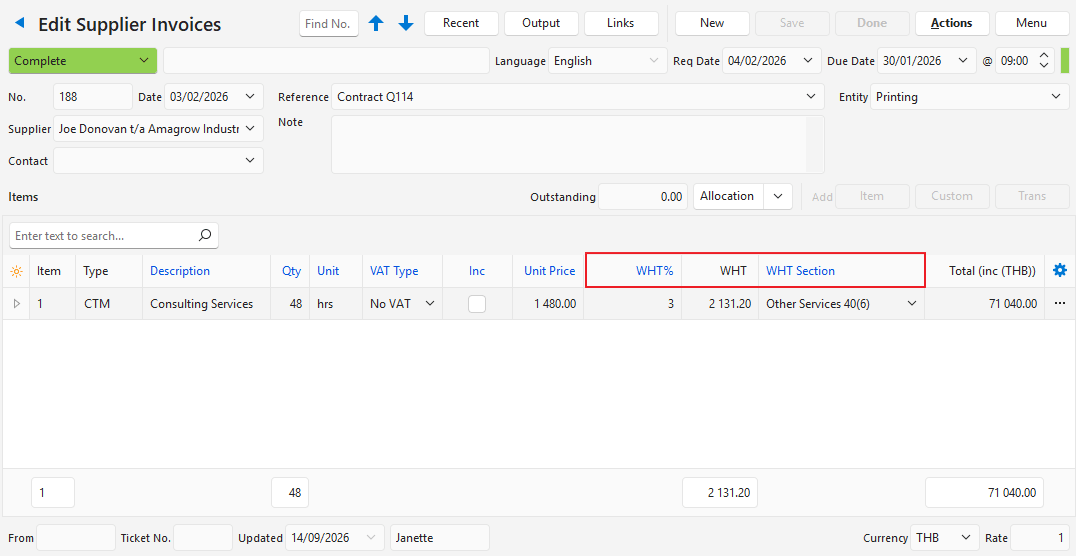
If withholding taxes are enabled, these fields are included on invoices:
| Field | Description |
|---|---|
| WHT% | Enter the withholding tax percentage that applies. |
| WHT | The withholding tax amount. |
| WHT Section | Select the applicable WHT section as used in Thailand from the dropdown list. The options are:
To clear the section, select the blank entry at the top of the list. On payments, the WHT section is read-only (see below). |