
Form Designer Interface
- QuickEasy BOS has a built-in form designer that lets you customise all your templates (e.g. statements, invoices, emails).
- You have access to the data tables and fields, and to editing tools that help you design forms.
- Forms can be designed from scratch or copied from an existing template and edited.
- There is also a form wizard that guides you through creating your own forms (accessed from File > New > Report Wizard).
- The explanations below describe the main functionality of the Form Designer. They do not describe every function in detail.
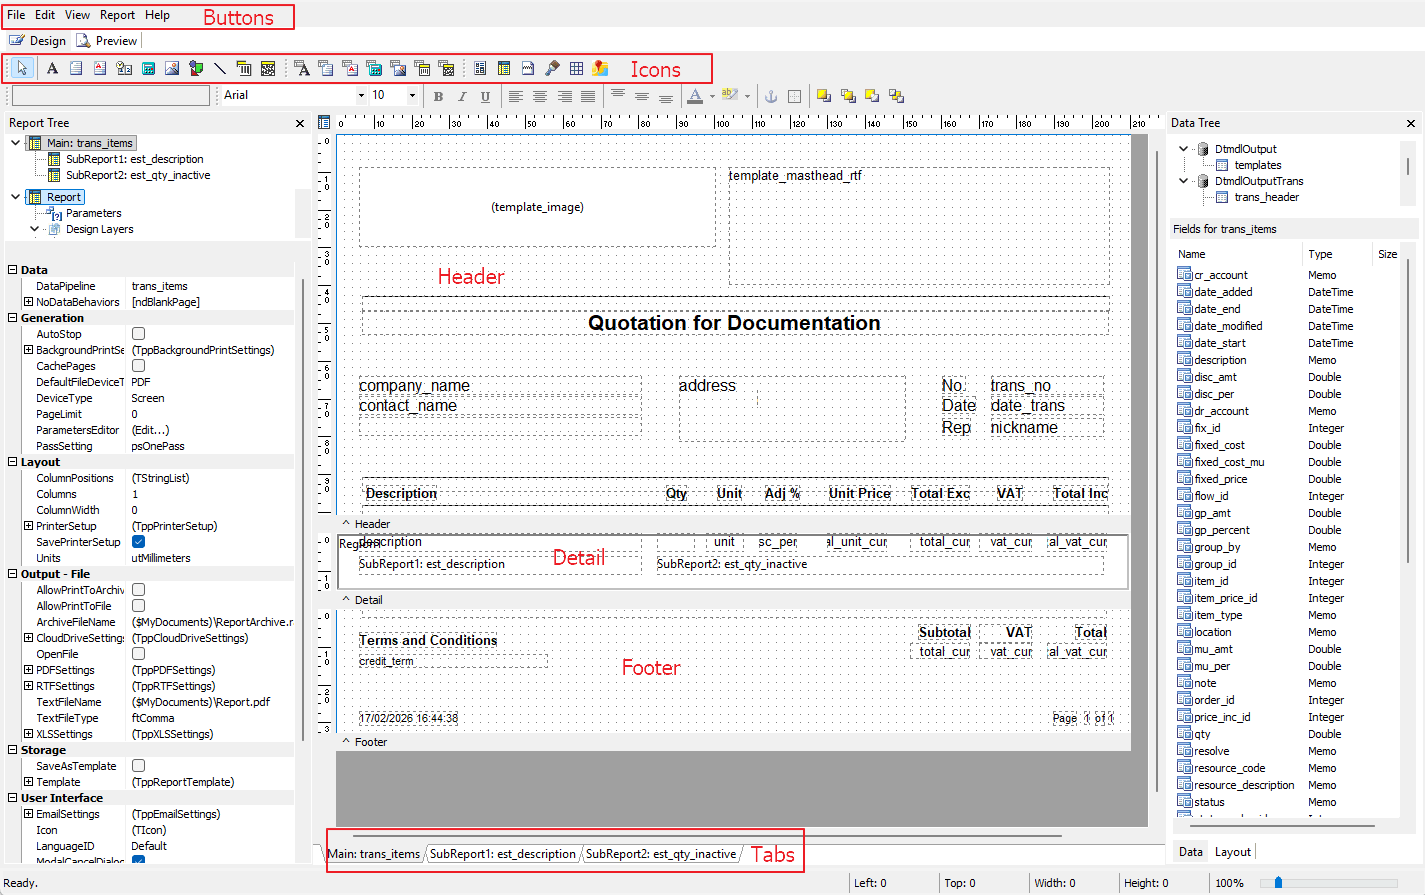
Buttons Explained
- Form Designer is a Report Builder created by Digital Metaphors Corporation.
- It is a plugin in QuickEasy BOS, so commands such as View and Edit work as they do in Windows, not as they do elsewhere in QuickEasy BOS.
- Most of the menu commands appear as icons around the workspace. They can also be accessed via context menus (right-click).
| Button | Description |
|---|---|
| File |
|
| Edit | The following standard Windows options:
Tools to reorder overlapping fields:
|
| View |
|
| Report |
|
| Help |
|
Tabs Explained
| Tab | Description |
|---|---|
| Design | The main interface to design a new template. |
| Preview | Shows what the report looks like. For the preview to be accurate, there must be data to preview (that is, transactions in BOS). |
Form Sections Explained
| Form Section | Description |
|---|---|
| Header | The header section typically contains the following fields:
|
| Detail | This section includes the item details (e.g. Description, Quantity, Unit Price, Total Price). |
| Footer | This section typically contains the following fields:
|
Icons Explained
The icons below are in order of appearance. The names (as used in this table) appear when you hover over the icons.
| Icon | Description |
|---|---|
| Select Object | Click objects to select them. |
| Label | Inserts a label:
|
| Memo | Inserts a memo field for several lines of text. |
| RichText | Inserts a rich-text field for you to enter information with different fonts and sizes. |
| SystemVariable | Inserts system variables such as date, time and page numbers. Click SystemVariable (icon). Click the form to place it where you clicked (click and drag to reposition it). The word Date appears below the icons (top right). Click the arrow next to it to select a different variable. Resize the field using the dots. |
| Variable | Inserts a variable. Used if you need to perform a calculation. |
| Image | Inserts an image. |
| Shape | Inserts a shape. |
| Line | Inserts a line. |
| Barcode | Inserts a barcode. |
| 2DBarcode | Inserts a 2D barcode. |
| DBText | Inserts a database text field. |
| DBMemo | Inserts a database memo field. |
| DBRichText | Inserts a database rich-text field. |
| DBCalc | Inserts a database calculation. |
| DBImage | Inserts a database image. |
| DBBarcode | Inserts a database barcode. |
| DB2DBarcode | Inserts a database 2D barcode. |
| Region | Inserts a region:
|
| Subreport | Inserts a subreport:
|
| PageBreak | Inserts a page break. |
| PaintBrush | Inserts a paintbox field. |
| TableGrid | Inserts a table in grid format. |
| GoogleMap | Inserts a Google Map. |